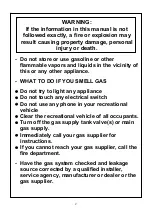
Thetford Spinflo 160 Series User And Installation Instructions Manual Download Page 12

 
OPERATION  


WARNING 


The appliance is NOT intended for use by young children or 
infirm persons, without supervision 


Glass lids may shatter when heated. Turn off all burners 
before shutting the lid 


Spillage on the lid surface should be removed before opening. 

 
Burner operation


The burners on this appliance have fixed aeration and no adjustment is required.  The burners 
should flame as follows:- 
 
Propane -  

The flames should burn quietly with a blue/green colour with  
no sign of yellow tips. 

IMPORTANT 


Care should be taken not to overload the appliance as reduced 
performance may result.  The burners can support pans up to   
            Small burner: 8

½

  in Ø; Large burner: 11 in Ø.   


For safe operation burner flames should be adjusted so they do NOT 
extend beyond the edge of the pan as this will reduce the efficiency 
of the burner. 


Avoid old or misshapen pans as these may cause instability. 


The lid must be opened fully when using the hotplate burners. 


Using the Hob Burners 
  

1.  Ensure gas cylinder/supply is connected and turned on. In the event of a gas smell turn off at 

gas cylinder/mains and contact supplier. 

2.  Flame supervision: Each burner is controlled individually and is monitored by a 

thermocouple probe. In the event of the burner flames being accidentally extinguished, turn 
off the burner control and do not attempt to re-ignite the burner for at least one minute.  

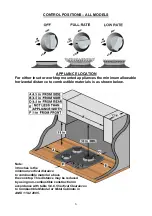
3.  To light:  Push in the control knob and turn to ‘LITE’ position – see Control Positions, page 6. 

Hold a lighted match or taper to the burner and push the control knob in and hold.  It is 
necessary to hold the knob depressed after the burner has ignited for approximately 10 - 15 
seconds, to allow the thermocouple probe to reach temperature, before releasing the knob. 
Should the flame go out when the knob is released, the procedure should be repeated 
holding the knob depressed for slightly longer. 

4.  For models fitted with Spark Ignition the procedure is identical to operation (3) except that 

ignition is performed automatically – ie the electronic spark ignition operates automatically 
when the control knob is pushed in. If the burner has not lit within 15 seconds the control 
knob should be released and the burner left for at least 1 minute before a further attempt to 
ignite the burner. 

5.  For simmering, turn the knob further anti-clockwise to the low rate position.  
6.  To turn off: Turn the control knob until the line on the control knob is aligned with ‘OFF’  on 

the control panel. Always make sure the control knob is in the ‘OFF’ position when you have 
finished using the hotplate burners – see Control Positions, page 6. 


Summary of Contents for Spinflo 160 Series

Page 1: ...RIES 921 SERIES 910 PCC 1272Y Issue 8 SPINFLO LIMITED 19 Oakham Drive Parkwood Industrial Estate Rutland Road Sheffield S3 9QY ENGLAND TEL 44 0 114 273 8157 FAX 44 0 114 275 3094 USER AND INSTALLATION...

Page 2: ...vehicle of all occupants Turn off the gas supply tank valve s or main gas supply Immediately call your gas supplier for instructions If you cannot reach your gas supplier call the fire department Hav...

Page 3: ...3...

Page 4: ...4...

Page 5: ...5...

Page 6: ...tal distance to combustible materials is as shown below Note 30 inches is the minimum vertical distance to combustible material above the cooktop This distance may be reduced by using non combustible...

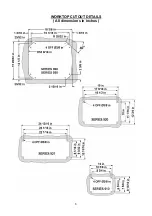
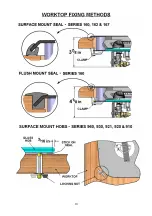
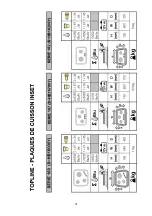
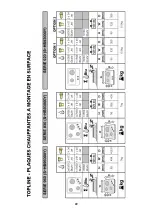
Page 7: ...WORKTOP CUTOUT DETAILS All dimensions in inches 7...

Page 8: ...WORKTOP CUTOUT DETAILS All dimensions in inches 8...

Page 9: ...WORKTOP CUTOUT DETAILS All dimensions in inches SERIES 162 167 WORKTOP CUTOUT FOR SURFACE MOUNT SEAL 9...

Page 10: ...10...

Page 11: ...general the appliance should have adequate ventilation for complete combustion of gas proper flueing and to maintain temperature of immediate surroundings within safe limits Location This appliance m...

Page 12: ...probe In the event of the burner flames being accidentally extinguished turn off the burner control and do not attempt to re ignite the burner for at least one minute 3 To light Push in the control kn...

Page 13: ...ontrols are in the OFF position when finished DO turn pan handles away from the front to avoid accidents DO NOT allow children near the appliance when in use DO NOT allow fats or oils to build up on t...

Page 14: ...Never check for leaks with a naked flame Abnormal Operation Any of the following are considered to be abnormal operation and may require servicing Yellow tipping of burner flame Sooting of cooking ute...

Page 15: ...f 41 2 in must exist between the edge of appliance and combustible material unless protected by a layer of non combustible material see Appliance Location page 6 For models with a glass lid the distan...

Page 16: ...ssure has been checked The burners on this appliance have fixed aeration and no adjustment is necessary Models with 12Volt Spark Ignition Connection to the 12volt electrical supply of the recreational...

Page 17: ...procedures should only be carried out by an approved competent person Before commencing any leak testing Isolate the appliance from the gas supply For each test the system should be pressurized via t...

Page 18: ...ce from housing 2 12v Spark Generator replacement Located on the underside of appliance Remove all electrode wires Unscrew and or unclip the spark generator and lift off the unit Spark Ignition Wires...

Page 19: ...ENCASTREE DE CUISINE S UTILISE AVEC LE GAZ DE PROPANE SERIE 160 SERIES 162 SERIE 167 SERIE 960 SERIE 920 SERIE 930 SERIE 921 SERIE 910 PCC 1272Y Issue 8 MODE D EMPLOI ET D INSTALLATION A LIRE ET A CON...

Page 20: ...voir d alimentation en gaz ou l alimentation principale en gaz Appelez imm diatement la soci t qui vous fournit le gaz pour lui demander ce qu il faut faire Si vous n arrivez pas contacter la soci t q...

Page 21: ...21...

Page 22: ...22 22...

Page 23: ...23...

Page 24: ...LES MODELES EMPLACEMENT DE CET APPAREIL Qu il s agisse d un appareil encastr ou qui vient se fixer sur un plan de travail la distance horizontale minimale entre cet ensemble et tout mat riau combustib...

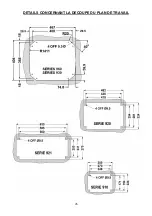
Page 25: ...DETAILS CONCERNANT LA DECOUPE DU PLAN DE TRAVAIL 25...

Page 26: ...DETAILS CONCERNANT LA DECOUPE DU PLAN DE TRAVAIL 26...

Page 27: ...SERIE 162 167 DETAILS CONCERNANT LA DECOUPE DU PLAN DE TRAVAIL 27...

Page 28: ...28...

Page 29: ...e vacuation et afin de maintenir la temp rature des zones proches dans des limites ne pr sentant aucun danger Emplacement Cet appareil peut tre install dans une cuisine ou un coin cuisine mais IL NE F...

Page 30: ...s car elles peuvent s av rer instables Lors de l utilisation des feux de la plaque chauffante le couvercle doit rester ouvert au maximum Utilisation des feux de la plaque chauffante 1 V rifiez que la...

Page 31: ...s ce qu il faut faire et ce qu il ne faut pas faire VOUS DEVEZ lire soigneusement ces consignes avant de vous servir de cet appareil pour la premi re fois VOUS DEVEZ nettoyer r guli rement cet apparei...

Page 32: ...lamme nue Fonctionnement anormal L un ou l autre des l ments num r s ci dessous est consid r comme tant un fonctionnement anormal et peut n cessiter l organisation d un entretien Flamme de feu pointes...

Page 33: ...dans une pi ce qui contient une baignoire ou une douche Il ne faut pas disposer des appareils fonctionnant au GL au dessous du niveau du sol comme par exemple dans un sous sol Une distance directe de...

Page 34: ...une a ration fixe et aucun ajustement ne s av re n cessaire Mod les quip s d un allumage de 12 V par tincelle Le raccordement la tension d alimentation de 12 V du v hicule s effectue par le biais des...

Page 35: ...et agr e Avant tout essai d tanch it il convient de couper l alimentation en gaz de l appareil Lors de chaque test il faut pressuriser le circuit en faisant appel au point d essai sous pression qui s...

Page 36: ...e d tincelles D poser de son logement cet appareil 2 Remplacement de la g n ratrice d tincelles de 12 V Elle se trouve sous l appareil Retirez tous les fils d lectrodes D vissez et ou desserrez la g n...

Reviews: