background image

Installations instructions

The toilet can only be mounted against a vertical rear 
wall.
  1. Remove the toilet from the box.
  2. Remove the plastic bag containing the loose parts. 

The instructions for use and the spout cap are also 
in this bag.

  3. First read the instructions for use to familiarise 

yourself with the names of the various parts.

  4. Pull the yellow clip upwards and remove the holding 

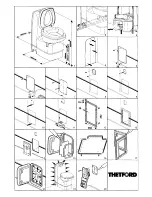
tank. (See drawing 3)

  5. Remove the shower tray, if applicable, or adjust this 

tray in such a way that the C-200 CW can be fitted 
in.

  6. Put the toilet in the right place and lift the seat to 

check the vertical clearance. Draw the toilet’s 
outline on the rear wall with a pencil. If there is any 
floor covering, bear in mind that this will be pressed 
down when someone sits on the toilet. (Tip: Sit on 
the toilet when you draw the outline.) Remove the 
toilet.

  7. Place template number 1 over the outline of the 

toilet.

  8. Drill four holes with a diameter of 3 mm in the 

caravan wall from the inside. The locations are 
shown by the template. (See drawing 4) Remove 
the template. (Template for the large door.)

  9. Fasten template number 2 to the outside of the 

caravan with 2 screws in the pre-drilled holes. 
Template 2 is used to check the 20 mm distance 
(from the trim rear wall caravan/wheel housing to 
the opening). (See drawing 5 + 6)

10. Replace template 2 with template 3 and outline 

template 3 using a marker to indicate the cuttingline.
(See drawing 7)

11. Fasten template number 6 to the outside of the 

caravan using 2 screws in the pre-drilled holes. 
Template 6 is used to check the space for the small 
door. (See drawing 8)

12. Replace template 6 with template 5 and outline 

template 5 with a marker to indicate the cutting line.
(See drawing 9)

13. Remove templates 3 and 5 and stick protective tape 

on the inside and outside of the cutting lines.

14. Drill a hole with a diameter of 8 mm on the inside of 

both cutting lines (at the bottom) to admit the saw.
(See drawing 10)

15. Make the cut-outs using a electric saw. Make sure 

that the cut is dead straight. (See drawing 11)

16. Check that both door frames fit in the openings.
17. Make the wooden frame wich will be placed round 

the large doorway to strengthen the wall and secure 
the door. (See drawing 12) The frame is glued in for 
additional strength. (See drawing 13)

18. Now cut the sawn-out panel from the caravan wall 

to fit the door frame using template 4A or 4B,  
depending on whether the door is right-hand or left-
hand hung. Make sure that the decorative stripes on 
the panel are in line with those on the caravan. (See 
drawing 14)

19. Fill the groove of the door outer with sealant. (15).

Then position the panel in the door outer. Fix the 
clips to the door inner, make sure that the two clips 
with the arrow are mounted on this location (See 
drawing no.16), and then push the door inner into 
the door outer. Fill in the groove of the frame to be 
placed in the opening (=3) with sealant (See drawing 
17) place the complete door against the outside wall 
of the caravan and fasten the door with 9 sheet-  
metal srews (4.2 x 12.5 mm.)

20. Push the toilet into the correct position and screw 

the toilet on to the floor with 4 crews (4.5 x 55).

21. Install the adapted or new shower tray.
22. Install the toilet.
23. Seal the space between the door and the toilet from 

the outside. Also seal the gaps between the toilet 
and the side walls, between the toilet and rear  
wall and between the toilet and the shower tray (or 
floor). (See drawing 18 + 19)

24. Before you place the small door use sealant 

between the door and caravan wall, use screws  
(4 x 35 mm) to place the door. (See drawing 20)

Summary of Contents for C-200 CW D3

Page 1: ...C 200 CW D3 w w w thetford eu GB INSTALLATION INSTRUCTIONS F INSTRUCTIONS POUR L INSTALLATION S INSTALLATIONSANVISNINGAR D EINBAU ANLEITUNG NL INBOUW INSTRUCTIES I INSTRUSIONI PER L INSTALLAZIONE ...

Page 2: ......

Page 3: ...wheel housing the distance between the housing trim and the hole to be made must be at least 20 mm If the toilet is at the back of the caravan the distance between the hole to be made and the caravan s rear wall must also be 20 mm See drawing 5 6 3 The toilet must be mounted against a vertical rear wall The rear wall must be at least 728 mm high 4 The wall thickness of the caravan or camper must b...

Page 4: ... the cutting line See drawing 9 13 Remove templates 3 and 5 and stick protective tape on the inside and outside of the cutting lines 14 Drill a hole with a diameter of 8 mm on the inside of both cutting lines at the bottom to admit the saw See drawing 10 15 Make the cut outs using a electric saw Make sure that the cut is dead straight See drawing 11 16 Check that both door frames fit in the openin...

Page 5: ...t die Toilette sich hinten im Wohnwagen so ist der Abstand zwischen der einzuschneidenden Öffnung und der Rückwand des Wohnwagens ebenfalls 20 mm Abb 5 6 3 Es muß eine senkrechte Rückwand an der die Toilette montiert werden kann vorhanden sein Die minimale Höhe der Rückwand muß 728 mm sein 4 Die Wanddicke des Wohnwagens oder Campers soll zwischen 24 und 46 mm liegen Wenn die Wand stärke mehr als 4...

Page 6: ...e mit einem Zeichenstift die Umrißlinie von Schablone 5 Abb 9 13 Entfernen Sie Schablone Nr 3 und 5 und kleben Sie Schutzfolie an beide Seiten de Linien 14 Bohren Sie ein Loch mit einem Durchmesser von 8 mm an der Innenseite der beiden Umrißlinien unten dies dient zum Ansetzen der Säge Abb 10 15 Machen Sie die Ausschnitte mit einer elektrischen Säge sägen Sie genau senkrecht Abb 11 16 Kontrolliere...

Page 7: ...se trouve à l arrière de la caravane la distance entre l orifice à percer et la cloison arrière de la caravane sera également de 20 mm voir fig 5 et 6 3 La présence d une cloison arrière verticale est impérative pour le montage de la toilette Sa hauteur minimale doit être au minimum de 728 mm 4 L epaisseur de la cloison de votre vehicule doit être idéalement comprise entre 24 et 46 mm Si l épaisse...

Page 8: ...nlevez les gabarits no 3 et 5 Apposez une bande adhésive de protection de part et d autre des lignes de découpe pour protéger la cloison 14 Percez un trou de 8 mm de diamètre à l intérieur des deux lignes de découpe en dessous afin de vous permettre d insérer la scie voir fig 10 15 Découpez à la scie électrique Effectuez une bonne découpe verticale voir fig 11 16 Vérifiez la bonne adaptation de ch...

Page 9: ...van de wielkast en het te maken gat Bevindt het toilet zich achter in het voertuig dan is de minimaal benodigde afstand tussen het te maken gat in de zijwand en de achterwand van het voertuig eveneens 20 mm zie tek 5 6 3 Er moet een verticale achterwand aanwezig zijn waartegen het toilet gemonteerd kan worden De minimale benodigde hoogte van de achterwand is 728 mm 4 Om het C 200 CW Cassette toile...

Page 10: ...lijn deze met een stift om zo de snijlijn aan te geven zie tek 9 13 Verwijder sjabloon nr 3 en nr 5 en plak beschermingstape aan de binnen en buitenkant van de snijlijnen om krassen door de decoupeerzaag te voorkomen 14 Boor een gat 8 mm diameter aan de binnenkant van beide snijlijnen onderaan om de zaag in te stellen zie tek 10 15 Maak de uitsneden met een decoupeerzaag Zorg ervoor dat het uitzag...

Page 11: ...ritning 2 2 Om toaletten är nära hjulhuset måste avståndet mellan hjulhuset och det hål som skall göras vara minst 20 mm Om toaletten finns baktill i husvagnen måste även avståndet det hål som skall göras och husvagnens bakvägg vara 20 mm se ritningarna 5 och 6 3 Toaletten måste monteras mot en vertikal yttervägg Den måste vara minst 728 mm hög 4 Husvagns eller husbilsväggens tjocklek måste vara m...

Page 12: ...märkpenna för att ange skärlinjen se ritning 9 13 Ta bort mall nr 3 och nr 5 och fäst maskeringstejp på inner och yttersidan av skärlinjerna 14 Borra ett hål på 8 mm diameter på insidan av skärlinjen undertill så att man kan sticka in sågen se ritning 10 15 Gör urtaget med en elektrisk såg Se till att sågningen blir alideles rak se ritning 11 16 Kontrollera att båda dörramarna passar in i öppninga...

Page 13: ...praticare deve essere almeno di 20 mm Se la toilette si trova nella parte posteriore del caravan la distanza tra il foro da praticare e la parete posteriore del caravan deve ugualmente essere di 20 mm vedi diagramma n 5 e 6 3 Installare la toilette solo contro una parete posteriore perfettamente verticale L altezza minima della parete posteriore deve essere di 728 mm 4 Le pareti del caravan o del ...

Page 14: ...le sagoma n 3 e n 5 e applicare del nastro adesivo di protezione all interno e all esterno delle linee di taglio 14 Praticare un foro del diametro di 8 mm all interno delle linee di taglio in fondo per potervi inserire la lama della sega vedi diagramma n 10 15 Eseguire le aperture utilizzando una sega elettrica Assicurarsi che il taglio sia perfettamente diritto vedi diagramma n 11 16 Controllare ...

Page 15: ...S A R L Bâtiment Le Californie 11 Rue Rosa Luxembourg BP 40204 Eragny sur Oise 95614 Cergy PONTOISE Cedex France T 33 0 1 30375823 F 33 0 1 30379767 E infof thetford eu Thetford BV Repres Office Scandinavia Hönekullavägen 13 43544 Mölnlycke Sverige T 46 0 31 3363580 F 46 0 31 448570 E infos thetford eu Thetford Italy c o Tecma s r l Via Flaminia Loc Castel delle Formiche 05030 Otricoli TR Italia T...

Reviews: