background image


Device overview 

BA_TT5-L_GB_V(0).DOCX


page 10 


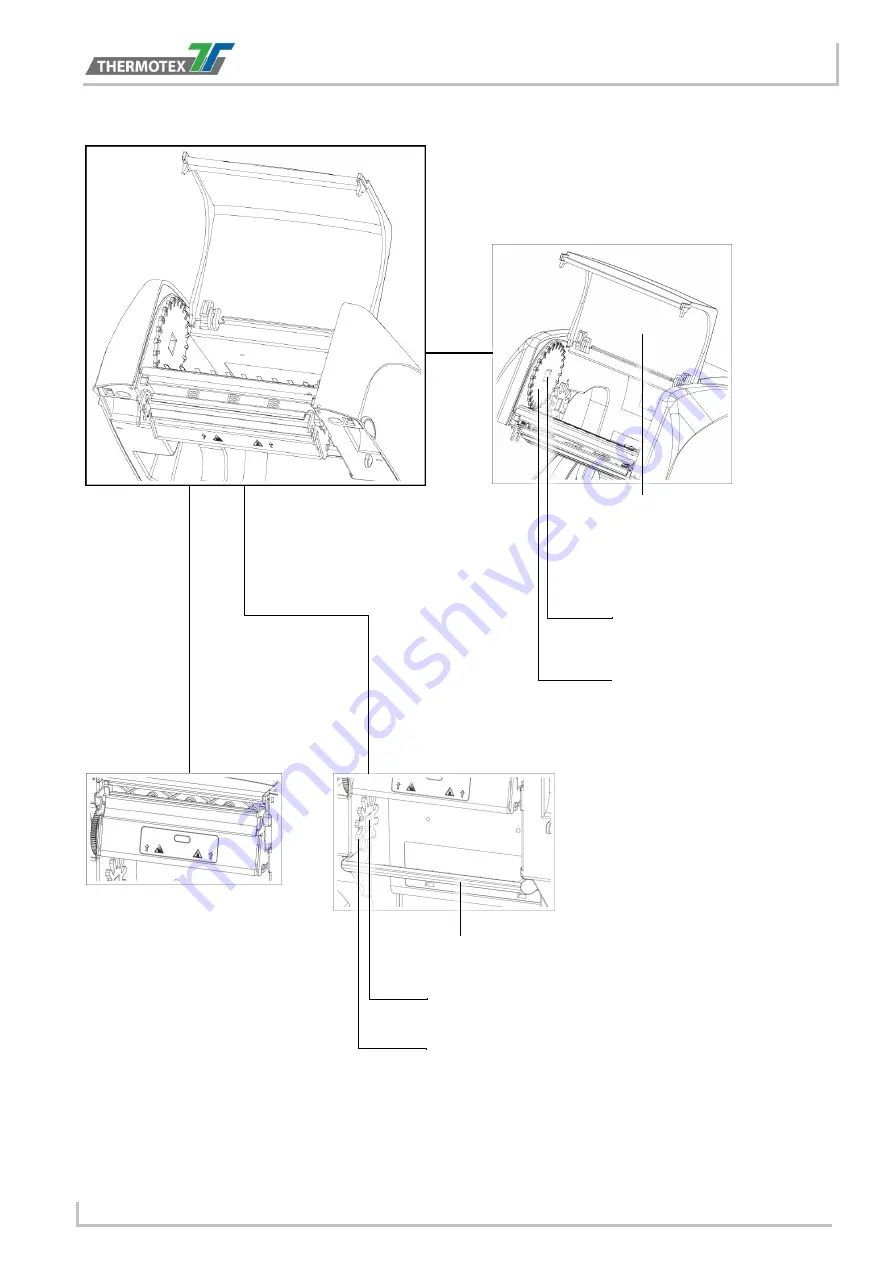
4.5  The Printing Mechanism 


RIBBON REW IND MECHANISM


COVER 
The cover for Ribbon rewind 
mechanism 

NOTCH OF RIBBON  
REW IND W HEEL


RIBBON REWIND WHEEL


PAPER PRESS BAR


NOTCH OF RIBBON SUPPLY W HEEL


RIBBON SUPPLY W HEEL


RIBBON 
SUPPLY 
MECHANISM 

PRINT HEAD 

Summary of Contents for TT5-L

Page 1: ...Nagel GmbH Schutterstr 14 77746 Schutterwald GERMANY Phone 49 781 9616 0 fax 49 781 9616 50 info thermo tex de www thermo tex de Operating manual for TT5 L Translated version of the original operatin...

Page 2: ...inting Mechanism 10 5 Printer Setup 11 5 1 Open the Printer 11 5 2 Loading the Ribbon 12 5 3 Loading the Label Roll Module 17 5 4 Connecting the Printer to the Host Computer 19 5 5 Printer Driver inst...

Page 3: ...ing the Print Head 41 8 2 Troubleshooting 42 8 3 Communication port specifications 43 9 Bluetooth Setting 44 9 1 Steps for setting Bluetooth keyboard 44 9 2 Steps for setting Bluetooth connection on t...

Page 4: ...40 C Storage Temperature 4 F to 140 F 20 C to 60 C Humidity Operation 25 85 non condensing Storage 10 90 non condensing 1 2 Conformity EN 55032 2012 AC 2013 Class A EN 61000 3 2 2014 EN 61000 3 3 2013...

Page 5: ...DOCX page 5 1 4 Content Please check that all of the following items are included with your printer TT5 L Barcode Printer Ribbon Hubs Set of 2 Ribbon Module Empty Ribbon Core Quick Guide AC Adapter Po...

Page 6: ...the equipment to avoid electrical shock 2 2 Basic safety measures for maintenance and servicing For safety and warranty reasons ONLY qualified service personnel should open the equipment Do not repai...

Page 7: ...r View PRINTER COVER POWER BUTTON FEED BUTTON TOUCH PANEL FRONT COVER COVER RELEASE CATCHES Pull catches for opening the printer cover FAN FOLD LABEL INSERT Feed slot for outside continuous labels PAR...

Page 8: ...Device overview BA_TT5 L_GB_V 0 DOCX page 8 4 3 Bottom View COVER OF THE MODULE CONNECTION JACKS...

Page 9: ...nter LABEL SUPPLY MODULE LABEL GUIDE PLATE LABEL SUPPLY HUB LABEL GUIDE RELEASE CATCH Release catch for opening the label supply hub RELEASE CATCH Release catch for closing the printer cover LABEL SEN...

Page 10: ...4 5 The Printing Mechanism RIBBON REWIND MECHANISM COVER The cover for Ribbon rewind mechanism NOTCH OF RIBBON REWIND WHEEL RIBBON REWIND WHEEL PAPER PRESS BAR NOTCH OF RIBBON SUPPLY WHEEL RIBBON SUP...

Page 11: ...nter on a flat surface Open the printer cover by pulling the cover release catches on both sides of the printer and lift the printer cover COVER RELEASE CATCHES Pull the catches for opening the printe...

Page 12: ...strip at the end of the ribbon 2 Insert the ribbon hub into empty ribbon core and new ribbon Wind the ribbon around the empty ribbon core for 2 to 3 circles 3 A ribbon module is assembled as below A N...

Page 13: ...module into the printing mechanism Please the left hand side of ribbon hub first Make sure the holder of ribbon hub is inserted into the notch Then place the right hand side of ribbon hub RIBBON SUPPL...

Page 14: ...release catch forward to unlock it The ribbon supply module loading is completed Load the Ribbon on the Printer for Ribbon Rewind Module RELEASE CATCH Release catch for closing the printer cover COVER...

Page 15: ...m 7 Place the ribbon rewind module into the ribbon rewind mechanism Please the left hand side of ribbon hub first Make sure the holder of ribbon hub is inserted into the notch Then place the right han...

Page 16: ...urn the ribbon rewind wheel to tighten the ribbon until it has no wrinkles 9 Close the cover of ribbon rewind mechanism The ribbon loading is completed once the ribbon supply module and ribbon rewind...

Page 17: ...bel supply hubs Make sure the label stock is aligned to both hubs Adjust the label guide plates to fix the label width Remember to push the release catch when moving the label guide plates LABEL STOCK...

Page 18: ...prevent the label swaying 3 Unlock the release catch to close the printer cover 4 Press the FEED key and make sure the label is fed smoothly The label loading is completed now NOTE Please keep the rac...

Page 19: ...omputer 1 Please make sure that the printer is switched off 2 Connect the power cord to the AC adapter Connect the jack of the power adapter to the printer and connect the plug of the power adapter to...

Page 20: ...mputer BA_TT5 L_GB_V 0 DOCX page 20 3 Connect the USB serial cable to the printer and host computer 4 Press the power button The Touch Panel LCD will light up USB CABLE PLUG PLUG USB PORT PC SOCKET TT...

Page 21: ...r installation 1 From the Driver CD launch the Application 2 Select I accept the terms in the license agreement and click Next then click Finish to next step 3 The Driver Wizard will guide you through...

Page 22: ...connection search models such as the right diagram printer device Specify your printer model and click Next 5 Enter the printer name you can use default then click Next to display as right diagram Cli...

Page 23: ...t stop at the correct position you need to run the auto detection function for your media please see Section 3 4 Label Calibration and Self Test PAUSE PRINTING_FEED Button Pressing the FEED button dur...

Page 24: ...ound the main screen and other screen for setting Tap the screen with your finger when you want to select on screen items such as settings icons On the Ready Page three functions mode for setting You...

Page 25: ...t Backfeed Serial Part Setting LAN Setting LCD Setting Clock Setting WiFi Setting and Bluetooth Setting Self Diagnose functions for printer ex Calibration Self Test page and Clear Memory Recall Label...

Page 26: ...ng Mode Direct Thermal Thermal Transfer Tear off Position 0 40 Top of Form OFF FULL Door Open Only Back Up Only LCD Language English Deutsch Francais Espanol Italiano T rkce P Code Page 850 852 437 86...

Page 27: ...ask 255 255 255 0 Gateway 192 168 0 254 Port N 9100 LCD Setting Password OFF ON Correction Clock Setting Year Month Day Hour Minute Visible OFF ON Printer Control Test Configuration Directory TPH Test...

Page 28: ...to entering to the dialog for Keyboard Mode operation Recall Label From the Ready page tap to Main page From the Main page tap Recall Label to Recall Label page From the Recall Label Page the touch p...

Page 29: ...unctioning normally Here is how you run the label size calibration and self test 1 Check that the label stock is loaded correctly 2 Turn off the printer and pressing the FEED button 3 Turn the printer...

Page 30: ...hange using gap label to continuous or black mark labels Press Calibration button for 1 2 seconds it will make an auto sensing to calibrate the label s parameters NOTE Press Calibration button is equi...

Page 31: ...ee an error message on LCD screen and hear some beep signals Please refer to below table for the error alerts 6 9 Operation Panel Status Type Beeps Description Solution Door Open Only 2 x4 beeps The p...

Page 32: ...etect the paper run the auto detection function again Paper is finished Replace the label roll Printer feed problem Possible reasons the printer medium has become trapped around the rubber roll the se...

Page 33: ...ware into USB memory stick Connecting an USB keyboard to printer for Keyboard Mode mode operation Plug in an USB scanner to operate the printer in Keyboard Mode Usage of Extended Memory 6 10 1 USB mem...

Page 34: ...oard Mode operation Note The USB Host port on printer does not support USB HUB function The USB Memory Stick supports with FAT32 Disk Format and up to 32GB only The certified venders are Transcend Apa...

Page 35: ...rn off the printer Remember to switch off the printer before installing any module And also remove the power supply 2 Open the printer cover and the printing mechanism Open the printer cover by pullin...

Page 36: ...ps on both sides of the platen to release and pull upward the platen 5 Ribbon loading Please see the Section 5 2 for further information about Loading the Ribbon 6 Label loading Please see the Section...

Page 37: ...r Installing the Cutter 7 2 1 1 Pass the connection cable through the slot of the printer NOTE Remember to switch off the printer before installing the cutter Do not use to cut adhesive labels Glue re...

Page 38: ...ew and then tighten the screws Screw holes on the front side of the bottom barcode Printer 3 Place the platen back to the printer and lock the clips 4 Close the printer cover and printing mechanism Th...

Page 39: ...nection jacks NOTE The printer must be switched off or the motherboard may be destroyed There are 5 jacks the lower jack for the label dispenser the upper jack for the cutter And additionally Real Tim...

Page 40: ...labels through the guides and the cutter 2 Close the top cover and printing mechanism To finish press the FEED button to set the label position NOTE We advise against using inside wound label stock La...

Page 41: ...er or labels ensures a good print quality and a longer lifespan of the print head Cleaning Steps 1 Switch off the printer 2 Open the printer cover 3 Remove the ribbon 4 To remove any label residue or...

Page 42: ...or the image is blurred Check the thermal print head for dust or other dirt Use the internal T command to check whether the thermal print head will carry out a complete print job Check the quality of...

Page 43: ...232 Housing 9 pin to 9 pin Pin NO 1 2 3 4 5 6 7 8 9 Type 5V max 500mA TXD RXD N C GND RTS CTS RTS N C DB9 Plug RXD TXD DTR GND DSR RTS CTS RI DB9 Socket Default Settings Baud rate 9600 no parity 8 dat...

Page 44: ...30 31 32 33 34 35 36 GND GND GND GND GND GND GND GND GND GND GND 5V NOTE Serial port total output cannot exceed the maximum current of 500mA 9 Bluetooth Setting 9 1 Steps for setting Bluetooth keyboar...

Page 45: ...means the keyboard enters pairing mode Step 6 Steady light for 5 seconds indicates successful pairing If light blinks slowly repeat previous step 9 2 Steps for setting Bluetooth connection on the LCD...

Page 46: ...between the printer and the Bluetooth keyboard and then the LCD panel will display Please enter PIN Code Enter the PIN Code into the printer via the Bluettoth keyboard Note The PIN Code does not need...

Page 47: ...PIN Code Code of printers and Bluetooth Note To be allowed to change this setting please select Clear Bind in order to disconnect the paired device Clear Bind It deletes connections of Bluetooth devi...

Reviews: