background image

16

• Grill2Go Express

Use and Care

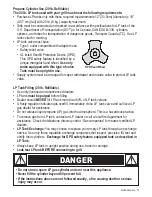
Propane Cylinder Use (1 lb. Disposable)


Use only cylinder marked “Propane Fuel”.
Size should be 4” diameter, 8” height, or 3” diameter, 10” height.
Save cylinder cap and reinstall when not in use.
Cylinder supply system must be arranged for vapor withdrawal. Gas cylinder must be upright
in use.

WARNING

Use only 1 lb. propane bottles as specified above. Use of other gas bottles could
cause gas leak or fire.

Leak Testing (1 lb. Disposable)

Do not use household cleaning agents.

1.

control knob

2.

connection

(A)

• During leak test, keep grill away from open flames or sparks and do not smoke. Grill must be

leak tested outdoors in a well ventilated area.
Leak test must be repeated each time gas cylinder is replaced or after storage.

Materials needed include clean paint brush and 50/50 soap and water solution. Use mild soap
and water.

Damage to components can result.

Be sure

on regulator is in "OFF" position.

Brush soapy solution onto

between gas cylinder and regulator at

.

s

IMPORTANT!

A

s

If growing bubbles appear, there is a leak. Retighten connection

and repeat steps 1 and 2

If you cannot stop a leak, remove gas cylinder from regulator and
check for damaged threads, dirt and debris on regulator and gas
cylinder. Also check to see if anything is obstructing flow of gas at
regulator and gas cylinder openings. Remove any obstruction that
may be found and repeat leak test.

Order new parts by

giving the serial, model number and name of items needed to the
Grill Service Center at 1-800-435-5194 U.S. or 1-800-387-6057 CAN.

If threads are damaged on

either regulator or gas cylinder, replace.

Summary of Contents for EXPRESS 465630503

Page 1: ... which could cause property damage personal injury or death Grill2Go Express E 36 6047 050 208 04 30 03 Read and follow all safety statements assembly instructions and use and care directions before attempting to assemble and cook Installer assembler Leave these instructions with consumer Consumer Keep this manual for future reference Model Number 465630503 Owner s Manual Assembly Operation Use an...

Page 2: ...inues immediately call your gas supplier or your fire department CAUTION Indicates a potentially hazardous situation which if not avoided may result in minor or moderate injury WARNING WARNING Be alert to the possibility of serious bodily injury if the instructions are not followed Be sure to read and carefully follow all of the messages DANGER Indicates an imminently hazardous situation which if ...

Page 3: ... 24 hours Seven days a week To order non warranty replacement parts or accessories call 1 800 993 2677 visit www grilllovers com or send a FAX to 1 706 565 2121 This grill is designed for use with LP propane gas The regulator valve supplied must be used Replacement parts must be those specified by the manufacturer Grill installation must conform with local codes or in their absence with or Handlin...

Page 4: ...onsumer purchaser prior to discovery of the nonconformity In addition in the state of California only you may take the product to the retail establishment from which it was purchased or to any retail establishment selling this product in order to obtain performance under this warranty This warranty does not include the cost on any inconvenience or property damage due to failure of the product and ...

Page 5: ... Warranty Information Warranty 4 Table of Contents 5 Parts Lists and Diagrams 6 8 Assembly 9 15 Use Care 16 30 1 lb Disposable Propane Cylinder 16 20 lb Refillable Propane Cylinder 17 20 Safe Use of Your Grill 21 Safety Tips 22 Lighting Instructions 23 24 Cleaning and Storing 25 26 Food Safety 27 Troubleshooting 28 Table of Contents ...

Page 6: ... Coach Bolt 41 9000 589 000 3 1 Washer 42 9000 390 000 4 3 Spring Washer 42 9000 381 000 5 3 Nut 43 9000 034 000 6 4 Spring Washer 42 9000 380 000 7 2 Side Spacer 13 6047 397 200 8 1 Center Spacer 13 6047 399 200 9 2 Self Tap Screw 41 9000 278 000 10 2 Self Tap Screw 41 9000 334 000 11 4 Self Tap Screw 41 9000 355 000 12 2 Washer 42 9000 349 000 13 2 Machine Screw 41 9000 709 000 14 2 Nut 43 9000 ...

Page 7: ...r Latch 65 6047 094 200 S 1 Heat Indicator 69 6047 013 200 T 1 Sight Glass 69 6047 018 200 U 1 Ignitor 69 6047 014 200 Key Qty Description Part No 17 2 Self Locking Ring 42 9000 368 000 18 4 Self Tap Screw 41 9000 355 000 19 2 Hinge Pin 41 6047 025 200 20 1 Machine Screw 41 9000 088 000 21 1 Nut 43 9000 005 000 22 4 Self Tap Screw 41 9000 334 000 23 1 Washer 42 9000 307 000 G H I J K L 23 M N O P ...

Page 8: ... Key Qty Description Part No 24 4 Plastic Fasteners 11 6047 033 200 25 4 Stand Offs 13 6047 026 200 26 4 Coach Bolt Bracket 21 6047 021 200 27 1 Stopper Left Rear 22 6047 102 200 28 1 Stopper Left Front 22 6047 103 200 29 1 Stopper Right Rear 22 6047 104 200 30 1 Stopper Right Front 22 6047 105 200 31 2 Washer 42 9000 391 000 32 2 Coach Bolt 41 9000 588 000 33 1 Coach Bolt 41 9000 570 000 34 5 Nut...

Page 9: ...lid Remove all protective packaging and product information cards before assembly NOTE The rubber spacers on the grill lid help to protect the non stick cooking surface and should not be removed Plinth Legs Grill Spacer Graphics in front Larger leg opening to right side during assembly Plinth is designed to fit into slots at each corner of legs Plinth will only fit into legs correctly and easily w...

Page 10: ... of leg e Permanently attach hub to leg with two self tapping handle hub screws DO NOT OVERTIGHTEN SCREWS Stripping may occur Long coach bolt passes completely through holes in plinth and leg Front Handle Hub Part MM Handle Hub Screw Foot Graphics In Front 2 Assemble REAR handle hub to leg by repeating steps 1a 1e Graphics In Front Long coach bolt passes completely through holes in plinth and leg ...

Page 11: ...nd legs as shown below Graphics In Front Plastic Fastener Washer Short Coach Bolts 4 Assemble handle as shown below with the short screws and barrels Insert bushing with the shoulder out as shown in the detailed view Bushings Handle Cap Bushing Handle Arm Handle Handle Arm Short Screw Barrel ...

Page 12: ... plastic fasteners at this time Graphics In Front Plastic Fastener Handle Assembly Fully unfold legs to position shown below and hand tighten the four plastic fasteners Long Screw Wheel Axle Assemble wheels and axle as shown above Gently tap axle through leg with hammer if you have difficulty sliding the axle into the shown holes NOTE ...

Page 13: ...ts into slot in plinth A Attach 1 lb LP cylinder to regulator by twisting clockwise NOTE 1 lb LP cylinder sold separately B Connect regulator to burner on right side of grill Slide regulator lock to right to insert regulator Regulator should rest firmly against burner Regulator lock should spring back to original position to lock regulator in place If necessary loosen left fasteners raise handle a...

Page 14: ...n sides of grill bottom Shelf with valve cutout attaches to right side of grill WARNING Combustion by products produced when using this product contain chemicals known to the State of California to cause cancer birth defects and other reproductive harm ...

Page 15: ... secure legs in the closed position C A Turn Counterclockwise C Turn Clockwise Fold right leg first Fold Second B To transport your Grill2Go Express loosen the left fasteners rotate handle to position shown then retighten fasteners NOTE Sideshelves and propane cylinder must be removed before transporting grill TM TM In order to use a long LP cylinder the right side shelf must be removed and the bo...

Page 16: ...e gas cylinder is replaced or after storage Materials needed include clean paint brush and 50 50 soap and water solution Use mild soap and water Damage to components can result Be sure on regulator is in OFF position Brush soapy solution onto between gas cylinder and regulator at s IMPORTANT A s If growing bubbles appear there is a leak Retighten connection and repeat steps 1 and 2 If you cannot s...

Page 17: ...fied by a unique triangular hand wheel Supply system must be arranged for vapor withdrawal and include collar to protect LP tank valve Use only licensed and experienced dealers LP tank before filling Dealer should fill LP tank more than 80 of LP tank volume A frosty regulator indicates gas overfill Immediately close LP tank valve and call local LP gas dealer for assistance Do not release liquid pr...

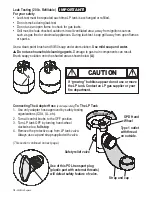
Page 18: ...ts can result Brush soapy solution onto the shaded areas shown below s A If growing bubbles appear do not use or move the LP tank Contact an LP gas supplier or your fire department CAUTION Connecting The Adapter Hose To The LP Tank full stop sold separately 1 Use only adapter hose approved by safety testing organizations CSA UL etc 2 Turn all control knobs to the OFF position 3 Turn LP tank OFF by...

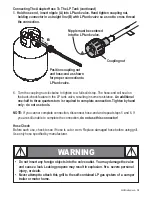
Page 19: ...e resulting in some resistance If you cannot complete connection disconnect hose end and repeat steps 5 and 6 If you are still unable to complete the connection Before each use check to see if hose is cut or worn Replace damaged hose before using grill Use only hose specified by manufacturer An additional one half to three quarters turn is required to complete connection Tighten by hand only do no...

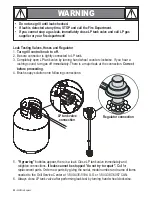
Page 20: ...ng hand wheel counter clockwise If you hear a turn gas off immediately There is a major leak at the connection 4 Brush soapy solution onto following connections rushing sound 5 bubbles appear there is a leak Close LP tank valve immediately and retighten connections all for replacement parts Order new parts by giving the serial model number and name of items needed to the Grill Service Center at 1 ...

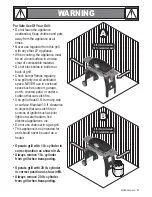
Page 21: ...rial Do not block holes in bottom or back of grill Check burner flames regularly Use grill only in well ventilated space NEVER use in enclosed space such as carport garage porch covered patio or under a surface that can catch fire Use grill at least 3 ft from any wall or surface Maintain 10 ft clearance to objects that can catch fire or sources of ignition such as pilot lights on water heaters liv...

Page 22: ...Allow the appliance to cool before moving or storing Use only tools supplied or plastic tools Maximum load for side shelf is 10 lbs The regulator may make a humming or whistling noise during operation This will not affect safety or use of grill If you have a grill problem see the Troubleshooting Section Light burners see lighting instructions on following page Check to make sure they are lit close...

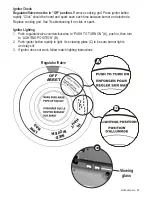
Page 23: ...k or spark 1 Push regulator valve counterclockwise to PUSH TO TURN ON A push in then turn to LIGHTING POSITION B 2 Push ignitor button rapidly to light Use viewing glass C to be sure burner lights and stays lit 3 If ignitor does not work follow match lighting instructions OFF ARRET PU SH TO TU RN O N EN FO N CER PO U R REG LER SU R M ARCH E LI GH TI NG PO SI TI ON D AL LU MA GE PO SI TI ON H I H A...

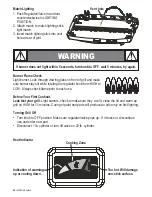
Page 24: ...hrough viewing glass on front of grill and make sure burner stays lit while rotating the regulator knob from HIGH to LOW Always check flame prior to each use Light burners check to make sure they are lit close the lid and warm up grill on HIGH for 10 minutes Curing of paint and parts will produce an odor only on first lighting Turn knob to OFF position Make sure regulator valve pops up If it does ...

Page 25: ...ill off before cleaning While still warm pour a cup of water over cooking surface to loosen grease and food particles and to speed cool down Use supplied cleaning comb to scrape off excess grease and food particles Wipe cooking surface with a paper towel or sponge Once completely cool cooking surface can be removed and washed with warm soapy water or placed in dishwasher After each use remove bott...

Page 26: ...s are found replace burner Burner can be cleaned either installed or removed 5 If grill is to be stored coat burner lightly with cooking oil Wrap in protective cover to keep insects out 6 Replace cooking surface Burner Flame Check Non Stick Cooking Surface Use and Care Use only plastic tools Do not cut food on surface Do not put pots or pans on surface Do not leave lid down for more than 10 minute...

Page 27: ... often browns very fast on the outside Use a meat thermometer to be sure food has reached a safe internal temperature and cut into food to check for visual signs of doneness NOTE Do not cut into food while it is on the grill s cooking surface This may damage the cooking surface Move food to a plate to check then return it to the cooking surface if necessary Poultry should reach 180 F breasts 170 F...

Page 28: ...gnitor and electrode Bad ignitor No gas flow Obstruction of gas flow Does valve cap stay down Disengagement of burner to valve High or gusting winds Burner is blocked Prevention Cure Wipe dry with cloth Replace electrode Reconnect or replace ignitor wire Reconnect or replace ignitor wire Replace ignitor Check gas source Clear burner Replace with Thermos parts Check steps in assembly instructions T...

Page 29: ...pt directly to the tank itself The additional 20 lb or 30 lb tank is available from your RV dealer and must be mounted on the RV complying with approved RV standards The connection from the tank to the grill must be with a minimum 15 approved hose available from your RV dealer The must always be operated at least 10 from the body of the RV Never use the in an enclosed space or under a surface such...

Page 30: ...30 Grill2Go Express ...

Page 31: ...Grill2Go Express 31 ...

Page 32: ...on and The Urban Grill are Trademarks of the W C Bradley Company Universal Grill Parts and Design is a trademark of the Thermos Company and its affiliates Protected under one or more of the following U S Patents 4 598 692 4 624 240 4 747 391 4 747 391 4 817 583 4 924 846 4 989 579 5 003 960 5 076 256 5 076 257 5 090 398 5 109 834 5 224 676 5 277 106 5 421 319 5 441 226 5 452 707 5 458 309 5 566 60...

Reviews: