background image

Operation

Indicators and Buttons

4

Nicolet iS20 User Guide

Thermo Scientific

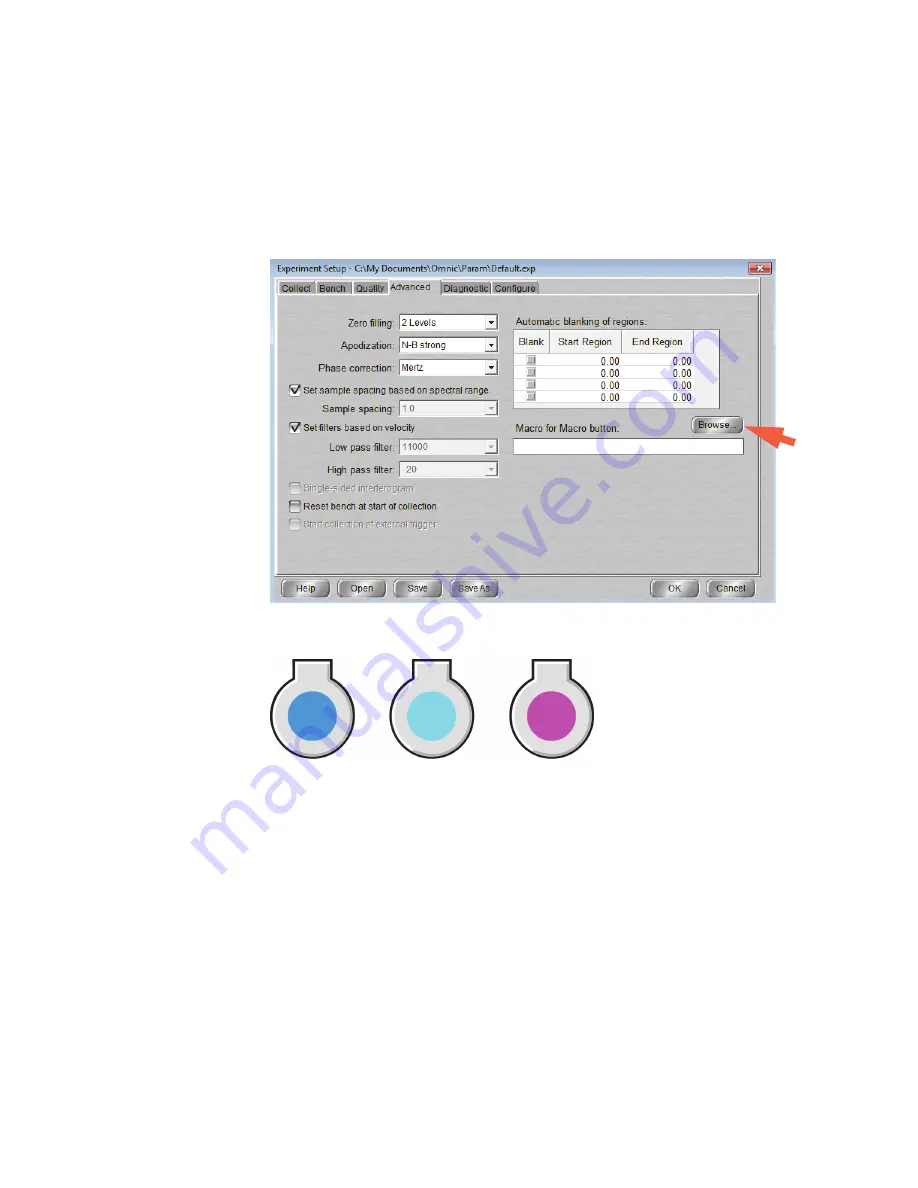
Workflow button

. Can be used to assign a software workflow (macro) to the touch panel 

for automated operations with the instrument. For information about creating macros, 
see the 

Macros Basic User Guide

 in your instrument documentation set. To assign a 

Macros Basic macro (.mac) file to the operations panel, open OMNIC software and 
choose 

Collect

 (menu) 

> Experiment Setup > Advanced

 (tab). Then choose 

Browse


next to Macro For Macro Button and select the macro file.

Humidity indicator

.The humidity indicator monitors the level of humidity inside the 

spectrometer. The status is indicated by the color of the indicator:

OK/Enter button

. Can be used to confirm a message box displayed in OMNIC software.

Stop button

. Can be used to cancel a message box displayed in OMNIC software.

Scan bar

. Provides instrument status information. Scan states:

Solid-pulsing green light—Instrument is ready for use.

Moving green light—Data collection is in progress.

Solid-pulsing yellow light—Scheduled maintenance required. For more information, 
click the System Status icon (shield) in OMNIC software. See the OMNIC Help 
system for details.

Quick-pulsing red light—Instrument requires attention. For more information, see 
System Status in OMNIC software.

BLUE


(good)

LIGHT BLUE


(Change desiccant)

PINK

(Call service)

Summary of Contents for Nicolet iS20

Page 1: ...Nicolet Series FT IR Spectrometers Nicolet iS20 User Guide 269 335700 Revision A November 2018...

Page 2: ...only System configurations and specifications in this document supersede all previous information received by the purchaser Thermo Fisher Scientific Inc makes no representations that this document is...

Page 3: ...uency 7 Cooling a Detector 8 Chapter 3 Installing or Replacing Hardware 11 Installing a Purge Kit 11 Installing a Sample Compartment Extension Kit 13 Installing Baseplate mounted Accessories 14 Instal...

Page 4: ...tents iv Nicolet iS20 User Guide Thermo Scientific Checking and Changing the Purge Gas Filter 27 Chapter 5 Troubleshooting 30 Using the Troubleshooting Topics 30 Instrument Problems 30 Error Messages...

Page 5: ...uble clicking the book in the Contents tab that interests you and then double clicking the topic you want to read There is also an Index tab where you can search for topics by phrase or keyword and th...

Page 6: ...mail us first for any shipping requirements or other instructions Contacting Us For Technical Support please contact www thermofisher com If you have problems with your system refer to the Troubleshoo...

Page 7: ...e main cover of the instrument This panel also has buttons that allow you to operate the instrument Background button Acquires a background spectrum which shows the response of the instrument when no...

Page 8: ...monitors the level of humidity inside the spectrometer The status is indicated by the color of the indicator OK Enter button Can be used to confirm a message box displayed in OMNIC software Stop butto...

Page 9: ...your instrument please see the getting started manual that came with the instrument Collecting Data With the Module You must use Thermo Scientific OMNIC software to collect data OMNIC can be started...

Page 10: ...re regulator until the gauge indicates that the pressure is between 0 7 and 1 4 bar 70 to 140 kPa or 10 to 20 psig NOTICE We recommend that you maintain seal and desiccation and or purge your instrume...

Page 11: ...in the Help menu Verifying the Laser Frequency Use the Laser Verification button on the Diagnostic tab in the Experiment Setup dialog box in OMNIC software to verify the laser For optimum system perf...

Page 12: ...er frequency appears below the previously measured frequency and a message indicates the laser frequency has been optimized Click OK to finish Cooling a Detector If you have an MCT detector you must c...

Page 13: ...liquid nitrogen always follow standard laboratory safety practices and make sure your dewar is made to use with liquid nitrogen Wear protective clothing and eye wear and avoid letting liquid nitrogen...

Page 14: ...y two or three times Wait until the vapor plume disappears and then repeat until the dewar is filled 4 Remove the funnel 5 Wait until the vapor plume disappears and then replace the plastic stopper an...

Page 15: ...1 Install a shutoff valve and either a 1 4 inch male fitting or a 3 8 inch female fitting on the purge gas source Choose a shutoff valve and fittings that are appropriate for the purge gas source NOT...

Page 16: ...ipple that was included with your purge kit Wrap the reducing nipple with Teflon pipe tape before you install it and use an 11 16 inch open ended wrench to tighten the connection 3 Wrap the reducing n...

Page 17: ...ample Compartment Extension Kit Time needed 10 minutes or less Tools needed 4 in1 tool included with your instrument A 5 32 inch hex wrench 1 Remove any Smart Accessory and then disconnect any cables...

Page 18: ...e screws should be just finger tight 4 Install the sample compartment cover You are now ready to install baseplate mounted accessories Installing Baseplate mounted Accessories To install the standard...

Page 19: ...nstall a slide mounting sample or accessory slide the sample or accessory into one pair of slots in the standard sample holder Use the adjustment screw to position the sample vertically so that it is...

Page 20: ...essory Use the instructions that came with the accessory to make any adjustments or perform any alignment procedures that are necessary Replacing the Power Supply Time needed 5 minutes or less Tools n...

Page 21: ...e to the other Time needed 25 minutes or less Tools needed 4 in 1 tool included with your instrument Finger cots gloves or laboratory tissue Alternate or duplicate source 1 Turn off your instrument wa...

Page 22: ...small Phillips bit installed to loosen the screws that hold the source in place The screws are captive so you only need to loosen them until they spin freely 3 Remove the current source 4 Insert the...

Page 23: ...ore information Use the Advanced Diagnostics command in the Collect menu to verify that the new source is working properly If it does not work properly contact us for assistance 7 Make sure the system...

Page 24: ...back of the instrument NOTICE Do not use harsh detergents solvents chemicals or abrasives these can damage the finish Do not allow liquid to run contact any windows such as those that may be in the sa...

Page 25: ...nants condensing on the detector window show up in spectra as unwanted peaks NOTICE Before you disconnect the power supply always discharge any static electricity you may have accumulated by touching...

Page 26: ...g the Humidity Indicator The humidity indicator must be replaced when it turns white or does not return to blue after the desiccant has been replaced Time needed Less than 1 minute Tools needed Gloves...

Page 27: ...n as shown below press the round blue indicator onto the adhesive on the holder Place the new indicator and holder over the indicator opening and press down gently to make sure it is sealed Note Alway...

Page 28: ...pink or white This means you must replace the desiccant cartridges Time needed 3 minutes or less Tools needed 4 in1 tool included with your instrument Replacement or regenerated desiccant canisters 2...

Page 29: ...hermo Scientific Nicolet iS20 User Guide 25 1 Open the tool compartment and use the 4 in 1 tool with the large Phillips bit installed to loosen the captive screw in the desiccant cover Lift off the de...

Page 30: ...ant canisters or you can dry and reuse the saturated canisters according to the following instructions Time needed 3 hours Tools needed Vented oven Insulated cloth or hot pad CAUTION The contents of t...

Page 31: ...make sure it is clean and dry The drawing below shows where the purge filter is located If the filter is green it does not need to be replaced If it is yellow or otherwise discolored replace it accord...

Page 32: ...or the pressure regulator 2 Remove the plastic bowl that houses the filter You can unscrew the bowl by hand NOTICE We recommend that you maintain seal and desiccation and or purge your instrument at...

Page 33: ...he filter by hand 4 Install the new filter and replace the plastic bowl 5 Turn on the purge flow to the instrument Note You may notice increased levels of water and carbon dioxide in spectra collected...

Page 34: ...icator in the upper right corner of the OMNIC home page reflects the results of system diagnostic tests and system errors If the System Status indicator has a green check mark the instrument is operat...

Page 35: ...or a scheduled maintenance procedure is overdue 2 Check the source indicator in Collect menu Experiment Setup Diagnostic If the source is not working replace it Contact us for assistance 3 Check the l...

Page 36: ...ng are installed and aligned correctly For more information see the instructions that came with the accessory 6 Check the sample compartment windows If they are fogged contact us to have the windows r...

Page 37: ...sts contact us for assistance Data cannot be collected or other software problems 1 Close OMNIC software and then turn off the instrument power Wait 90 seconds and then turn on the instrument power Al...

Page 38: ...ately controlled move the instrument to a location that is maintained in the recommended temperature range 4 If the problem persists contact us for assistance OMNIC cannot communicate with the detecto...

Page 39: ...icolet iS20 User Guide 35 The source voltage is out of specification 1 Check to see if the source is properly seated in its holder 2 Replace the source Contact us for assistance The power supply volta...

Page 40: ......

Reviews: