background image

5

TMT-HA200 Hot Air Tool

USER MANUAL

FREQUENTLY ASKED QUESTIONS

Q: The unit has no power.

A: Check if the unit is switched on and the power cord is plugged in. Verify that the 

fuse has not blown out. Pick up the hot air gun, the unit may just be in sleep mode.

Q: The actual temperature is not increasing

A: Pick up the hot air gun, the unit may just be in sleep mode. The overheat protection 

may be engaged, power off unit to cooldown and then power back on. Lastly, check if 

the heating element is damaged, replace if damaged.

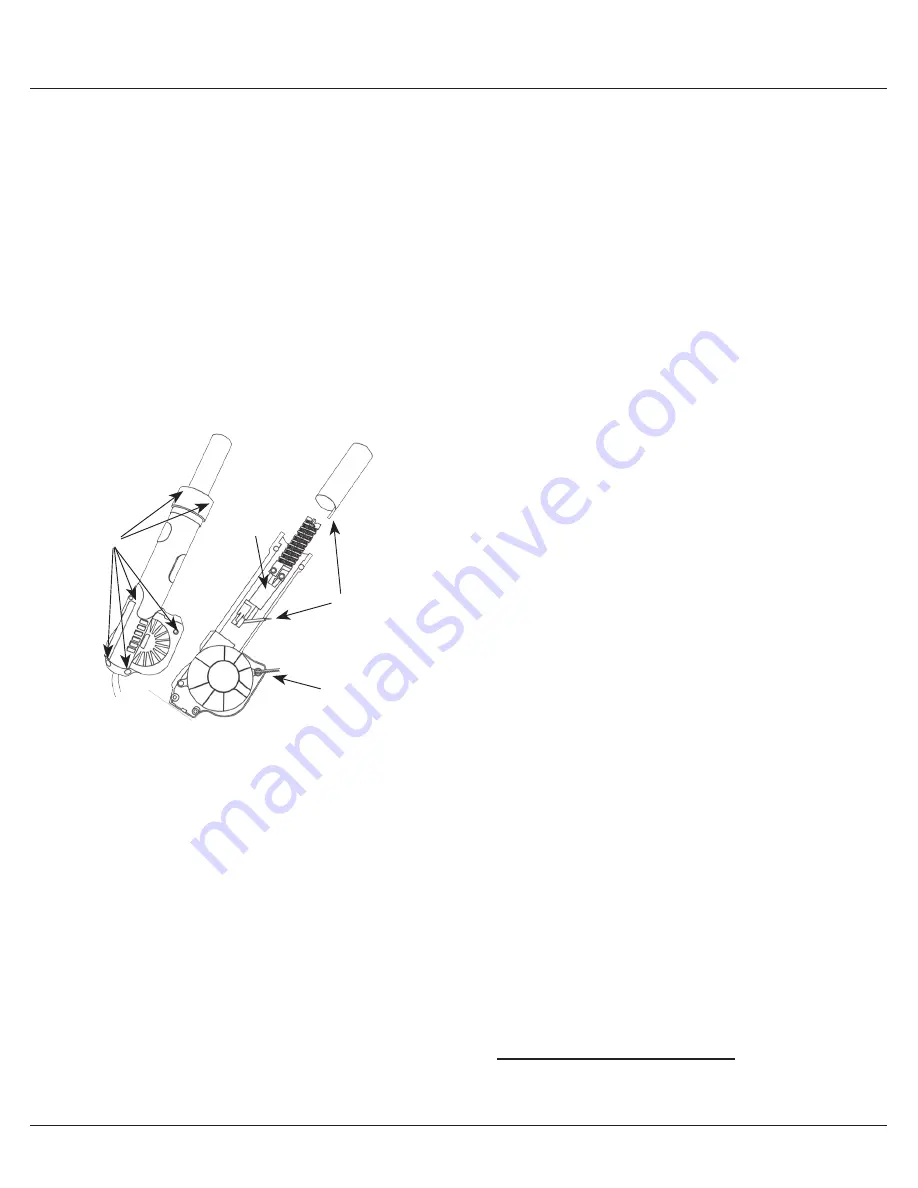
Q: Replacing the heating element.

Q: No air is coming out of the hot air gun

A: Check if the fan is damaged, replace if damaged.

Q: Replacing the fan.

Caution: Disconnect power before replacing the fan.

1. Remove the screws holding the hot air tool together and open the cover.

2. Disconnect and remove the heater pipe.

3. Pull back the heat shrink tube and disconnect the fan by unsoldering the power 

wires. Remember the wire order (one wire is positive, one wire is negative)

4. Insert a new fan (HA-PU200).

5. Reassemble the hot air gun in the reverse order it was disassembled.

Q: Other problems

A: Please contact your vendor or Thermaltronics: [email protected].

Caution: Disconnect power before replacing heater element.

1. Remove the six screws holding the hot air tool together and 

open the cover.

2. Disconnect and remove the heater pipe.
3. Disconnect the heater connector, pull back the heat shrink 

tube and desolder thermocouple wires.

4. Insert a new heating element (HA-HE200).
5. Reassemble the hot air gun in the reverse order it was 

disassembled.

1

2

3

Fan Wires

Summary of Contents for TMT-HA200

Page 1: ...USER MANUAL TMT HA200 HOT AIR TOOL www thermaltronics com ...

Page 2: ......

Page 3: ......

Page 4: ... free of charge at its sole option Warranty period is from the date of purchase by the original owner If the date of purchase cannot be substantiated the date of manufacture will be used as the start of the warranty period TABLE OF CONTENTS TMT HA200 SPECIFICATIONS 1 INTRODUCTION 1 SYSTEM FEATURES 1 SAFETY PRECAUTIONS 2 CONTROL PANEL 3 UNPACKING ASSEMBLY OPERATION 3 4 FREQUENTLY ASKED QUESTIONS 5 ...

Page 5: ...ted by Thermaltronics prior to shipment and with proper maintenance will give you years of reliable performance SYSTEM FEATURES The TMT HA200 hot air tool can be used for surface mount component removal and reflow on components such as SOIC CHIP QFP PLCC and others 1 Auto sleep activated when hot air tool is put in the holder 2 Adjustable easy to use temperature control knob 3 Adjustment easy to u...

Page 6: ...nly genuine replacement parts Caution 1 Use this equipment in a well ventilated area away from combustible equipment 2 Disconnect the power cord if unit is not used for extended period of time 3 Place handle in stand when not in use 4 Handle with care Never drop or sharply jolt the unit The unit contains delicate parts that can be damaged if subjected to physical force Do not spill any liquids int...

Page 7: ... in the handpiece holder 5 Connect the AC plug to a suitable AC power outlet 6 Switch the power switch to the on position 7 Adjust the air flow and temperature 8 The unit is now in sleep mode with the power off and both the heating element and airflow off 9 To activate the unit lift the hot air gun from the holder 10 After the heating element reaches temperature The unit should then be read to use...

Page 8: ...than 100C 1 The heating element is turned off 2 The fan is turned off 3 Lifting the hot air gun from the holder will deactivate the sleep mode 4 In sleep mode both the power and temperature LED indicator are off Operation Power off The unit is powered down Both the heating element and fan are off Note To prolong heating element life always turn the temperature knob fully counter clockwise and airf...

Page 9: ...er before replacing the fan 1 Remove the screws holding the hot air tool together and open the cover 2 Disconnect and remove the heater pipe 3 Pull back the heat shrink tube and disconnect the fan by unsoldering the power wires Remember the wire order one wire is positive one wire is negative 4 Insert a new fan HA PU200 5 Reassemble the hot air gun in the reverse order it was disassembled Q Other ...

Page 10: ... 10 6mm x 10 8mm SOL 14 16 10 6 10 8 HTN SL20 Nozzle 10 6mm x 13 3mm SOL 20 20J 10 6 13 3 HTN SL24 Nozzle 10 6mm x 15 9mm SOL 24 24J 10 6 15 9 HTN SL28 Nozzle 10 6mm x 18 4mm SOL 28 10 6 18 4 HTN SL44 Nozzle 16 0mm x 27 9mm SOL 44 16 0 27 9 HTN SJ32 Nozzle 13 5mm x 20 6mm SOJ 32 13 5 20 6 HTN SJ40 Nozzle 13 5mm x 25 4mm SOJ 40 13 5 25 4 HTN TS24 Nozzle 17 0mm x 7 1mm TSOP 20 24 PIN 17 0 7 1 HTN TS...

Reviews: