background image

22

21

Ara Kablo Kurulum K

ı

lavuzu

Kasa 

ı

şık bağlantısı

USB 2

.

0 bağlantısı

Ses Bağlantısı

Ara Kablo Kurulum K

ı

lavuzu

 / 

Kasanın ön kısmında bazı ışıklar ve anahtar ara kabloları görebilirsiniz. Lütfen anakart üreticinizin 

sağladığı kullanım kılavuzuna bakın ve daha sonra, bu ara kabloları, anakart üzerindeki panel bağlantı noktalarına bağlayın.

USB 2

.

0 bağlantısı

 / 

Lütfen anakart kılavuzunuzun “USB bağlantısı” bölümüne bakın.

USB 3.0 Bağlant

ı

s

ı

 /

1. 

Ana kart

ı

n

ı

z

ı

n dahili USB 3.0 bağlant

ı

s

ı

n

ı 

desteklediğinden emin olun.

2. USB 3.0 kablosunu, bilgisayar

ı

n

ı

zdaki kullan

ı

labilir USB 3.0 bağlant

ı 

noktas

ı

na bağlay

ı

n.

Ses Bağlantısı

 / 

Lütfen aşağıdaki Ses konektörü resmine ve anakartınızın kullanım kılavuzuna bakın.


Lütfen AC’97 veya HD 

Audio(Azalia) spesifikasyonunu kullanan bir anakart seçin (ses sisteminizin AC’97 veya HD Audio (Azalia) spesifikasyonunu 

desteklediğini unutmayın); aksi takdirde, aygıt(lar)ınız zarar görür.

Kasa 

ı

şık bağlantısı

คู่มือการติดตั้งสายไฟ

การเชื่อมต่อไฟ LED ของเคส
กรุณาศึกษารายละเอียดจากคู่มือผู้ใช้ของผู้ผลิตแผงวงจรหลักของคุณ 
จากนั้นให้เชื่อมต่อสายไฟเหล่านี้เข้ากับส่วนหัวของแผงบนแผงวงจรหลัก
การเชื่อมต่อ USB 2.0 / กรุณาศึกษารายละเอียดจากคู่มือผู้ใช้ของผู้ผลิตแผงวงจรหลักของคุณ ในหัวข้อ "การเชื่อมต่อ 
USB"
การเชื่อมต่อ USB 3.0 /

1 . 

ตรวจดูให้แน่ใจว่าแผงวงจรหลักของคุณรองรับการเชื่อมต่อ USB 3.0 ภายใน

2. เชื่อมต่อสาย USB 3.0 เข้ากับพอร์ต USB 3.0 ที่สามารถใช้งานได้บนคอมพิวเตอร์ของคุณ
การเชื่อมต่ออุปกรณ์รับส่งสัญญาณเสียง/ กรุณาดูรายละเอียดจากภาพประกอบของตัวเชื่อมต่อสัญญาณเสียงต่อไปนี้ 
และคู่มือผู้ใช้ของผู้ผลิตแผงวงจรหลักของคุณ
กรุณาเลือกแผงวงจรหลักที่ใช้ AC’97 หรือ HD Audio(Azalia) 
(กรุณาตรวจสอบให้แน่ใจว่าอุปกรณ์รับส่งสัญญาณเสียงของคุณรองรับ AC’97 หรือ HD Audio (Azalia)) 
มิฉะนั้นอุปกรณ์ของคุณอาจเสียหายได้

 / ที่ด้านหน้าของเคส คุณจะเห็นไฟ LED และสายไฟของสวิตซ์ 

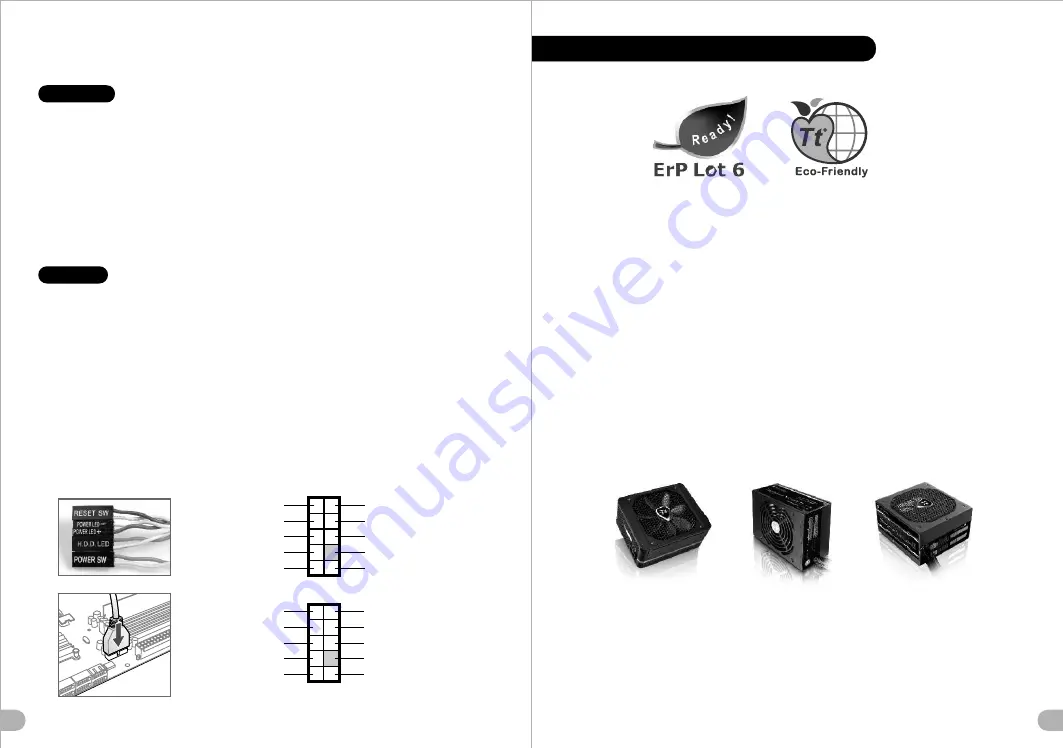
Thermaltake Power Supply Series (Optional)

As today’s technology updates rapidly, consumers are always requesting for higher and higher PC 
performance, which also increases loads to power supplies. Therefore, selecting a suitable and reliable 
power supply becomes a necessary lesson for all PC users.

Why Choose Thermaltake Power Supply?

Quality From Within

Every power supply units from Thermaltake should pass a very strict quality control before sent to 

customers, including BIT(Burn-in-test) for over 8 continuous hour in a 45

 room to test if a unit can run 

normally under usual scene, and Hipot test to ensure the power supply unit can survive and protect both 
users and their systems when the voltage volume surges.

Less is more

In order to prevent wasted energy, all of Thermaltake’s products should have at least 80% of 
transforming efficiency, and we’re also one of the manufacturers that have the most 80 PLUS 
certificates. Because Thermaltake knows how to save for the earth and customers; we know what makes 
less to be more.

Being Supportive By All Means

A product with better quality can have longer life and working hours but less pollution. Thermaltake 
obeys and respects all environmental clauses in all countries and make sure all of our products are both 
user and environmental-friendly. Therefore we show our supports by giving 2 to7-year warranties, which 
is not only a quality commitment to the users, but also love to this planet by reducing resources and 
wastes.

Thermaltake has several power supply product lines; 
please refer to our official website and Facebook Fan Page for more detail information! 

Brand official website:

http://www.thermaltake.com/

Global Facebook :

https://www.facebook.com/ThermaltakeInc

Taiwan Facebook

https://www.facebook.com/ThermaltakeTW

Türkçe

ภาษาไทย

AUDIO  AC'97  Function

GROUND

L-RET

R-RET

NC

BROWN

RED

MIC IN

MIC POWER

KEY

BLUE

NC

BLUE

L-OUT

YELLOW

R-OUT

BLACK

YELLOW

PRESENCE#

BLACK

SENSE1_RETURN

AUD GND

SENSE2_RETURN

YELLOW

BROWN

RED

PORT1 R

PORT2 R

PORT1 L

BLUE

PORT2 L

SENSE_SEND

KEY

PURPLE

GREEN

ORANGE

BLACK

AUDIO  AZALIA  Function

藍色線條為尺寸標示,請勿印刷上去!

產 品料 號

VP 20 0 0 S e ri es

Chaser A41

說明 書

1 2/

11

/

01

A

產品 名稱

印刷 項目

子件 料 號

發 稿 日期

版 本

騎馬釘

24

80

X

X

X

X

X

書寫紙

單色

其他特殊處理效果

表面處理

2

厚度

(g/m )

裝訂方式

材質

頁數

印刷色彩

規格樣式

整本

MARKETING

CHECK

DESIGN

PRODUCT GM

其他特殊處理效果

表面處理

2

厚度

(g/m )

材質

印刷色彩

封面樣式(當封面與內頁樣式不同時尚須填寫

)

Peipei

刀模線

125 

mm

176 

mm

Summary of Contents for Chaser A41 VP2000 Series

Page 1: ...take com User s Manual Benutzerhandbuch Mode d emploi Manual del usuario Manuale dell utente Manual do Utilizador 安裝說明書 用戶手冊 ユーザーズマニュアル Руководство пользователя kullanıcı elkitabı EEE Yönetmeliğine Uygundur คู มือการใช Tested To Comply With FCC Standards FOR HOME OR OFFICE USE Chaser A41 Chaser A41 Chaser A41 VP2000 Series Pursuit without fear ...

Page 2: ...For Fan Motherboard ODD 2 5 HDD 3 5 HDD Movable tie Nut setter Buzzer Cable Managment Motherboard Installation Motherboard Alarm 5 1 1 For Water Cooling 4 Washer 6 32 Stand off 1 Motherboard 240mm Radiator Installation Case Fan Screw 4 For Fan Chaser A41 Series Mid Tower PSU LCS Upgradable Net Weight SECC 4 x 5 25 1 x 3 5 5x 3 5 or 2 5 7 9 6 x 9 6 Micro ATX 12 x 9 6 ATX USB 3 0 x 2 HD Audio x 1 St...

Page 3: ... calore della CPU Il limite di altezza per il dissipatore di calore della CPU è 175 mm 6 9 Limite di lunghezza per la VGA schede grafiche Il limite di lunghezza per la VGA scheda grafica è 315 mm 12 4 Atenção Limite de altura para o dissipador do CPU O limite de altura para o dissipador do CPU é 175 mm 6 9 polegadas Limite de comprimento para VGA placa gráfica O limite de comprimento para VGA plac...

Page 4: ...Lay down the chassis 2 Install the motherboard in proper location and secure it with screws Deutsch 1 Legen Sie das Gehäuse auf die Seite 2 Installieren Sie die Hauptplatine in ihrer vorgesehenen Position und sichern Sie sie mit Schrauben Français 1 Posez à plat le châssis 2 Installez la carte mère dans l endroit approprié et sécurisez la avec des vis Español 1 Tumbe el chasis 2 Instale la placa m...

Page 5: ... to unlock the device Deutsch 1 Entfernen Sie die Abdeckung des 5 25 Zoll Laufwerksschachts 2 Schieben Sie the 5 25 Zoll Einheit in den Laufwerksschacht um die Einheit zu sperren Anmerkung Drücken Sie den 5 25 Zoll werkzeuglosen Mechanismus um die Einheit zu verriegeln Français 1 Enlevez le couvercle de la baie de lecteur de 5 25 2 Faites glisser le périphérique de 5 25 dans la baie de lecteur Rem...

Page 6: ...е крышку 3 5 дюймового отсека 2 Вставьте 3 5 дюймовое устройство в отсек 3 Установите 3 5 дюймовый жесткий диск и зафи ксируйте его винтами 简体中文 1 卸下 3 5 驱动器槽盖 2 将设备插入 3 5 驱动器槽 3 插入3 5 硬盘并用螺丝锁上 Türkçe 1 3 5 sürücü bölmesi kapağını çıkarın 2 Aygıtı 3 5 sürücü bölmesinin içine yerleştirin 3 3 5 HDD yi yerleştirin ve vidalarla sabitleyin ภาษาไทย 1 ถอดฝาปิดช องไดรฟ ขนาด 3 5 ออก 2 ใส อุปกรณ เข าในช องไ...

Page 7: ...取出 2 Placez le disque dur de 2 5 ou de 3 5 dans le boîtier et fixez le avec des vis 2 將2 5 或3 5 硬碟放置在硬碟托盤上 用螺絲固 定硬碟 3 Refaites glisser le boîtier du disque dur dans la cage de disques durs 3 將硬碟托盤放回硬碟磁架中 Español 简体中文 1 Extraiga la bandeja del disco duro 1 将硬盘托盘取出 2 Coloque el disco duro de 2 5 ó 3 5 en la 2 将2 5 或3 5 硬盘放置在硬盘托盘上 bandeja y fíjelo con los tornillos 用螺丝固定硬盘 3 Vuelva a meter la bandeja...

Page 8: ... de Segurança do Teclado e Rato e fixe na parte traseira do painel no interior do chassis com parafusos Place the keyboard or mouse cables through the Keyboard Mouse Security Lock then secure it back to the back panel from inside of the chassis with screw Führen Sie die Kabel durch die Einheit Tastatur Maussperren und sichern Sie sie dann wieder an der Rückwand innerhalb des Gehäuses mit den Schra...

Page 9: ...t the motherboard which used AC 97 or HD Audio Azalia be aware of that your audio supports AC 97 or HD Audio Azalia or it will damage your device s Anschlüsse herstellen Gehäuse LED Verbindungen Auf der Gehäusevorderseite finden Sie einige LEDs und Verbindungen Bitte nehmen Sie die Gebrauchsanweisung Ihres Motherboard Herstellers zur Hilfe und schließen Sie diese Verbindungen an die Panel Header B...

Page 10: ...uttore della scheda madre quindi connettere i contatti alla parte superiore del pannello sulla scheda madre Connessione USB 2 0 Consultare il manuale per la scheda madre che comprende la sezione relative alla connessione USB Connessione USB 3 0 1 Accertarsi che la scheda madre supporti la connessione USB 3 0 interna 2 Collegare il cavo USB 3 0 alla porta USB 3 0 disponibile sul computer Connession...

Page 11: ...каторов корпуса Подключение Подключение аудиоразъема USB 2 0 Указания по прокладке кабелей В передней части корпуса расположены индикаторы и провода выключателей Перед подсоединением этих проводов к монтажной колодке панели на материнской плате изучите руководство пользователя производителя материнской платы Подключение USB 2 0 См раздел Подключение в руководстве материнской платы Подключение USB ...

Page 12: ...chnology updates rapidly consumers are always requesting for higher and higher PC performance which also increases loads to power supplies Therefore selecting a suitable and reliable power supply becomes a necessary lesson for all PC users Why Choose Thermaltake Power Supply Quality From Within Every power supply units from Thermaltake should pass a very strict quality control before sent to custo...

Reviews: