background image

Page 7 of 17 

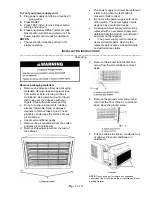
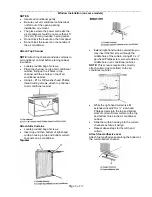
Install Cabinet into Window 


Handle air conditioner gently.


Be sure your air conditioner cabinet does 
not fall out of the opening during 
installation or removal.


The place where the power cord exits the 
air conditioner should be no more than 4 ft 
(122 cm) from a grounded 3 prong outlet.


Do not block the louvers on the front panel.


Do not block the louvers on the outside of 
the air conditioner.


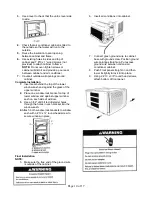
1. 

Center empty cabinet in window. Check 
that lower rail of air conditioner cabinet is 
behind and against back side of 
windowsill. Maintain a firm hold on the air 
conditioner cabinet. Lower window sash to 
hold cabinet in place.


2. 

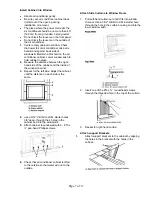
Measure the distance between the right-
hand side of the cabinet and the inside of 
the window channel.


3. 

Repeat for the left side. Adjust the cabinet 
until the distance on each side is the 
same.


4. 

use a 3/16” drill bit to drill 4 starter holes 
3/8” deep- through the 4 holes in the 
cabinet and into the windowsill.


5. 

Attach cabinet to windowsill with 4 - # 10 x 
½” pan-head Phillips screws.


6. 

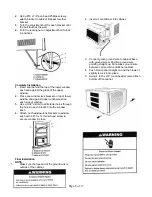
Check that air conditioner cabinet is tilted 
to the outside so that water will run to the 
outside.


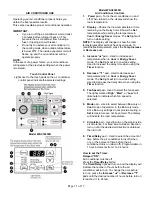
Attach Side Curtains to Window Frame 
 

1.  Pull Left-hand curtain out until it fits into window 

channel. Use a 3/32” drill bit to drill a starter hole 
through the hole in the curtain housing and into the 
lower window sash. 


2.  Insert one of the #10 x ¾” round-head screws 

through the threaded hole in the top of the curtain. 


3.  Repeat for right-hand curtain. 
 

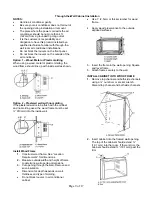
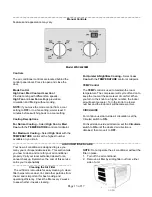
Attach support Brackets 

1. 

Attach support brackets to the cabinet by aligning 
the holes in the bracket with the holes in the


cabinet.


Summary of Contents for 420-0018

Page 1: ...Page 1 of 17 WINDOW AIR CONDITIONER INSTALLATION AND OPERATION 950 0011 revI 1 10 07 CATALOG NO PRODUCT CODE WAC18230R 420 0018 WAC24230R 420 0021 CATALOG NO PRODUCT CODE WAC24230M 420 0022...

Page 2: ...ty of others is very important We have provided many important safety messages in this manual and on your appliance Always read and follow all safety instructions This is the safety alert symbol This...

Page 3: ...ps Screwdrivers Tape measure Drill and 3 16 or smaller bit Level Parts supplied on some models NOTE Installation parts are supplied for double hung windows up to 40 101 6cm wide ______________________...

Page 4: ...roperly grounded 3 prong outlet installed by a qualified electrical installer It is the customer s responsibility To contact a qualified electrical installer To assure that the electrical installation...

Page 5: ...______________________________________________________________________________________ Unpacking Remove packaging materials Remove and dispose of recycle packaging materials Remove tape and glue resid...

Page 6: ...abinet Using 4 10 x 3 8 washer head Phillips thread cutting screws attach top channel to air conditioner cabinet Attach Side Curtains Locate provided bag of screws Insert top and then bottom of right...

Page 7: ...et and the inside of the window channel 3 Repeat for the left side Adjust the cabinet until the distance on each side is the same 4 use a 3 16 drill bit to drill 4 starter holes 3 8 deep through the 4...

Page 8: ...of window 3 Use a 3 32 drill bit to drill starter holes through the holes in each bracket into the window sash 4 Attach both window lock brackets to window sash with a 10 x round head screw to secure...

Page 9: ...ed wall is to be flush with the cabinet and no molding used the wood frame must be set 913mm into the inside wall Install Wood Frame 1 Construct wood frame See Location Requirements for dimensions 2 M...

Page 10: ...against the glass of the upper window 2 Place one window lock bracket on top of lower window and against upper window sash on each side of window 3 Use a 3 32 drill bit to drill starter holes through...

Page 11: ...ease or Decrease pads 3 Increase pad Used to increase set temperature when in Cool or Energy Saver mode The Set light will turn on while setting Used to increase the delay time when using the Timer fu...

Page 12: ...ver pad a second time turns the Energy Saver mode off and the fan runs all the time while the compressor cycles on and off 10 Fan Only Mode Use the Fan Only Mode at Low Med or High fan speed to provid...

Page 13: ...vel of comfort When you turn to the knob to a higher number the indoor air will become cooler Turn the knob to a lower number and the indoor air will become warmer CIRCULAIRE For continuous side to si...

Page 14: ...Press and release RESET listen for click Reset button will latch and remain in to resume operation A household fuse has blown or a circuit breaker has tripped Replace the fuse or reset the circuit br...

Page 15: ...e room Use a fan to exhaust heat or moisture from the room Try not to use heat producing appliances during the hottest part of the day The louvers are blocked Install the air conditioner in a location...

Page 16: ...e LCDI LCDI LCDI Power Cord Length 6 6 6 Refrigerant R22 R22 R22 Refrigerant Charge oz lbs 27 84 1 74 33 44 2 09 33 44 2 09 Sound Level Inside Outside dba MAX 56 61 56 61 56 61 4 Way Air Adjustment YE...

Page 17: ...ion period This warranty provides free replacement of defective parts only Labor and replacement parts as a result of normal wear and tear are not covered under this warranty Additional claims are exc...

Reviews: