background image

BROIL AND CONVECTION  BROIL TIPS

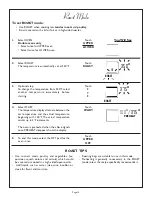
To Set the BROIL and  CONVECTION BROIL Modes:

Broil and Convection Broil  Mode

1.

Select OVEN

Double ovens only

• Select once for UPPER oven
• Select twice for LOWER oven

2.

Select BROIL or
CONVECTION and BROIL
The temperature is automatically set at
HI.

3.

Optional step:
To change the setting from HI, select a
500ºF for Medium Broil or 450ºF for Low
Broil temperature 

immediately 

before

starting.

4.

Select START

5.

To end this mode, select the oven OFF
pad for the oven in use.

You Will See

• Place rack at the rack level needed 

before

 turning

on the oven.

• Start broiling with cold food directly from the

refrigerator.

• Start broiling with a cool oven and broiler pan.
• Brush fish and lean cuts of meat with vegetable oil

before broiling to prevent sticking.

• Start poultry with skin side down.
• Turn food after one half of the total cooking time.

Thicker cuts of meat or poultry can be turned more
often.

HI

BROIL

500

o

Utensils:

• Slotted top grid on broiler pan lets fat drip away from

the upper heating element;  this reduces spattering
and smoking.

• When top browning casseroles or bread, use only

metal or glass-ceramic (Corning ) bakeware.

• Never use heatproof glass (Pyrexware ) or pottery;

they cannot tolerate the high temperatures.

CAUTION!

When broiling, open the door carefully.   There may be
an accumulation of steam and smoke.  Do not place the
hot broiler pan on the open oven door.

• Do not Preheat for broiling.
• Broil with the door closed.
• Always use the two piece broil pan packaged with

your oven.

• Use BROIL when broiling meats, fish or poultry pieces

up to

 1-1/2” thick.

• Use CONVECTION BROIL when broiling meats or

poultry halves 

over

 1-1/2” thick.

500

o

BROIL

Touch

UPPER

LOWER

Touch

BROIL

Touch

5
0
0

Touch

START

Touch

UPPER

OFF

Page 16

Summary of Contents for X272X

Page 1: ...Care Use Manual for ThermadorBuilt In Ovens Models X302X X272X X301X...

Page 2: ...liance We hope that the information in this manual will help you easily operate and care for your oven for years of satisfaction Please contact us if you have any questions or comments Phone us at 1 8...

Page 3: ...ection Chart 19 Convection Bake 20 Convection Bake Chart 21 Convection Roast and Probe 22 Convection Roast Chart 23 Proof 24 Dehydrate 25 Timed Oven 26 Setting the Sabbath Mode 27 CareandCleaning 28 3...

Page 4: ...h IMPORTANT SAFETY NOTICE The California Safe Drinking Water and Toxic Enforcement Act requires businesses to warn customers of potential exposure to substances which are known by the State of Califor...

Page 5: ...feu soit facilement disponible et tr s c t d aucun appareil de la cuisine Veuillez lire les instructions enti res avant de continuer LA S CURIT POUR LE FOUR Ne pas toucher les l ments de chauffage ou...

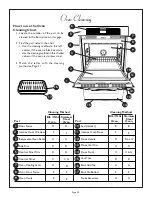
Page 6: ...er Pan and Grid MODEL X301X SINGLE OVENS MODELS X302X X272X DOUBLE OVENS Item 1 Door Handle 2 Oven Door Gasket 3 Window 4 Bake Element 5 Removable Oven Racks 6 Rack Rail Supports 7 Broil Element 8 Gla...

Page 7: ...6 Number pads 1 to 0 selects a time of day temperatures cook and stop time or timer s 7 Start pad touch this pad last to start cooking modes or timing functions LIGHT PANEL LOCK CLOCK and TIMER S MEN...

Page 8: ...oven temperature and the pre heat function 4 NUMBER PADS and START The number pads select temperatures and time set tings in seconds minutes and hours It is necessary to select the START pad to comple...

Page 9: ...e power returns to the oven the clock displays the time when the power was lost or turned off UPPER LOWER Double oven models only Selects the oven to be set Default Settings The cooking modes automati...

Page 10: ...upper and lower element with circulation assisted by the convection fan This mode is designed for breads and pastries CONVECTION or DEHYDRATE Convection is cooking with heat from a third element conce...

Page 11: ...he standard For accurate information write the Extension Service Colorado State University Fort Collins Colorado 80521 There may be a cost for the bulletins CONDENSATION It is normal for a certain amo...

Page 12: ...ing once or twice to highlight oven display 2 Touch once to turn light on or off To manually control the interior oven lights if both ovens are in use 1 Select the UPPER LOWER until lower oven is high...

Page 13: ...of each other Neither one controls au tomatic oven operations Touch START within 10 seconds or the set ting disappears Touch once and the Timer is set in minutes and seconds To Cancel an ActiveTimer 1...

Page 14: ...s mode select the oven OFF pad for the oven in use You Will See Follow the recipe package directions or the cooking chart on Page 13 for baking temperatures time and rack position Baking time will var...

Page 15: ...s Cupcakes 350 2 and 5 21 to 26 minutes Quick Breads Cornbread 400 3 20 to 30 minutes Mix or scratch Gingerbread 350 3 35 to 40 minutes Muffins 425 3 15 to 20 minutes Cookies Bar 350 3 24 to 26 minute...

Page 16: ...100 F The actual temperature counts up in 5 F increments The oven is preheated when the chime signals once PREHEAT disappears from the display 5 To end this mode select the OFF pad for the oven in use...

Page 17: ...af 350 3 60 to 90 minutes total time 170 Poultry Chicken whole 375 1 16 to 20 minutes per pound Breast 170 Halves and or Thigh 180 pieces Turkey Breast 350 2 20 to 25 minutes per pound 170 Turkey Roas...

Page 18: ...ng Start poultry with skin side down Turn food after one half of the total cooking time Thicker cuts of meat or poultry can be turned more often HI BROIL 500 o Utensils Slotted top grid on broiler pan...

Page 19: ...Well 12 to 15 minutes Poultry Chicken pieces 4 or 5 Low 450 F 30 to 45 minutes Sausage Hot Dogs whole 6 HI 4 to 5 minutes Veal Chop 1 6 HI Well 12 to 16 minutes FOOD ITEM RACK BROIL BROIL THICKNESS PO...

Page 20: ...metal pans and heatproof glass or ceramic bakeware may require oven temperature to be reduced or the time shortened To Set the CONVECTION Mode Preheat when using the convection mode For a quick recip...

Page 21: ...325 3 31 to 34 minutes Cupcakes 325 1 3 and 5 17 to 20 minutes Biscuits Scratch or 425 3 10 to 12 minutes Refrigerator Cookies Drop or Sliced 350 1 through 6 or 8 to 10 minutes any combination Cream...

Page 22: ...e PREHEAT disappears from the display 5 To end this mode select the oven OFF pad for the oven in use CONVECTION BAKE TIPS Most recipes are cooked on rack positions 1 or 2 When a recipe has a two step...

Page 23: ...Crust Fruit scratch I 375 45 to 60 minutes or frozen 2 400 60 minutes Pumpkin scratch 2 350 50 to 60 minutes or frozen 2 400 55 to 60 minutes Meringue toppings 2 350 15 to 20 minutes Nut pies 350 40 t...

Page 24: ...u Will See To Set the CONVECTION ROAST and PROBE Mode Do not preheat Use CONVECTION ROAST when roasting tender cuts of meat or poultry of any size Roast in a low sided pan and uncovered CONVECTION ROA...

Page 25: ...minutes per lb Rack of Lamb 325 1 30 to 35 I35 Med Rare 145 1 to 3 lbs minutes per lb Pork Loin 325 2 32 to 35 160 WeII 170 4 to 6 lbs minutes per lb Shoulder 325 2 32 to 35 160 WeII 170 3 to 5 lbs mi...

Page 26: ...e for the proof mode 3 Select START The oven is preheated when the chime signals once PREHEAT disappears from the display 4 To end this mode select the oven OFF pad for the oven in use PROOFING TIPS K...

Page 27: ...oven is preheated when the chime signals once PREHEAT disappears from the display 4 To end this mode select the oven OFF pad for the oven in use DEHYDRATING TIPS Some foods require as much as 14 to 15...

Page 28: ...n double oven models both ovens can be set independently to operate a timed mode The oven light does not operate during this mode Be sure that the time of day clock is displaying the correct time The...

Page 29: ...ment is also on Opening the door will not cause the heating element to be activated since it will already be on The heating element will remain on while the door is open under this condition 7 To Canc...

Page 30: ...aper towels 3 Remove all utensils 4 Remove oven racks If the oven racks are left in the oven during a self cleaning cycle they will permanently lose their shiny finish and change to a dull dark finish...

Page 31: ...is a reminder that the door must be closed before the SELF CLEAN mode can be set TO DELAYTHE START OFTHE MODE 1 Select OVEN Double ovens only Select once for UPPER oven Select twice for LOWER oven 2...

Page 32: ...he oven is black or white Use the cleaning method in the shaded column if the oven is stainless steel 3 Match the letter with the cleaning method on Page 31 B E D G C D A E G Cleaning Method Blk Wht S...

Page 33: ...lus onto a cloth first then wipe to clean Use Fantastik or Formula 409 to remove grease spatters D Painted Clean with hot sudsy water or apply Fantastik or Formula 409 first to a clean sponge or paper...

Page 34: ...s to clear the indents 4 Pull the hinges out of the slots in the oven front frame To Replace the Oven Door 1 Grasp the sides of the door at the center and in sert the ends of the hinges into the slots...

Page 35: ...owel or facial tissue with the prongs facing down Locate the two prongs in the ceramic holder gently poking until the two prongs locate in the ceramic socket 9 Press down to seat the bulb 10 Snap the...

Page 36: ...the change touch or OFF Do It YourselfMaintenance OvenThermostat The electronic thermostat has been preset to 0 F and accurately maintains its setting If the browning results are too light or too dar...

Page 37: ...ect rack position Pans touching each other or oven walls Food dry or has shrunk Oven temperature too high excessively Baking time too long Oven door opened frequently Pan size too large Food baking or...

Page 38: ...ert the light bulb if loose or defective See Page 33 not work Touching the bulb with your fingers may cause the bulb to burn out quickly Oven light does not work if CLEAN mode is set The oven temperat...

Page 39: ...r Models X302X X272X X301X ThermadorBuilt InOvenWarranty Model Number Serial Number Date of Installation or Occupancy WARRANTY APPLICATIONS This warranty applies to appliances used in normal family ho...

Page 40: ...ecifications or design without notice Some models are certified for use in Canada Thermador is not responsible for products which are transported from the U S for use in Canada Check with your local C...

Reviews: