background image

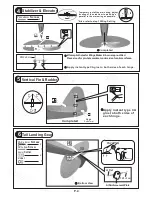
Main Wing

1

P.3

Bottom View

Apply instant type CA glue to both sides of each hinge.

Main Wing

3

Wing Joiner
5x13x82mm

Aileron Servo

2

4

PM2x18mm

 Screw

Ø1mm pilot holes for The Wings

tri-horn are pre-drilled.  Please 

look for pin-hole marks at under side of control surfaces.


 Maker 

Bottom View

PM2x18mm

Pushrod

d2xD4x4mm

Clevis

2mm

Horn

Fuel Tube

Straper

1mm

Ø

1.4x70mm

1mm

Plywood

3x6x12mm

Aileron Servo lead

Please dry fit wing joiner into left and right wing to make sure they fit with 
the proper dihedral angle, mark the wing joiner if necessary.  Apply epoxy 
glue to both sides of all surfaces in contact. Use a stick to apply the glue
to inner side of wing joiner sleeve, and apply the glue to wing joiner before
putting them together. Wing joiner not glued properly will lead to wing failure
and plane crash.

Summary of Contents for Piper J-3 CUB 26

Page 1: ...se injuries Remember safety is the most important thing Always keep this instruction manual at hand for quick reference Warning This model is not a toy Wing Span 48 5 in 1230 mm Wing Area 330 sq in 21...

Page 2: ...ctive or missing parts contact your local dealer Please DRY FIT and check for defects for all parts that will require CA or Epoxy for final assembly Any parts you find to be defective after the gluing...

Page 3: ...SPEED 400 MOTOR 1 set GEAR BOX 1 set PROPELLER 1 pair SPINNER 36mm 1 set COWLING 1 pc DUMMYENGINE COVER 1 pair MOUNT PLATE PL4114015 1 pc SCREW PWA2x8mm 4 pcs WASHER d2xD5mm 1 pc M2 NYLON INSERT LOCK...

Page 4: ...hrod d2xD4x4mm Clevis 2mm Horn Fuel Tube Straper 1mm 1 4x70mm 1mm Plywood 3x6x12mm Aileron Servo lead Please dry fit wing joiner into left and right wing to make sure they fit with the proper dihedral...

Page 5: ...C 6 Rudder Vertical Fin 5 2mm 2 PM2x8mm Screw Stabilizer Main Wing B B Also refer to step 15 Wing Setting Temporary install the main wing adjust leveling of the stabilizer to make it as parallel to th...

Page 6: ...oles for tri horn are pre drilled Please look for pin hole marks at side of control surfaces The Wings Maker P 5 1 4x415mm Pushrod Bottom View 70mm 23mm PM2 x 8mm Clevis Fuel Tube d2xD4x4mm Bottom Vie...

Page 7: ...PAPER BETWEEN THE GEARS AND THEN TIGHTEN THE M2 6X7mm SCREWS REMOVE THE PAPER BEFORE FLYING 1 3 9 2 M2 6 x 7mm PM2 X 10mm 2mm Bottom View 6 M2 Nylon Insert Lock Nut d2xD5mm Washer 4 PM2 x 12mm Top Vie...

Page 8: ...PWA2 X 8mm Radio Equipment 11 15A Speed Controller Battery Double Sided Tape Battery Tie 1 5mm Receiver wrapped up in sponge Straper Elevator Servo Fuel Tube d2xD4x4mm Elevator Pushrod 1 4x415mm Rudde...

Page 9: ...2 d2 6xD7mm Washer 2 PM2 5x25mm d2 6xD7mm Wing Protection PA2 3x8mm 1mm 1mm PA2 6x10mm PVC PLATE 1 5mm M2 NUT Washer d2xD5mm PM2x6mm PA2 6x10mm Screw 2 6mm Collar 4 6 4 4 M2 NUT 4 3mm set screw 2 6mm...

Page 10: ...P 9 Wing Setting 15 A A B B C C A A B B C C Adjust the wing and fuselage configuration as shown in the diagrams...

Page 11: ...er should never fly by himself herself Assistance from experienced flyer is absolutely necessary Pre flight adjustment must be done before flying it is very dangerous to fly a badly pre adjusted aircr...

Page 12: ...GE0160708 THE WINGS MAKER www thewingsmaker com...

Reviews: