background image


- 10 - 

time. After the operation, click the Stop button (Button 6), the instrument 
will stop working. 
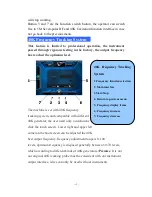
Button  4  and  8  are  the  function  switch  button,  the  operator  can  switch 
free to 5M Seven-polar RF, 5M Five-polar RF, 5M Tri-polar RF function 
interface in case not go back to the previous menu.


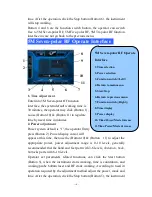
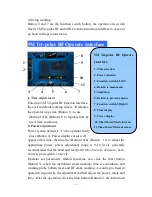
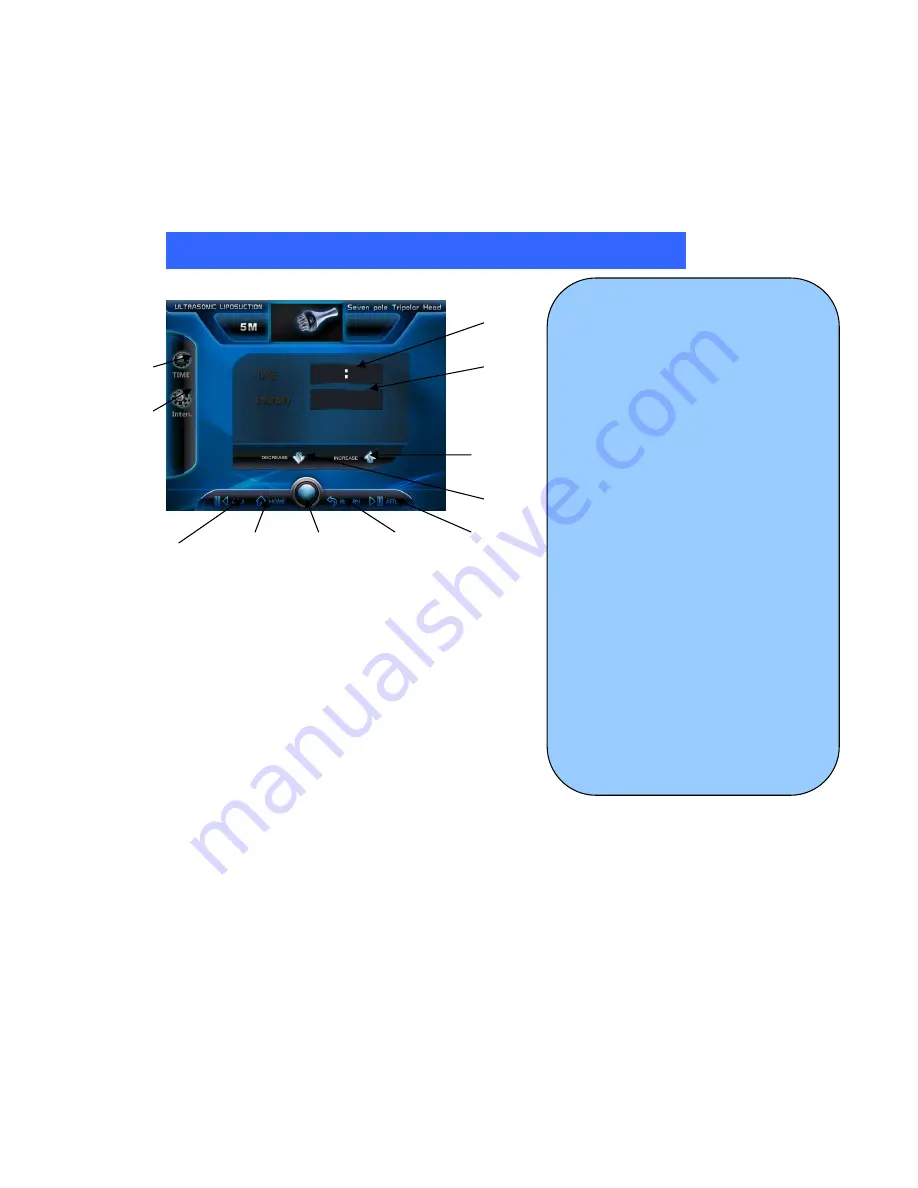
5M Seven-polar RF Operate Interface


                                                              8 

1                                                            9                                   

2                                                             

                                                            10 

                                                              11 


4          5            6            7 


1. 

Time adjustment


Enter into 5M Seven-polar RF function   

interface, the system default working time is   

30 minutes, the operator may click (Button 1) , 

re-use (Button 10) & (Button 11) to regulate   

time by need, time in minutes. 

2. Power 

adjustment


Power system default is "1", the operator firstly   

press (Button 2). Power display cursor will   

appear at this time, then use the (Button 10) & (Button    11) to adjust the 

appropriate  power,  power  adjustment  range  is  0-10  levels,  generally 

recommended that the hand and feet part with 3-6 levels, 

abdomen, back, 

buttocks

 parts with 8-10 levels.   

Operator  set  parameters  related  functions,  can  click  the  Start  button 

(Button  5),  when  the  instrument  starts  working,  time  is  countdown,  and 

working probe 640nm laser and RF starts working. According to need in 

operation required by the adjustment method adjust the power, mode and 

time. After the operation, click the Stop button (Button 5), the instrument 

5M  Seven-polar  RF  Operate 

Interface 

1. Time selection 

2. Power selection 

3. Function switch

Left


4. Return to main menu 

5. Start/Stop 

6. Return to previous menu 

7. Function switch

Right


8. Time display 

9. Power display 

10. Time/Power/Mode increase 

11.Time/Power/Mode decrease 

Summary of Contents for SE-C83

Page 1: ...Evolutionary solution for fat reduction Professional Beauty Equipment SE C83 User Manual Http www SPAelf com...

Page 2: ...invasive Cavitation technology in 2010 which means do on any part of the body for rapid fat soluble by the in vitro ultrasound equipment and body location precision that can dissolve fat thickness to...

Page 3: ...ion phenomenon in the liquid This phenomenon is generated by the momentary pressure Cavitation Technology Cavitation is defined as under the frequency the energy of the sound waves produce many gaps i...

Page 4: ...cantly improved wrinkles sagging eyelids raise up eyes bigger slack jaw has also become tight and shaping the whole body are completely new Find young beautiful face like a decade ago really is not a...

Page 5: ...a relatively low power can be obtained sufficient energy together with the special design of the safety button the entire treatment doubly safe Q Q Q Q What kind of people suitable for 5M Multipolar R...

Page 6: ...eping longer Because a lot of skin problems lies in prevention Cold Laser Weight Loss Techniques By 640nm high energy narrow spectrum red light resulting in a unique photochemical reactions cells quic...

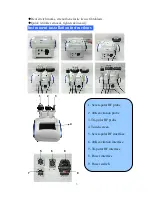
Page 7: ...emoval tighten skin easily Instrument installation instructions 1 2 3 4 5 6 8 7 9 1 Seven polar RF probe 2 40K cavitation probe 3 Tri polar RF probe 4 Touch screen 5 Seven polar RF interface 6 40K cav...

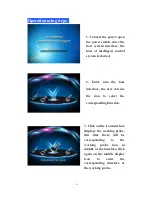
Page 8: ...rted 2 Enter into the host interface the user can use the icon to select the corresponding function 3 Click on the icon interface displays the working probe this time there will be corresponding to th...

Page 9: ...operator click Button 3 by need This mode displays cursor will appear and then use Button12 Button 13 to adjust the appropriate mode 40K mode is divided into pulse wave and continuous wave shallow fa...

Page 10: ...or will appear at this time then use the Button 10 Button 11 to adjust the appropriate power power adjustment range is 0 10 levels generally recommended that the hand and feet part with 3 6 levels abd...

Page 11: ...ton 10 Button 11 to adjust the appropriate power power adjustment range is 0 10 levels generally recommended that the hand and feet part with 3 6 levels abdomen back buttocks parts with 8 10 levels Op...

Page 12: ...system and compatible with different 40K generator the user need only a continuous click the touch screen Lower right and upper left corneron the boot screen can be adjusted the 40K best output freque...

Page 13: ...ith treatment Treatment settings 12 times treatment the former 5 times day once After 7 times do once every 3 days Except during menstruation Warm prompt Abdominal weight loss proper operation time sh...

Page 14: ...ries can be targeted acts on the site of fat accumulation when operation thymus sides and underarms in passing the intensity should not be too large Acting on the back on the zoom position the accessa...

Page 15: ...rated in the hips the best choice to choose the chair with backrest Correct wearing underwear Underwear especially thin triangles can t tightly wrap hip easy to make buttocks sagging and deformation r...

Page 16: ...ed fixed point one hand grasp the arm slid the accessory along the same route to its original position 2 Pushing by above diagonally from one end of the arm and back pushing back at the starting point...

Page 17: ...or subject to the instrument training 2 To avoid thyroid bone lymph when perations 3 Avoid wounds sensitive parts 4 Instrument when not in use turn off the instrument in order to avoid excessive work...

Reviews: