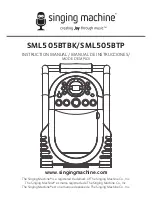
The Singing Machine SML505BT Instruction Manual Download Page 6

— E5 —

Connection

Connecting the Microphone(s)

Microphones:

Connect a microphone into Mic jack 1 

u  

as well as Mic jack 2 

(when desired). 

Note: 

Do not drop or tap the Mic as 

damage to the Mic or speakers may occur. 
Do not twirl the microphone cord as it will 
cause damage to the encased wiring.

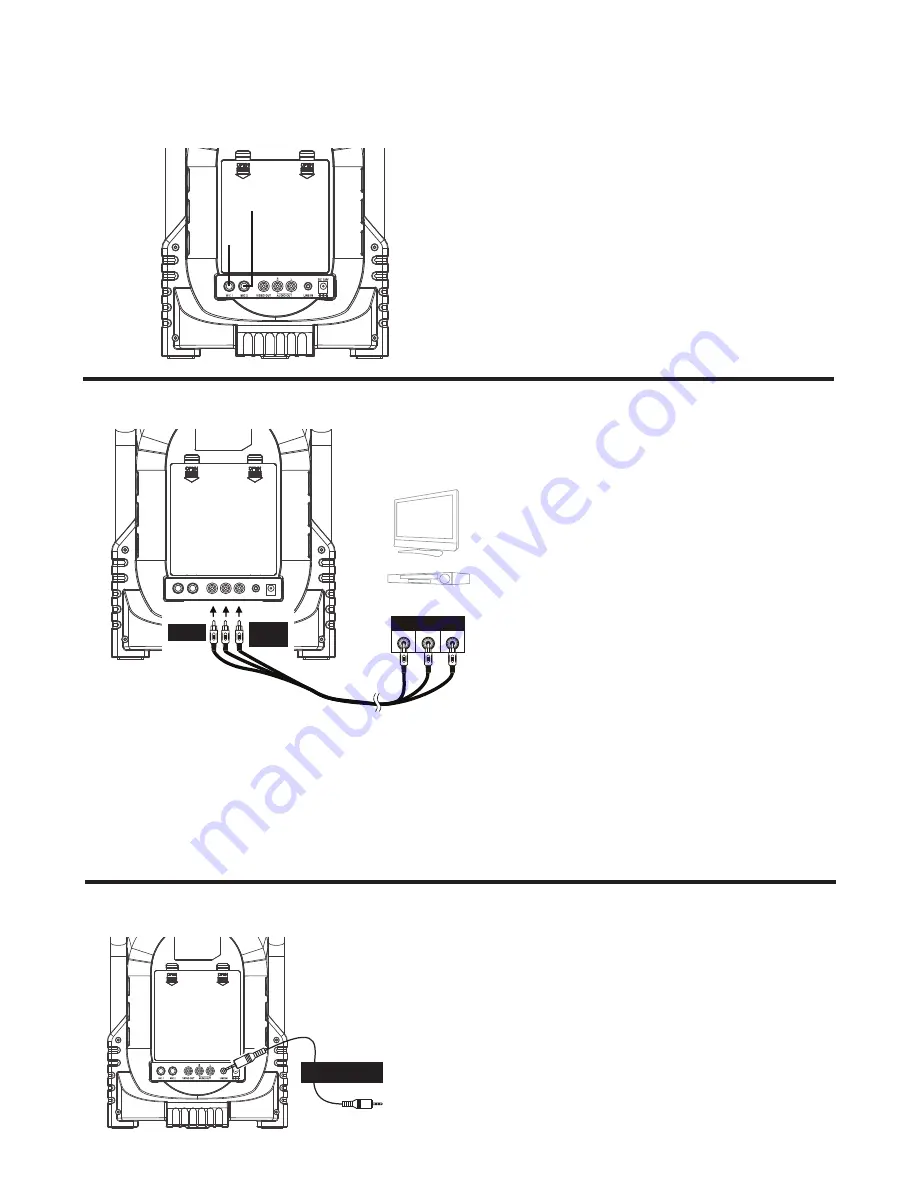
Connecting the Unit to a TV

VIDEO
INPUT

AUDIO
INPUT

R

L

RCA cables

VIDEO OUT

(yellow)

AUDIO OUT

(white - L

red - R)

REAR VIEW OF TV 

OR DVD PLAYER

To output the video, lyrics and audio to 
your TV, perform the following steps: 
Connect the RCA video cable (Yellow) 
to the VIDEO OUT jack and the audio 
cables (White and Red) to the AUDIO 
OUT jacks located on the back of the 
Singing Machine.
Connect the opposite end of the RCA 
video cable (Yellow) to the VIDEO IN 
jack and the audio cables (White and 
Red) to the AUDIO IN on your TV.

Notes: 

•  This unit can be used with or without a TV, but it is highly recommended to use a TV in 

order to utilize all the features.

•  Also refer to the TV’s User Guide. 
•  To see the lyrics on the screen, you must use a CD+G disc files.

u

v

Connecting to Line In Jack

Connect an external device by using an 
appropriate cable (3.5mm audio cable not 
included) as shown.

Note: 

See page E13 to select and use the 

Line In function.

To External Unit

AUDIO OUTPUT

/ HEADPHONE JACK

Summary of Contents for SML505BT

Page 1: ...IONES MODE D EMPLOI www singingmachine com The Singing Machine is a registered trademark of The Singing Machine Co Inc The Singing Machine es marca registrada de The Singing Machine Co Inc The Singing...

Page 2: ...n the literature accompanying this product FCC WARNING This equipment may generate or use radio frequency energy Changes or modi cations to this equipment may cause harmful interference unless the mod...

Page 3: ...E2 Included Please make sure that the following items are included Wired Microphone Main Unit AC Adapter Audio Video Cables Manual Welcome Kit Demo Disc...

Page 4: ...8 Skip 9 Button 9 REPEAT indicator 10 ECHO Control 11 BALANCE Control 12 MASTER VOLUME Control 13 Disco Lights 14 Play indicator 15 Play Pause Button 16 CDG BT indicator 17 Stop PAIR Button 18 Skip B...

Page 5: ...E4 Location of Controls Rear 23 Speaker 24 Battery Door 25 MIC 2 Jack 26 MIC 1 Jack 27 VIDEO OUT Jack 28 AUX OUT Jack R 29 AUX OUT Jack L 30 DC Jack DC 5 8V 31 line in Jack bn bm br bq bs ct ck bo bp...

Page 6: ...le Yellow to the VIDEO OUT jack and the audio cables White and Red to the AUDIO OUT jacks located on the back of the Singing Machine Connect the opposite end of the RCA video cable Yellow to the VIDEO...

Page 7: ...the batteries as indicated in the battery compartment Reversed batteries may cause damage to the device 3 Do not mix different types of batteries together e g Alkaline and Carbon Zinc or old batteries...

Page 8: ...D door Notes What is a CD G A CD G CD Graphics is the standard format for most karaoke discs that will display the words on the screen If no disc is inserted no will appear on the display Never place...

Page 9: ...C VOLUME control as desired Increasing this control will increase the volume of both microphones 8Rotate the ECHO control to add an echo effect to your voice Rotate towards MAX to increase the echo ef...

Page 10: ...ck by pressing the SKIP 9 or SKIP buttons SEARCH When playing any audio CD press and hold the SKIP 9 or SKIP button The CD will search at high speed in the forward or backward direction Normal play wi...

Page 11: ...will appear on the display indicating the first program is ready to program Note Press the STOP PAIR button TWICE to stop and clear the program 14PAUSE During playback if you wish to pause the disc m...

Page 12: ...ings to search for a discoverable device with a Bluetooth signal Select Singing Machine from the device results on the Bluetooth menu Note Also refer to the user manual of your Bluetooth device for de...

Page 13: ...your Bluetooth device 7Connect microphone s and slide the ON OFF switch on the microphone to the ON position 8Adjust the MIC VOLUME control as desired Increasing this control will increase the volume...

Page 14: ...an external unit will allow the audio to be played through your Singing Machine Notes LINE IN function can always be switched ON once the audio cable is plugged It is highly recommended to set the vo...

Page 15: ...as desired Increasing this control will increase the volume of both microphones 6Rotate the ECHO control to add an echo effect to your voice Rotate towards MAX to increase the echo effect 7Adjust the...

Page 16: ...lyrics These are the only files that allow you to view the lyrics on the TV screen Nothing will appear on the TV screen when using Line In No sound from the microphone Make sure the microphone is firm...

Page 17: ...Power DC 5 8V 1 5A Positive Center DC12V 8 x C cell batteries not included Dimensions Main Unit 13 2 x 9 1 x 6 7 inches 33 6 x 23 x 17cm Weight Main Unit 3 3Lbs 1 5kgs Microphone 74 dB 600 Ohms impeda...

Reviews: