background image


TEXI Treccia & Treccia C Matic operation manual 

11. ADJUSTING PRESSER FOOT 


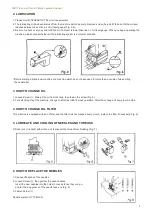
Loosen Screw (1) and adjust Presser Foot (2) left and right to a proper position to let the needle may get into the center of 
Presser Foot ‘s eyelet. After adjusting, tighten screw (1). (Fig. 13) 

12. ADJUSTING STITCH LENGTH 


Stitch length can be adjusted variably in range from 1.2 mm - 4.0 mm, or 6 - 18 stitches per inch. 

1. Keep pressing the push button (A) with your left hand, then turn the hand-wheel with your right hand until your left hand 

finger feels the push button lock in (Fig. 14). 

2. Keep turning hand-wheel for an inquired stitch length, whose scale indicated on the hand-wheel must be aligned with, then 

stop pressing the button (Fig. 15). 

3. Rotate the hand-wheel counter clock-wide to increase the stitch length, and clockwise to decrease. 

4. After adjusting stitch length the differential ratio will usually be changed too. So adjustment of differential ratio is required. 

13. ADJUSTING DIFFERENTIAL FEED RATIO 


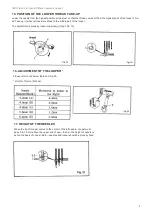
The differential Feed Ratio of this machine is adjustable from 1:0.5 to 1:1.3 (Fig. 16). 

To adjust the ratio, loosen the nut (2), move the indicator (1) up or down. 


* To stitch the cloth, move the indicator (1) upward;


* To gather the cloth, move the indicator (1) upward;


14. ADJUSTING THE PRESSURE OF PRESSER FOOT 


Pressure of the Presser Foot should be as light as possible, so that cloth can be fed and sewed smoothly. 

Summary of Contents for Treccia

Page 1: ...TEXI Treccia Treccia C Matic operation manual Opera on manual High speed interlock sewing machine Treccia Treccia C Ma c...

Page 2: ...TEXI Treccia Treccia C Matic operation manual...

Page 3: ...CE THE NEEDLES 7 THREADING 8 ADJUSTING THREAD TENSION 9 ADJUSTING NEEDLE THREAD TAKE UP 10 LOOPER THREAD TENSION 11 ADJUSTING PRESSER FOOT 12 ADJUSTING STITCH LENGTH 13 ADJUSTING DIFFERENTIAL FEED RAT...

Page 4: ...e machine in the temperature more than 45 C 3 Working The machine doesn t work over 40 C 4 Warning 1 Pay attention to this warning advice as follow a Working area is dangerous b Never touch the needle...

Page 5: ...For extending life of the machine change oil after the initial 4 week operation After that change oil every four months 4 HOW TO CHANGE OIL FILTER This machine is equipped with an oil filter and the...

Page 6: ...horizontal Tip of part a of Needle Thread Take up should be 52mm from the center of screw B To tighten needle thread move Needle Thread Take up A in the direction of Y and to release move it in direc...

Page 7: ...ired stitch length whose scale indicated on the hand wheel must be aligned with then stop pressing the button Fig 15 3 Rotate the hand wheel counter clock wide to increase the stitch length and clockw...

Page 8: ...reaches to the middle part of the looper The adjustment is made by loosening screw j Fig 18 19 16 ADJUSTMENT OF THE LOOPER Please refer to the below table and Fig 20 Only for Treccia flat bed 17 HEIG...

Page 9: ...tween left needle and tip a of thread hooking point When it comes to the extreme left the clearance between the center of the left needle and tip a of thread hooking point should be 4 5 5 5 mm Fig 22...

Page 10: ...OOT SPREAD ER LOOPER NEEDLE TEXI TRECCIA 10011608 10010834 10011466 10011470 10014315 10011662 10012780 UY 128 GAS OPTIONAL GAUGE 6 4 10011266 10011332 10011328 10011327 10014105 TEXI TRECCIA C MATIC...

Page 11: ...9 TEXI Treccia Treccia C Matic operation manual Notes...

Page 12: ...80 Tarnowo Podg rne Poland We declare that the following product High speed interlock sewing machine Model Treccia ZJ2500A 156M VF BD Model Treccia C Matic ZJC2500 156M BD D3 With this declaration rel...

Page 13: ...TEXI Treccia Treccia C Matic operation manual...

Page 14: ...2 TEXI Treccia Treccia C Matic operation manual...

Page 15: ...3 TEXI Treccia Treccia C Matic operation manual...

Page 16: ...TEXI Treccia Treccia C Matic operation manual Dealer...

Reviews: