RAM Modules
3.
Rotate the screwdriver toward the rear of the computer about 30 degrees
until the top left corner of the keyboard loosens and raises about 1/4 inch
(6 mm) above the computer case.
4.
Holding the top left corner of the keyboard above the case with one
hand, insert the screwdriver blade into the center slot (behind the F8
key) and rotate the screwdriver 30 degrees toward the rear to release the
middle catch.
5.
Continue holding the top left corner of the keyboard while inserting the
screwdriver blade into the rightmost slot (behind the Ins key). Then
rotate the screwdriver 30 degrees toward the rear; the keyboard should
now be fully released from the rear catches.
6.
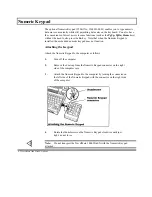
Raise the rear of the keyboard several inches, rotate the rear of the
keyboard 180 degrees toward you, and place the keyboard in front of you
with the keys facing down as shown in the following figure.
Note:
Do not disconnect the cable connecting the keyboard to the computer case.
6-4 TravelMate 3000 WinSX Options
Summary of Contents for TravelMate 3000 WinSX
Page 1: ...Texas Instruments TravelMate 3000 WinSX Notebook Computer User s Manual ...
Page 138: ...Character Sets Code Page 437 United States B 2 Character Sets ...
Page 139: ...Character Sets Code Page 850 MultLingual Character Sets B 3 ...
Page 140: ...Character Sets Code Page 863 Canadian French B 4 Character Sets ...
Page 141: ...Character Sets Code Page 865 Nordic Character Sets B 5 ...
Page 143: ...Keyboard Layouts C 2 Keyboard Layouts ...
Page 144: ...Keyboard Layouts Keyboard Layouts C 3 ...
Page 145: ...Keyboard Layouts C 4 Keyboard Layouts ...
Page 146: ...Keyboard Layouts Keyboard Layouts C 5 ...
Page 205: ...2 Index ...
Page 208: ......
Page 213: ......
Page 217: ...TravelMate 3000 WinSX Notebook Computer Major Components ...
Page 219: ...Manual Part No 2608455 0001 Printed in U S A Texas Instruments ...


