background image

3

Operation

3.1

Running the Software

3.2

Software Features

www.ti.com

Operation

Turn on the input supply voltage.

Move S1 from OFF to ON.

The 16 LEDs now are displaying a default pattern.

This section provides instructions on how to turn on the TLC5944EVM and operate the software.

The user now can run the host computer software and change the LED programming with the easy-to-use
graphical interface.

Click on the TLC594x EVM GUI icon on the host computer to start the software. If no icon appears on the
host computer, then use the start button in the lower left corner of the screen to browse the program
folders to find the software. The default directory for software installation is Program Files\Texas
Instruments\TLC594x EVM GUI Application. The executable file name is TLC594x.exe. Once started, the
software checks the firmware in the DSP board to ensure it is compatible with the software. If the firmware
is not compatible, the software gives the user instructions on how to reprogram it. Once the software is
started and communication is established between the GUI and the EVM, the user can use the graphical
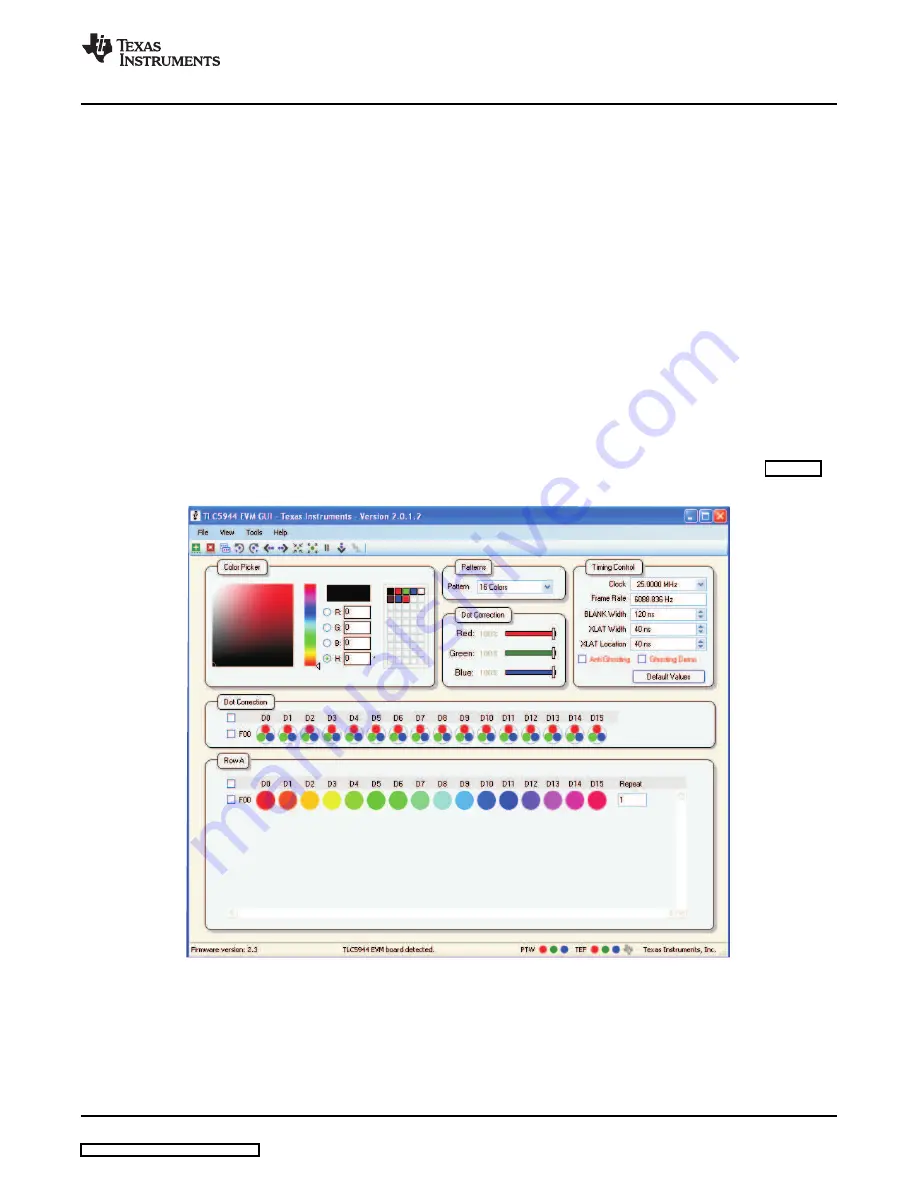
interface to program the LEDs. If the EVM is properly connected, the software screen looks like

Figure 2

when first opened.

Figure 2. TLC5944EVM Software Start-Up Screen

SLVU306 – April 2009

TLC5944EVM-358

7

Submit Documentation Feedback

Summary of Contents for TLC5944EVM-358

Page 1: ...Software Features 7 3 3 Hardware Features 11 4 Schematics Board Layouts and Bill of Materials 12 4 1 Schematics 12 4 2 Board Layouts 19 4 3 Bill of Materials 28 List of Figures 1 Board Connections 3...

Page 2: ...is illuminated because of stray currents flowing through it that are generated by switching the rows of LEDs in and out of the circuit stray board capacitance and mismatches in diode forward voltages...

Page 3: ...D board however the customer may also remove the LED board to drive a custom LED board LED Board The LED board contains two rows of LEDs Row A consists of 16 LEDs each with three individual LEDs in th...

Page 4: ...ug user generated software J5 is not populated or used with the supplied EVM software This is the positive input supply to the EVM The input voltage must be between 5 V and 15 V for normal operation w...

Page 5: ...ustom board to this connector with a standard 30 pin ribbon cable with 0 1 inch pin to pin spacing In order to minimize stray inductance and ringing on the output traces connections to this connector...

Page 6: ...code from changing this application If at any time in the future the binaries are modified the code no longer attempts to run Ensure that S1 is in the OFF position Ensure that the shorting shunt is i...

Page 7: ...he screen to browse the program folders to find the software The default directory for software installation is Program Files Texas Instruments TLC594x EVM GUI Application The executable file name is...

Page 8: ...each LED or select all LEDs by checking the box to the left of the LEDs Then adjust the Dot Correction value The programmed Dot Correction value is used for all frames Dot Correction values can not b...

Page 9: ...w A and Row LEDs The LED Board and Timing Control Settings are optimized to show visible ghosting When the Ghosting Demo is enabled the red LEDs in Row B are visually illuminated even when programmed...

Page 10: ...s the input format for the PWM Grayscale values in the Color Picker and Dot Correction Values between Hex Percentage and Absolute When Solid display mode is chosen the pixel in the LED Frames window s...

Page 11: ...ble to read and display the error signals The GUI can show an error condition for 2 seconds longer than the condition actually exists on the hardware Note that the PTW does not affect device operation...

Page 12: ...hematics Schematics Board Layouts and Bill of Materials www ti com Figure 5 through Figure 11 provides the schematics for the TLC5944EVM 358 and the LEDEVM 249 Figure 5 HPA357A Schematic 1 12 TLC5944E...

Page 13: ...1 1 1 1 1 www ti com Schematics Board Layouts and Bill of Materials Figure 6 HPA357A Schematic 2 SLVU306 April 2009 TLC5944EVM 358 13 Submit Documentation Feedback...

Page 14: ...1 1 Schematics Board Layouts and Bill of Materials www ti com Figure 7 HPA358A Schematic 1 TLC5944EVM 358 14 SLVU306 April 2009 Submit Documentation Feedback...

Page 15: ...www ti com Schematics Board Layouts and Bill of Materials Figure 8 HPA358A Schematic 2 SLVU306 April 2009 TLC5944EVM 358 15 Submit Documentation Feedback...

Page 16: ...Schematics Board Layouts and Bill of Materials www ti com Figure 9 HPA358A Schematic 3 TLC5944EVM 358 16 SLVU306 April 2009 Submit Documentation Feedback...

Page 17: ...www ti com Schematics Board Layouts and Bill of Materials Figure 10 HPA358A Schematic 4 SLVU306 April 2009 TLC5944EVM 358 17 Submit Documentation Feedback...

Page 18: ...Schematics Board Layouts and Bill of Materials www ti com Figure 11 HPA358A Schematic 5 TLC5944EVM 358 18 SLVU306 April 2009 Submit Documentation Feedback...

Page 19: ...his section provides the TLC5944EVM 358 and LEDEVM 357 board layouts and illustrations Figure 12 through Figure 16 show the board layout for the LED driver board HPA357 Figure 12 HPA357A Assembly Laye...

Page 20: ...Schematics Board Layouts and Bill of Materials www ti com Figure 13 HPA357A Top Layer Routing TLC5944EVM 358 20 SLVU306 April 2009 Submit Documentation Feedback...

Page 21: ...www ti com Schematics Board Layouts and Bill of Materials Figure 14 HPA357A Layer 2 Routing SLVU306 April 2009 TLC5944EVM 358 21 Submit Documentation Feedback...

Page 22: ...Schematics Board Layouts and Bill of Materials www ti com Figure 15 HPA357A Layer 3 Routing TLC5944EVM 358 22 SLVU306 April 2009 Submit Documentation Feedback...

Page 23: ...cs Board Layouts and Bill of Materials Figure 16 HPA357A Bottom Layer Routing Figure 17 through Figure 19 show the board layout for the LED board HPA358 SLVU306 April 2009 TLC5944EVM 358 23 Submit Doc...

Page 24: ...Schematics Board Layouts and Bill of Materials www ti com Figure 17 HPA358A Assembly Layer TLC5944EVM 358 24 SLVU306 April 2009 Submit Documentation Feedback...

Page 25: ...www ti com Schematics Board Layouts and Bill of Materials Figure 18 HPA358A Top Layer SLVU306 April 2009 TLC5944EVM 358 25 Submit Documentation Feedback...

Page 26: ...Schematics Board Layouts and Bill of Materials www ti com Figure 19 HPA358A Layer 2 TLC5944EVM 358 26 SLVU306 April 2009 Submit Documentation Feedback...

Page 27: ...www ti com Schematics Board Layouts and Bill of Materials Figure 20 HPA358A Layer 3 SLVU306 April 2009 TLC5944EVM 358 27 Submit Documentation Feedback...

Page 28: ...F Capacitor Ceramic 16V X7R 10 0603 Std Std 0 C9 C10 Open Capacitor Ceramic 16V X7R 10 0603 Std Std 16 D0A D15A Q65110A4184 Diode LED 20mA Common Anode 0 118 0 134 Q65110A4184 Osram 16 D0B D15B LST676...

Page 29: ...8R70J104KA Murata C9 C10 C19 C38 C39 C40 2 C30 C31 2 2 F Capacitor Ceramic 6 3V X5R 10 0805 C2012X5R0J225KT TDK 1 C33 4700pF Capacitor Ceramic 16V X7R 10 0603 GRM188R71C472KA Murata 2 C36 C37 2 2 F Ca...

Page 30: ...551 inch CS12ANW03 NKK 14 TP1 TP2 5000 Test Point Red Thru Hole Color Keyed 0 100 0 100 inch 5000 Keystone TP6 TP8 TP10 TP1 8 4 TP3 TP5 5001 Test Point Black Thru Hole Color Keyed 0 100 0 100 inch 500...

Page 31: ...m flux and all contaminants Use of no clean flux is not acceptable 3 These assemblies must comply with workmanship standards IPC A 610 Class 2 4 Ref designators marked with an asterisk cannot be subst...

Page 32: ...or to handling the product This notice contains important safety information about temperatures and voltages For additional information on TI s environmental and or safety programs please contact the...

Page 33: ...ce TI is not responsible or liable for any such statements TI products are not authorized for use in safety critical applications such as life support where a failure of the TI product would reasonabl...

Reviews: