


Out-of-box
Control your LaunchPad
Control LEDs, read buttons
Control the LaunchPad I/O
signals using the LaunchPad
App
Over-the-Air upgrade
Upgrade your LaunchPad from
the LaunchPad app and enable
your own own upgradable
products
1. Download the LaunchPad iOS or Android app
Download the
Simplelink Starter
app from
App Store or Google Play
2. Connect to the computer or USB power
Connect the LaunchPad using the included USB cable to a computer or USB power supply.
Open the Launchpad app on your phone and press once the Right/BTN-2 button on the
LaunchPad to start advertising Bluetooth Smart data to the phone. The green LED will flash
while advertising. The LaunchPad will show up on the device list in the app, select the
LaunchPad in the device list to connect.
3. The LaunchPad mission control
In the LaunchPad app you can control the LEDs, see the state of the buttons, send data to the
UART, and control the I/O signals on the LaunchPad headers. If you connect an LCD
BoosterPack you can write text to the LCD from the phone.
4. Move LaunchPad mission control to the Cloud
Follow the cloud view link in LaunchPad mission control to connect your LaunchPad to the
cloud view. With the cloud view you can control your LaunchPad from any web browser in
minutes after setting it up. You can control all I/O signals on the LaunchPad header or read
analog inputs from external sources
Simplelink Starter iOS/Android app
Find more information @
dev.ti.com/launchxl-cc2650
0. For rev 1.1 of the LaunchPad only
Go to dev.ti.com/launchxl-cc2650 and upgrade the firmware via
USB before using the LaunchPad with the Simplelink Starter app
Ready to Learn More?
- Documentation
- TI RTOS Drivers
- Bluetooth Smart
Code Examples
- Application Notes
- Design Files
- and more!
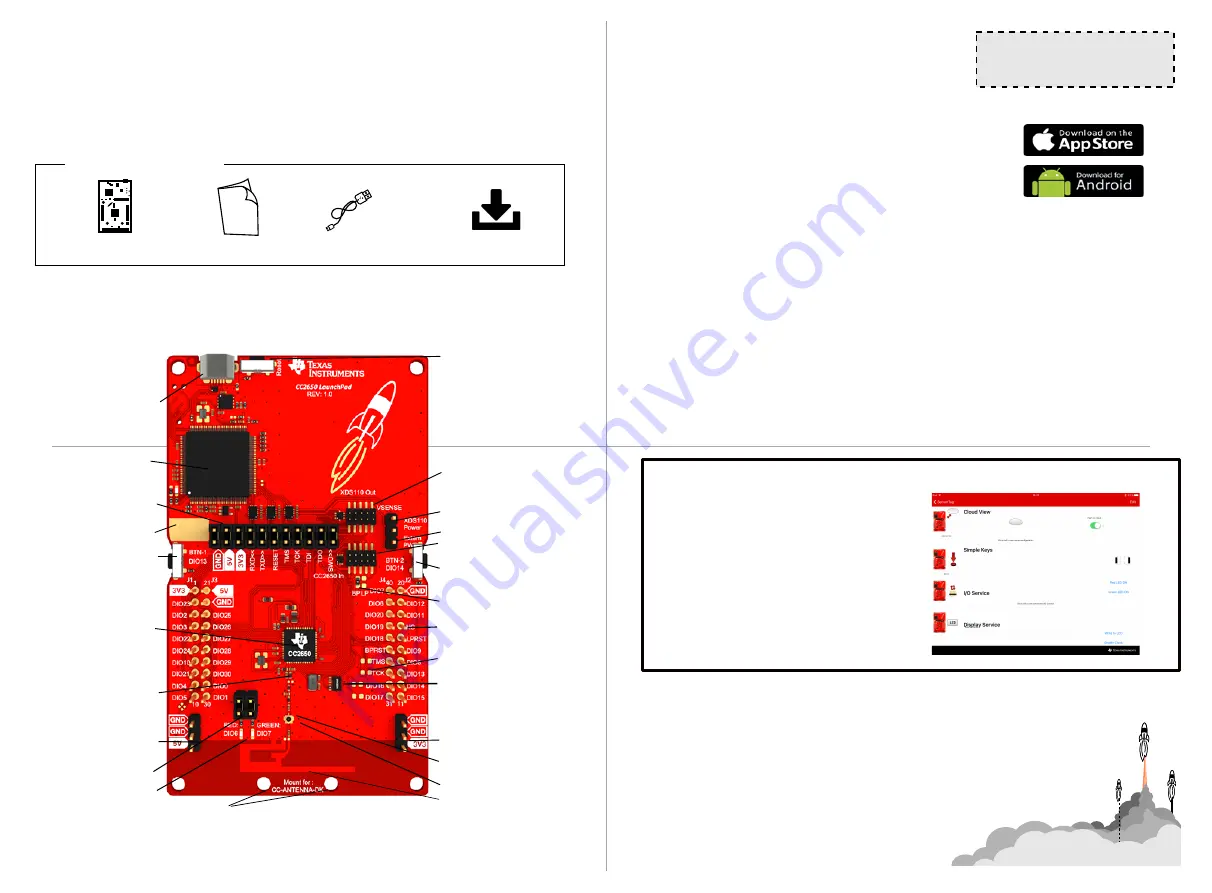
CC2650 Launchpad Overview
{
dev.ti.com/launchxl-cc2650
A closer look
at your new
LaunchPad Development Kit
Featured wireless MCU:
CC2650: Low-power, multi-protocol, 2.4GHz wireless MCU
What's in the box?
QSG
This Quick
Start Guide
CC2650
LaunchPad
Micro-USB
Cable
Software available @
dev.ti.com/launchxl-cc2650
User Button2, Right
Side mounted to allow easy access
with BoosterPacks on top
Jumper for Internal(USB) Power
Jumper for External Power
Use this connector to use XDS110 as
JTAG debugger of external targets
Use this connector to debug CC2650
with an external debugger
Select BoosterPack or LaunchPad reset
signal mode
40-Pin BoosterPack connector
Connector for external 3V power
8Mbit (1MB) Serial flash for data storage
Connector for external antenna
No-cost high performance PCB antenna
Mounting for external antenna
Connector for external 5V power
Red and green LED
Jumpers for LEDs
CC2650 Wireless MCU
Just a few antenna matching components
Solder one resistor here to use external antenna
User Button 1, Left
Side mounted to allow easy access
with BoosterPacks on top
GND pad
Jumpers to isolate debugger from MCU
Power, UART, and JTAG signals
XDS110 debugger
Debug and UART backchannel
Power supply to the target MCU
USB Power/debug and serial port
Get started by plugging the USB cable
Target MCU
Reset button
Optional routing of JTAG signals to
boosterpack header
SWRU451


