background image

   www.ti.com 


CapTIvate™ Touch Getting Started Manual

                                                                                                                        53    

Copyright © 2021, Texas Instruments Incorporated 


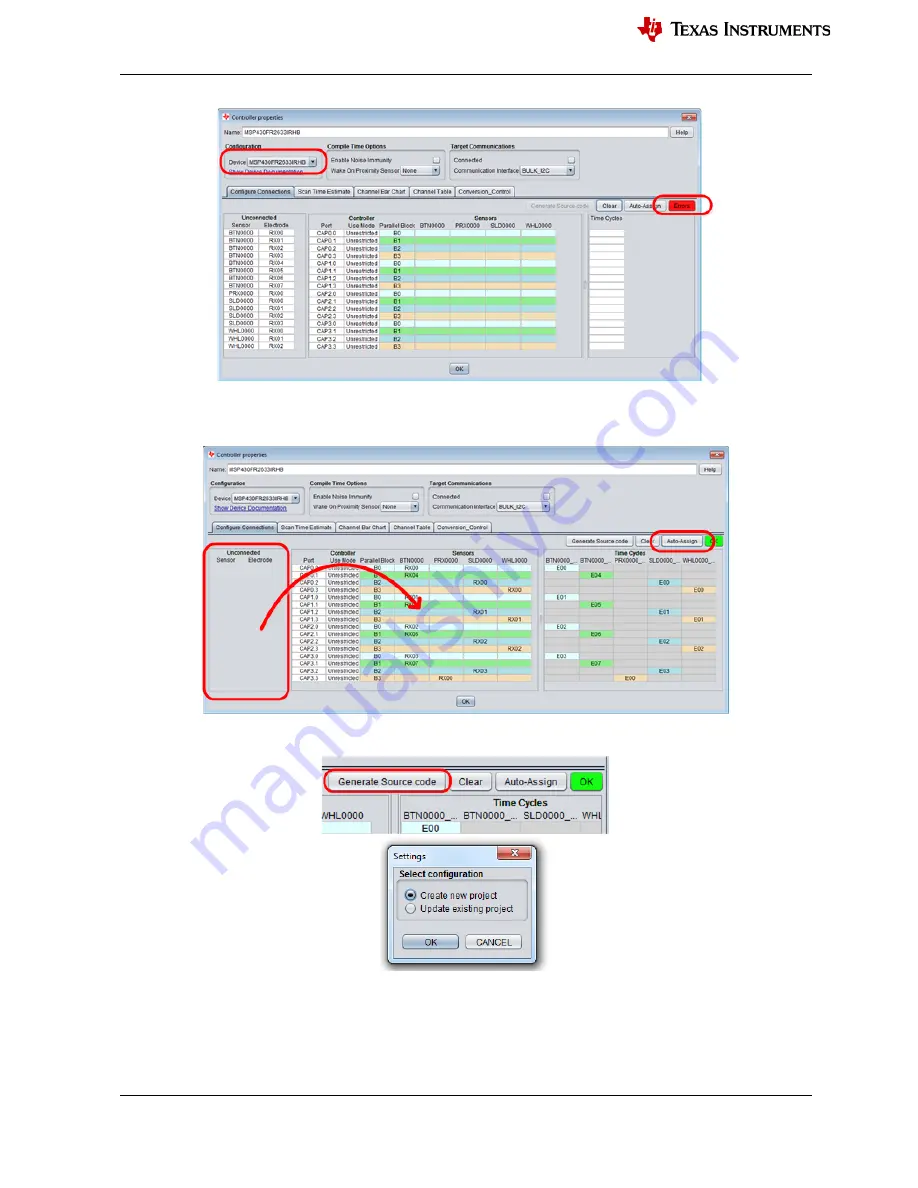
Select the “Auto

-

Assign” button to automatically assign all the sensor ports to appropriate ports on the MSP430. 

Note 

that the “Errors” LED turns green and “OK”, indicating that all sensor ports have been assigned to controller 

ports. 


12.


Generate source code 


Saving the source code on default location of 

CapTIvate™ Design Center 

is recommended. 

Summary of Contents for CapTIvate Touch

Page 1: ...www ti com CapTIvate Touch Getting Started Manual 1 Copyright 2021 Texas Instruments Incorporated CapTIvate Touch Getting Started Manual ...

Page 2: ...or FRAM GUI Graphical user interface IDE Integrated development environment BSL Bootloader JTAG JTAG named after the Joint Test ActI On Group is an industry standard for verifying designs testing printed circuit boards programming and debugging after manufacture SBW 2 wire Spy Bi Wire interface a typical JTAG interface for MSP430 MSP Mixed Signal Processor NVM Nonvolatile memory Reference Manual C...

Page 3: ...ment board selection and evaluation 13 4 Mechanical structure and hardware design 15 4 1 Mechanical structure design 15 4 1 1 Cover layer design 15 4 1 2 Sensor structure selection 15 4 1 2 1 Copper clad sensor PCB 16 4 1 2 2 Conductive washer spring type sensor 16 4 1 2 3 Electronic ink type sensor 16 4 1 3 Mechanical design checklist 16 4 2 Hardware design 17 4 2 1 Schematic design 17 4 2 2 PCB ...

Page 4: ... 3 Sensitivity parameter adjustment 30 5 3 4 System reliability parameter adjustment 30 5 3 5 Response speed and power assumption adjustment 31 5 4 Phase 4 Modify communication mode 32 5 5 Phase 5 Develop custom applications 32 5 5 1 Program structure 32 5 5 2 Capacitive touch status and parameter reading and processing 33 5 5 3 Realization and customization of communication function 34 5 5 4 Boot...

Page 5: ... scroll wheels sliders and touch panels and a variety of covering materials It has the characteristics of low power consumption strong and stable induction technology strong anti noise ability and support for waterproof function This document is written according to the actual capacitive touch development process also to help users quickly understand the full picture of TI CapTIvate capacitive tou...

Page 6: ... consumption please refer to the datasheet of the relevant device Rx In mutual capacitance mode or self capacitance mode the pin electrode responsible for charging from the parasitic capacitance to the internal reference capacitance of the MCU Tx In mutual capacitance or self capacitance mode the pin electrode responsible for charging the parasitic capacitance ...

Page 7: ...ion detecting the capacitance value between two electrodes 2 1 Self capacitive detection Figure 2 2 Self capacitive detection Taking the simplest single button as an example the detection schematic diagram of the self inductive capacitor is shown in Figure 2 2 and the detection model is shown in Figure 2 3 The self inductive capacitor uses a single electrode receiving electrode Rx formed by copper...

Page 8: ...overlay ε0 Air dielectric constant εr The dielectric constant of the overlay It can be seen from formulas 1 2 and 1 3 that the methods to improve the sensitivity are 1 Reduce the thickness of the cover plate to increase the 𝜀𝑟 and 𝐶𝑡 2 Reduce the density of the grid ground or increase the PCB s Thickness to reduce 𝐶𝑝 3 Since 𝐶𝑡 is of the same order of magnitude as 𝐶𝑔 connect the power ground to th...

Page 9: ...ease instead when the finger cannot cover Tx and Rx at the same time Generally speaking for self inductance and mutual inductance capacitance detection the capacitance change caused by a finger touch is about 1pF But the base capacitance of self inductance capacitance value before touch generally reaches several hundred pF While for mutual capacitive it is about tens of pF Therefore the sensitivit...

Page 10: ...l the voltage on both sides of 𝐶𝑠𝑎𝑚𝑝𝑙𝑒 reaches the trigger voltage 𝑉𝑡𝑟𝑖𝑝 of the internal comparator The number of charge transfers required to reach the threshold directly characterizes the size of 𝐶𝑒𝑞𝑢𝑎𝑙 When the capacitive sensor is touched by a human hand 𝐶𝑒𝑞𝑢𝑎𝑙 and charge transfer number will change The MCU senses the occurrence of a touch event by comparing the numbers of different charge tra...

Page 11: ...ial The button is also surrounded by a grounded copper clad separated by a ring gap Each button needs to occupy 1 MCU CAP I O pin Figure 3 1 Self capacitive button PCB diagram Mutual capacitive button In applications that require a large number of buttons capacitive sensors can be arranged in a matrix each button will be connected to two CAP I Os and one CAP I O will be connected to a row or colum...

Page 12: ...eginning and the end of the slider should be connected together by wires and belong to the same button For self capacitive sliders and scroll wheels at least 3 CAP I Os are occupied The resolution range of the sliders or scroll wheels supported by the software is 3 to 65535 The actual number of CAP I O occupied and the selected resolution must be adjusted according to actual needs Figure 3 4 Self ...

Page 13: ...n1 focuses on cost performance while the second generation product Gen2 has more abundant peripherals and stronger CapTIvate module performance The specific differences are shown in Table 3 2 Table 3 2 Comparison of Gen1 and Gen2 Features Gen1 device Gen2 device Advantages Electrode charging voltage VREG power supply 1 5V VREG power supply 1 5V DVCC power supply 2 7 3 6V Will affect the charging a...

Page 14: ...ons or to evaluate MSP430FR2522 o EVM430 CAPMINI is only used to evaluate specific 4 self inductive button schemes or to evaluate MSP430FR2512 Sensor board An evaluation board containing various sensors o CAPTIVATE BSWP is used to evaluate TI s self inductive solutions o CAPTIVATE PHONE is used to evaluate TI s mutual capacitive solutions For other CapTIvate related materials including instruction...

Page 15: ...c constant of covering material Material 𝜀𝑟 Air 1 00059 Glass 4 10 Sapphire glass 9 11 Mica 4 8 Nylon 3 Plexiglas 3 4 Polyethylene 2 2 Polystyrene 2 56 Polyethylene terephthalate PET 3 7 FR4 Fiberglass Epoxy 4 2 PMMA polymethyl methacrylate 2 6 4 For panels stacked from different materials the touch capacitance can be calculated equivalently according to the following formula 𝐶 𝜀𝑟𝜀0 𝐴 𝑑 𝐴𝜀0 𝜀𝑟𝑖 𝑑𝑖...

Page 16: ...nce the film resistance of electronic printing ink is larger than that of copper the series resistance needs to be appropriately reduced 4 1 3 Mechanical design checklist There are three main aspects of the mechanical structure that will affect the touch sensitivity coating housing and surrounding devices The unreasonable coating design mainly affects the capacitance change caused by finger touch ...

Page 17: ...d between the series resistance on the RX pin and the sensor electrode 7 TVS diode Add a 3 3V TVS tube with low leakage and low parasitic capacitance between the CAP I O series resistance and the electrode Add a general TVS tube to the power supply and external connection line 8 Common mode inductors magnetic beads Add common mode inductance and magnetic beads to the power supply as needed 9 other...

Page 18: ...nd grid copper The button is placed on the top layer of the PCB and the ground copper is 0 5 times the thickness of the cover layer of the button 2 Button mutual capacitance Shape Square or round inner Rx outer Tx Size Outer diameter side length is 10mm and 12mm RX width is 0 5mm Tx width is 1mm and the distance between Rx and Tx is 0 5mm Distance to grid copper The button is placed on the top lay...

Page 19: ...reduce the parasitic capacitance change caused by water Mutual capacitive scheme reference Liquid Tolerant Capacitive Touch Buttonpad Reference Design In terms of sensitivity buttons and slider wheels with a width similar to a finger touch and narrower and shorter sensor traces can enhance the capacitance change caused by touch Fewer vias and thinner copper can reduce the size of the capacitance t...

Page 20: ...an be roughly divided into five parts as shown in Figure 5 1 From the perspective of development time software tuning takes the longest time This chapter will be expanded in sequence with these 5 phases Figure 5 1 Software design process 5 1 Concepts required for CapTIvate software development Before entering the various stages of development I will first introduce several important concepts of Ca...

Page 21: ...Cap Peripheral will wake up the CPU to scan the sensor again and so on Figure 5 3 MCU status in Active mode The Wake on Prox mode mainly uses the Cap peripheral s ability to work out of the CPU and achieves lower power consumption than the Active mode by turning off the CPU for a long time Since no CPU is involved it means that the Cap peripheral register configuration cannot be changed so there c...

Page 22: ...sed by the touch and the filterCount and LTA is shown in Equation 5 3 For self capacitance detection Delta is a positive value and for mutual capacitance detection Delta is a negative value 𝐷𝑒𝑙𝑡𝑎 filterCount LTA 5 1 𝐶 𝛼 Gain filterCount 5 2 𝐶𝑡𝑜𝑢𝑐ℎ 𝐶𝑡𝑜𝑢𝑐ℎ 𝐶𝑏𝑎𝑠𝑒 𝛼 Gain 1 LTA Delta 1 LTA 5 3 The entire signal change process is when power is on the calibration function will calibrate the equivalent va...

Page 23: ...The object structure in CapTIvate There are four types of objects in CapTIvate Top Level Sensor Cycle and Element Figure 5 6 shows the parent child relationship between different structures and also gives the object name structure name and actual naming Top Level is used to describe the working mode of MCU It belongs to the abstract concept of MCU It corresponds to the MCU widget in the GUI and th...

Page 24: ...mount of low level information which is generally used for online parameter adjustment The UART communication module occupies about 1 5k of code and the BUCK_I2C communication occupies about 2k of code Register_I2C It is used to communicate with Host MCU through I2C to realize Host MCU s adjustment of capacitive touch parameters There are fewer debugging commands supported occupying about 1 4k of ...

Page 25: ... None Object Selection Sensors Drag the MCU widget and the required sensor widget to the design canvas None 5 1 7 Sensor widget configuration MCU widget and sensor widget are the two most important parts of the GUI covering functions such as code generation online parameter adjustment and sensor signal monitoring First we introduce the configuration required for the sensor widget as shown in Figur...

Page 26: ...nsor belongs that is how many buttons it occupies None Electrode config In the mutual capacitive mode select the corresponding TX and RX according to the actual number of rows and columns designed None Configure Tx Rx Groups Used to understand the TX and RX occupied by each virtual Element and map virtual buttons to virtual pins None 5 1 8 MCU widget configuration The MCU widget interface is shown...

Page 27: ...consumes less power in Wake on Prox mode Can be unenabled After enabling the timing clock source is VLO clock the timing error is relatively large No 3 Communication Interface Choose UART or BUCK_I2C to communicate with GUI according to actual design None Please refer to section 4 2 1 of this manual for the communication pins and IRQ PIN used No 4 Configure Connections According to the actual butt...

Page 28: ...ide for specific methods of downloading projects If there is a problem that cannot be imported please check whether there is a project with the same name under the CCS workspace For IAR please make sure to download the latest version to support all capacitive touch related MSP430 If you download it for the first time you need to wait about 10 20 minutes 5 3 Phase 3 Adjustment parameters The most i...

Page 29: ...he HID Bridge UART I2C is connected correctly Figure 5 12 Online tuning button Table 5 4 Description of the buttons for online tuning Number Button Function Description 1 Force Recalibration Mandatory system calibration used when the button function is not normal 2 Apply Transfer the parameters on the GUI to the MCU 3 Read Read the current relevant parameters in the MCU 4 Reset Reset the touch par...

Page 30: ...ify the noise while amplifying the touch signal In the end it only increases the resolution of the system but the signal to noise ratio itself does not change Since a larger gain will increase the conversion time it is not recommended to adjust the gain of the entire system too high The functions involved in this part are shown in Table 5 6 and the numbers in the selection boxes correspond to thos...

Page 31: ...valent Count value of the capacitor Default value The threshold value of the absolute change of the touch signal can prevent the negative signal change problem caused by touch power on Counter Filter Beta Set the strength of IIR filtering for the equivalent Count value of the capacitor 1 3 Too much assembly affects the response speed LTA Filter Beta Set the strength of IIR filtering for LTA 7 It i...

Page 32: ...er consumption which can be used to measure and display the power consumption of an application including software and hardware The software part is integrated in CCS and IAR Home page EnergyTrace Technology User guide ULP Advisor Software and EnergyTrace Technology 5 4 Phase 4 Modify communication mode After debugging the capacitive touch parameters the next step is to use other host computers to...

Page 33: ...Guide C ti msp CapTIvateDesignCenter_x xx xx xx CapTIvateDesignCenter docs api_guide Table 5 10 Important functions Number Contents Comment 1 WDTCTL WDTPW WDTHOLD Ban watchdog 2 BSP_configureMCU Configure the communication IO pin configure the clock 3 __bis_SR_register GIE Enable global interrupt 4 CAPT_appStart Capacitive touch module initialization and calibration while enabling communication pe...

Page 34: ...the processing button can be realized through the callback function of the Sensor For specific instructions please refer to Register a callback function For examples of custom projects please refer to the CCS IAR routines corresponding to EVM430 CAPMINI EVM430 CAPMINI Demo 5 5 3 Realization and customization of communication function It is recommended to use the provided UART and I2C library funct...

Page 35: ...after the I2C write operation is completed As shown in Figure 5 16 delete other codes and add custom frame processing functions Figure 5 16 CAPT_I2CRegisterReceiveHandler function modification o Step 2 Write a custom frame processing function As shown in Figure 5 17 MSP430 will read a byte sent by the host then modify the first byte of the data segment in the Buffer and then wait for the host to a...

Page 36: ...dule enables the Timer peripheral Modify the assignment of FUNCTIONTIMER__ENABLE in CapTIvate COMM FunctionTimer h Used for timeout function in I2C communication 5 Timeout function of I2C communication Modify the assignment of I2CSLAVE__TIMEOUT_ENABLE in Captivate COMM I2CSlave_Definitions h Modify the assignment of I2CSLAVE__TXFR_TIMEOUT_CYCLES in Captivate COMM I2CSlave_Definitions h By default ...

Page 37: ...pillars to characterize the lower limit of sensitivity At this time each test button should not respond to touch signals The thickness of the specific copper pillars needs to be designed according to the actual sensitivity requirements In small batch production the recommended burning software is Uniflash and the burning tool is eZ FET or MSP FET UniFlash UniFlash is a programming GUI tool develop...

Page 38: ...ows user how to install CCS and the CapTIvate Design Center step by step how to quickly evaluate the EVM board provided by TI and how to quickly develop your own applications system 6 1 CCS installation 1 Install Code Composer Studio CCS Integrated Development Environment IDE Project page CCS IDE for MSP430 2 Select the single file installer or the on demand installer for CCS IDE according to your...

Page 39: ...www ti com CapTIvate Touch Getting Started Manual 39 Copyright 2021 Texas Instruments Incorporated 5 Select MSP430 ultra low power MCUs 6 The installation is completed ...

Page 40: ...ht 2020 Texas Instruments Incorporated 6 2 CapTIvate Design Center GUI installation Note Please install corresponding Java JDK before CapTIvate Design Center installation 1 Install CapTIvate Design Center Product page CapTIvate Design Center 2 Start installation ...

Page 41: ...www ti com CapTIvate Touch Getting Started Manual 41 Copyright 2021 Texas Instruments Incorporated 3 Keeping the default installation directory is recommended 4 Installation is completed ...

Page 42: ...IVATE FR2633 CAPTIVATE BSWP Self mode button Wheel slider Proximity CAPTIVATE PHONE Mutual mode button Wheel slider Proximity BOOSTXL CAPKEYPAD FR2522 12 mutual mode buttons and 1 proximity EVM430 CAPMINI FR2512 4 self mode buttons 2 CAPTIVATE PGMR programmer Programmer product page CAPTIVATE PGMR programmer interface definition Power pins 3 3V METERED and 3 3V LDO Notes METERED pin is used for En...

Page 43: ...oard MCU board product page 4 CAPTIVATE BSWP Capacitive touch self capacitance button slider wheel and proximity sensor demonstration board Capacitive touch demonstration board product page 6 4 Rapid evaluation When the CapTIvate Design Center is installed and the hardware validation platform is ready we can import and open the example project insides of CapTIvate Design Center on CCS to evaluate ...

Page 44: ...d 1 Open CCS 2 Import CCS project Select Project Import CCS Projects 3 Select MSP provided capacitive touch example project on CapTIvate Design Center default folder The direction is C Users Username CapTIvateDesignCenter_x_xx_xx_xx CapTIvateDesignCenterWorkspace TI_Examples FR2676_ CAPTIVATE BSWP ...

Page 45: ...tive touch example project Click debug button on CCS IDE It may take a long time on the first compilation so please be patient Click the run button and stop button Then you may need to plug the power supply in again 5 Select and import the capacitive touch example project according to the capacitive touch demonstration board adopted ...

Page 46: ...xas Instruments Incorporated 6 Connect CapTIvate Design Center with the hardware board system 7 Evaluate the capacitive touch features White color indicates no signal triggering yellow color indicates proximity sensing triggering and green color indicates touch triggering ...

Page 47: ...e chapter 5 3 of this manual for further instructions and descriptions 6 5 Rapid development Before users develop their own hardware board users can rapidly create the project configure touch capabilities parameter and start validation or simple development based on the MSP hardware validation platform and CapTIvate Design Center 1 Create the new project on CapTIvate Design Center 2 Place a slider...

Page 48: ...www ti com 48 CapTIvate Touch Getting Started Manual Copyright 2020 Texas Instruments Incorporated 3 Configure the slider sensor on properties dialog 4 Place a wheel sensor in the design area ...

Page 49: ...ww ti com CapTIvate Touch Getting Started Manual 49 Copyright 2021 Texas Instruments Incorporated 5 Configure the wheel sensor on properties dialog 6 Place a button group keypad sensor in the design area ...

Page 50: ...www ti com 50 CapTIvate Touch Getting Started Manual Copyright 2020 Texas Instruments Incorporated 7 Configure the button group sensor on properties dialog 8 Place a proximity sensor in the design area ...

Page 51: ...www ti com CapTIvate Touch Getting Started Manual 51 Copyright 2021 Texas Instruments Incorporated 9 Configure the proximity sensor on properties dialog 10 Select and place the MSP430 controller ...

Page 52: ... Connect sensors to MSP430 capacitive touch I O ports Double click on the MSP430 controller object in the design area to display its properties Configure the MSP430 controller as MSP430FR2633IRHB 32 pin QFN package Note that the Errors LED is red indicating that there are still unconnected sensor ports ...

Page 53: ...ssign button to automatically assign all the sensor ports to appropriate ports on the MSP430 Note that the Errors LED turns green and OK indicating that all sensor ports have been assigned to controller ports 12 Generate source code Saving the source code on default location of CapTIvate Design Center is recommended ...

Page 54: ...chapter 6 4 the project generated after adjusting the parameters on CapTIvate Design Center is imported into CCS to add system functionality Note If the CCS icon is grayed out there is a project with the same name in the workspace or CCS directory Note for saving code size code compilation optimization selects the highest level It is recommended that Optimization be turned off during actual develo...

Reviews: