background image

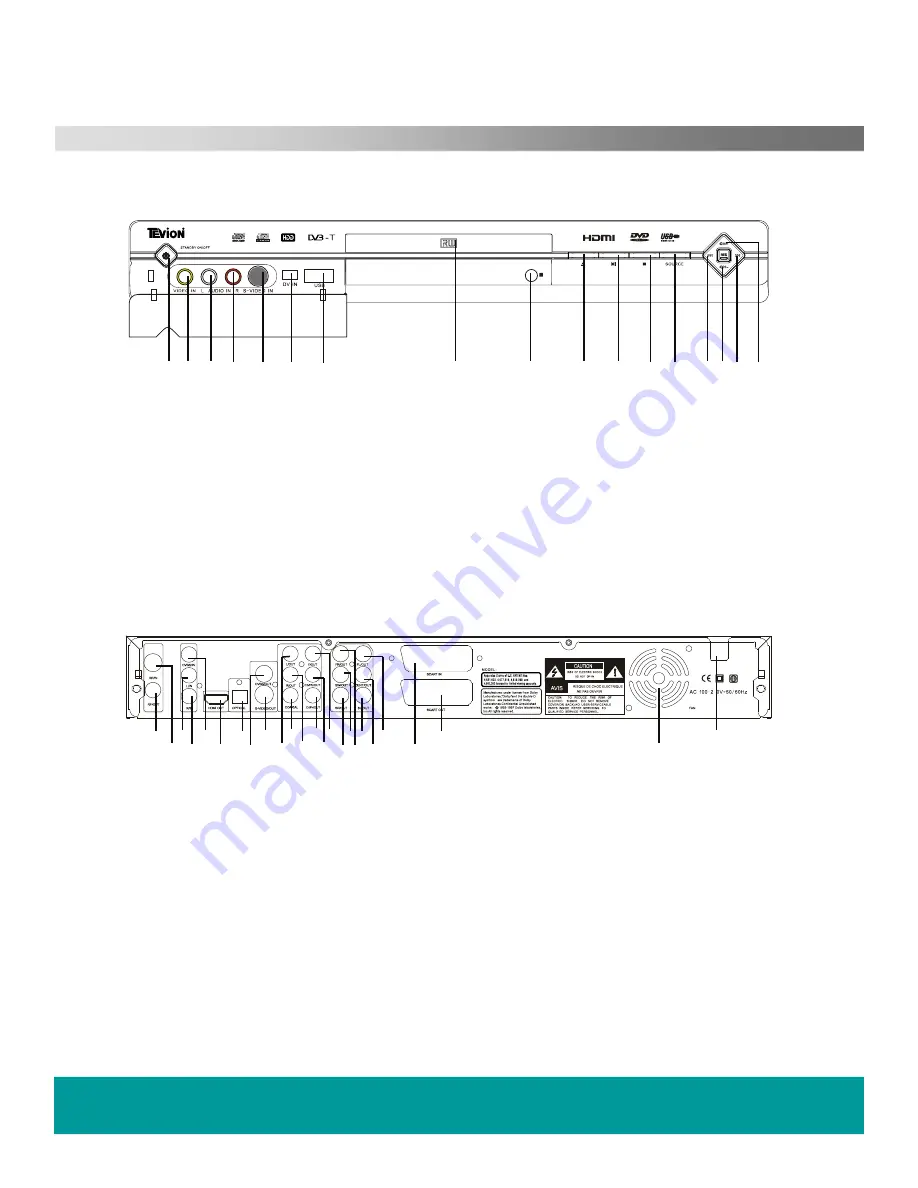
Controls and Connections

Front view

1. Standby

2. Video input

3. Audio input (Left)

4. Audio input (Right)

5. S-Video input

6. DV input

7.USB input

8. DVD disc tray

9. Remote Control sensor

10. Open / Close

11. Play / Pause

12. Stop

13. Input Source

14. Previous

15. Channel –

16. Next

17. C

Rear view

1. Tuner RF input

2. Tuner RF output (Loop through)

3. Video input (CVBS)

4. Audio input Left

5. Audio input Right

6. HDMI output

7. Optical output (PCMI)

8. Video output (CVBS)

9. S-Video output

10. Mixed Audio output Left

11. Digital Audio output (Coaxial)

12. Mixed Audio output Right

13. Cr / Pr output

14. Cb / Pb output

15. Y (Luma) output

16. Surround output Left

17. Surround output Centre

18. Front output Left

19. Surround output Right

20. Sub Woofer output

21. Front output Right

22. Scart input

23. Scart output

24. Ventilation fan

25. AC Mains input

HELPLINE No UK / Northern Ireland  01422 26 32 98.  Rep . Ireland No 1800 88 23 90.
WEB SUPPORT. www.ekey.co.uk
Model number 4683

1 2 3 4 5 6 7

8

9

10 11 12 13 141516 17

1

2

3

4

5

6

7

8

9

10

11

12    14

15

16

17

18

19

20

21

22

24

25

23

ASW8411AHD-160

4

2

13

Summary of Contents for 4683

Page 1: ......

Page 2: ...on to external apparatus 10 11 Getting Started 13 12 Initial Setup 14 13 DVD HDD USB Playback Basic 16 14 DVD HDD USB Record Basic 18 15 Instant Recording 20 16 DVD HDD USB Operation Advanced 21 17 Setup 35 18 TV operation Advanced 31 19 Trouble Shooting Guide 38 20 Specification 39 21 Warranty HELPLINE No UK Northern Ireland 01422 26 32 98 Rep Ireland No 1800 88 23 90 WEB SUPPORT www ekey co uk M...

Page 3: ... are manufactured to the highest standards of performance and safety and as part of our philosophy of customer service and satisfaction are backed by our comprehensive 3 Yeat warranty Please fill in and return the Warranty Card to the address provided We hope you will enjoy using your purchase for years to come HELPLINE No UK Northern Ireland 01422 26 32 98 Rep Ireland No 1800 88 23 90 WEB SUPPORT...

Page 4: ...ld waste and recycle it responsibly to promote the sustainable reuse of material resources Household users should contact either the retailer where you purchased the product or their local government office for details of where and how you can take this item for environmentally safe re cycling Business users should contact their supplier and check the terms and conditions of the purchase contract ...

Page 5: ... such as vases candles or other objects which may spill into the recorder Ventilation and Heat Sources Do not place material over the ventilation slots this will cause the recorder to overheat and fail Do not place the recorder in direct sunlight or near heat sources such as radiators or fires Moisture Do not place the recorder in wet or damp conditions such as steamy kitchens basements or other d...

Page 6: ...stream audio output High quality YCbCr output supporting future display devices Support physical format discs USB storage devices U_disc etc Available media DVD Video DVD Audio VCD CD MP3 MP4 KODAK PICTURE CD This DHR is capable of playing the following types of discs Type Dimension Recording Time Content Remark 12cm 8cm 12cm 8cm 12cm 8cm Single Sided Double Sided 80min Double Sided 160min 74min 2...

Page 7: ...he window on the receiver is not covered or obstacles are placed in the line of sight Bright sunshine or fluorescent light may affect the reliability Replace the batteries when the operation becomes intermittent or a reduction in operating range Battery Safety Do not leave old or exhausted batteries in the handset If not using the handset for a long period remove the batteries Do not mix battery t...

Page 8: ...er 6 Pause play 8 Previous track chapter 10 Stop 12 Next track chapter 14 Play 16 Select Enter 18 Navigate Right 20 Switch 22 Record Quality 24 Return 26 Edit 28 Chapter 30 Display 32 SubTitle Radio 34 Repeat 36 Goto 38 Volume 40 P Scan 42 Volume 43 Slow Remote Control HELPLINE No UK Northern Ireland 01422 26 32 98 Rep Ireland No 1800 88 23 90 WEB SUPPORT www ekey co uk Model number 4683 1 3 5 7 2...

Page 9: ...8 Video output CVBS 9 S Video output 10 Mixed Audio output Left 11 Digital Audio output Coaxial 12 Mixed Audio output Right 13 Cr Pr output 14 Cb Pb output 15 Y Luma output 16 Surround output Left 17 Surround output Centre 18 Front output Left 19 Surround output Right 20 Sub Woofer output 21 Front output Right 22 Scart input 23 Scart output 24 Ventilation fan 25 AC Mains input HELPLINE No UK North...

Page 10: ... Timer is set 6 Record Displays when Recording 7 Photo Displays when a photo disc is playing 8 Time Display Displays time played and messages to user 9 Chapter Displays the chapter number playing 10 R W denotes type of disc Recordable or Read write 11 DVD Displays a DVD disc is playing HELPLINE No UK Northern Ireland 01422 26 32 98 Rep Ireland No 1800 88 23 90 WEB SUPPORT www ekey co uk Model numb...

Page 11: ... S VIDEO connection do not use the Yellow CVBS video input Alternative AV connections VCR or DVD player Controls and Connections HELPLINE No UK Northern Ireland 01422 26 32 98 Rep Ireland No 1800 88 23 90 WEB SUPPORT www ekey co uk Model number 4683 SCART IN SCART OUT ...

Page 12: ...Do not select Progressive scan if your TV cannot display progressive video Connections to 5 1Ch Audio Amplifier Amplifier 5 1Ch audio inputs Controls and Connections HELPLINE No UK Northern Ireland 01422 26 32 98 Rep Ireland No 1800 88 23 90 WEB SUPPORT www ekey co uk Model number 4683 ...

Page 13: ...nections to DV and USB USB memory pod DV USB DV connection from Camcorder Note When you use the USB port to import signals you need to press mode first then select USB IN Controls and Connections HELPLINE No UK Northern Ireland 01422 26 32 98 Rep Ireland No 1800 88 23 90 WEB SUPPORT www ekey co uk Model number 4683 ...

Page 14: ...rations of the recorder It is wise not to add extra items such as HiFi amplifiers etc until you know the recorder is working as expected If you wish to add items such as Hi Fi amplifiers add one item at once and ensure it is working before adding another item Switching on Connect to a suitable mains supply 110 240V AC 50 60 Hz The recorder will take approx 30 seconds before the digital display lig...

Page 15: ...tup Press the SETUP button and using the buttons select Setup Fig 1 Press SELECT Digital Tv Using the buttons select Digital TV Fig 2 Press SELECT Fig 2 Setup NO DISC Remain 00 00 00 SP Select setup option 01 01 2008 12 00 00 AM System Playing A V Set Recording TV Tuner Digital TV DTV Channel Area Setting Area Scan Manual Scan System Menu Select one of the buttons ...

Page 16: ...s SELECT and a star will appear adjacent to the country selected Press the button to return to the centre sub menu Area Scan Using the button select Area Scan Fig 4 Press SELECT and the recorder will begin to search for Digital TV stations Tuning Completed When the tuning is completed a display similar to Fig 5 will be displayed The recorder will now revert to one of the stored channels Installati...

Page 17: ...ters press the button Each press will advance the chapters by one To Skip backwards one or more chapters press the button Each press will reverse the chapters by one Press the button to pause play To restart press the button Press the MENU button to display the disc s menu HDD Playback To select HDD playback press the SWITCH button on the remote control This will activate the menu Fig 6 Use Move t...

Page 18: ... the sub menu Fig 11 Use the buttons to move around the files displayed Press SELECT to play the file All the functions buttons have the same effect as DVD playback when playing files from USB Play Pause Stop Next Chapter and Previous Chapter will select the Next and Previous files Fig 10 Fig 11 DVD HDD and USB Record Basic General There are numerous options when recording it is best to decide wha...

Page 19: ...e normal setting To select the type of recording DVD or MPEG4 press REC FORMAT on the remote control Each time the REC button is pressed 30 minutes is added to the recording time up to 360 minutes may be recorded providing there is space on the disc To stop the recording press Stop Timer Recording To set the recorder to record a programme s when you are not able to set Quick Record you may use the...

Page 20: ...Q SEP SLP EP LP To move from box to box press SELECT To move in a box press then press SELECT To Move backwards press RETURN RETURN SELECT If the timer is set correctly the recorder will revert to the TV picture If there is an error the message will be shown as below Re enter the Timer menu and set correctly If you select DVD and there is no disc or the disc is full the same message is shown Fig 1...

Page 21: ...lity The final menu is GO Press SELECT and the recording will start If you have made a mistake press the RETURN button to return to the previous menu s in turn Fig 14 TV DISC 1 SP GO VR next NO DISC Remain 00 00 00 HQ Source ENTER Select recording source RETURN Previous Instant Recording Target Quality Mode RIGHT LEFT RIGHT buttons to select the USB HDD or USB as LEFT record ing target use LEFT an...

Page 22: ...e Move the cursor using the navigation buttons and when complete press SELECT The disc is now permanently named unless it is an erasable disc PROTECT To enable you to LOCK the disc contents select PROTECT Fig 20 This feature will stop data from being added if it s a R disc if it is a RW disc it will be locked until it is erased FINALIZE R discs only To enable you to play your recorded disc on anot...

Page 23: ...es so that when one file has completed playing the next will start playing without the need to select it DELETE ALL CHAPTER MARKS Fig 26 If the recording is longer that 10 minutes chapters are automatically inserted To remove these select this function and press SELECT The Chapter Marks will then be deleted PLAY FULL TITLE Fig 27 Select the file to be played and press SELECT DUBBING Fig 28 This is...

Page 24: ...SELECT SET INDEX PICTURE Fig 35 You can select which picture is to be displayed on the menu as the Root picture Start the disc playing and when you see a suitable picture press SELECT The disc will now be updated and the new picture shown as the Title picture HIDE UNHIDE CHAPTER Fig 36 You may wish to hide a chapter due to being unsuitable viewing select the chapter and press SELECT the chapter wi...

Page 25: ...visible file structure When a disc is inserted a Header bar at the top of the screen is displayed CD Disc Track playing Number of Repeat Mute Time played Track length tracks on disc Play CD ROM Picture disc This format will automatically start to play from picture 1 To select a picture press GOTO The top of the screen will display as Fig 37 CDROM Disc Picture playing Number of pictures on disc To ...

Page 26: ...ack use the navigation buttons and SELECT to start the track playing You may also use direct number entry to select a track and press SELECT to confirm JPEG Fig 40 The file structure is similar to WMA and MP3 systems If the disc has more than one directory Left of screen you must use the navigation buttons to select the directory required and press SELECT This will open that directory and the file...

Page 27: ...ve a Repeat capability Each press of the Repeat button will allow repeating of Directory File Track or Off Below is a list of disc types and the repeat functions DVD Chapter Title Off SVCD VCD CD CD G WMA MP3 JPEG MP4 Track Disc Off Slow In DVD and VCD SVCD playing modes you may slow the action using the SLOW button Each press slows the movement as follows 1 3 1 5 1 6 1 7 Full speed P Scan This al...

Page 28: ...s in various languages depending on the title To select the subtitle press the button and a subtitle header will be shown showing the language Press the button until the title you require is shown To turn off the subtitles press again until SUBTITLE OFF is displayed Audio DVD SVCD Most DVD s have more than one soundtrack To select a different soundtrack language press the Audio button Press again ...

Page 29: ...ng is longer that 10 minutes chapters are automatically inserted To remove these select this function and press SELECT The Chapter Marks will then be deleted PLAY FULL TITLE Fig 46 Select the file to be played and press SELECT DELETE ALL Fig 47 To delete all titles select the function and press SELECT There is NO WARNING with this function so be sure you want to delete all files before pressing SE...

Page 30: ... select the file to be deleted as described above Select DELETE and press SELECT There is NO WARNING with this function so be sure you want to delete this file COPY Fig 52 You may copy any file from the USB to either HDD or DVD Select the file you want to copy Select Copy in the menu and press SELECT You will be asked to choose a destination either HDD or DVD Use the navigation buttons to select a...

Page 31: ...l recorded time the recorder will exit Time Shift To exit Time Shift press the STOP button once the recorder will then Record in real time To stop the recording fully press the STOP button again Method 2 Time Shift without Title Generation i e not stored on HDD Press SOURCE to select TV or DVT Select the programme you wish to record Press PAUSE to enter the Time Shift mode You have now entered the...

Page 32: ...ct a time format from the list by pressing UP DOWN LEFT RIGHT and then SELECT In the time M Month D Date Y Year 12 12 Hr Time AM PM Time 24 24 Hr Time use ARROW key to adjust the system date use ARROW key to adjust the system time then press SELECT TV System Sys Language Seven system language selections for the UI display English German Spanish French Time Format format there is 6 format like M_D_...

Page 33: ... the disc level and your need Notes YCbCr Choose it if the unit is connected to your TV set with YCbCr video cable RGB Choose it if the unit is connected to your TV set through SCART out jack P SCAN Choose it if the unit is connected to your TV set with YPbPr video cable and the TV set is in the progressive scan mode SELECT restriction level Before setting the restriction level you will be asked t...

Page 34: ...e recorder connects to a power amplifier via coaxial or optical jacks For a Dolby Digital DTS or MPEG disc the output data from the recorder will be the corresponding raw digital data Of course the connected amplifier should be capable of decoding Dolby Digital DTS or MPEG OFF Disable the SPDIF Output function No data will be outputted from coaxial or optical jacks In this item three options are i...

Page 35: ...tart scan Tuning station TV Tuner TV Signal Auto Tuning Channel Set enter the following interface in which you can Manual Tuning Fig 58 Fig 57 Channel Number Aotive Fine Tune Audio Format Swap Channel Channel Name Manual Tune 1 Yes o PAL 1 1 Start Setup NO DISC Remain 00 00 00 SP ENTER select RETURN exit Select setup option 01 01 2008 12 00 00 AM System Playing A V Set Recording TV Tuner Digital T...

Page 36: ...ontinue as above The correct channel locations are BBC1 1 BBC2 2 ITV1 3 Channel 4 4 Five 5 Active This feature allows the user to Hide any channel tuned Select the channel you wish to hide using the Channel Number box Select ACTIVE and to hide switch the status to NO using the buttons The selected channel will now not be accessed by the CH CH buttons but still can be selected with the numeric butt...

Page 37: ...ed a password to view You may also unlock any channel providing the password is used To exit this menu press RETURN Radio Editing This has all the same functions as TV Editing and will not be repeated here Program Guide Fig 66 Select Program Guide and press SELECT See Fig 66 The coloured buttons provide Daily Red Weekly Green and Extended Yellow information You may use the EPG to set quick record ...

Page 38: ...ng Press SELECT to start a search When the search is complete the recorder will return to one of the signals received in that channel multiplex Teletext MHEG5 DVBt only To view Teletext press the Audio Text button on the remote control The main picture is shrunk to a smaller picture on the left side of the screen The teletext menu is displayed on the right Use the buttons to select the subject you...

Page 39: ... Disc damaged or dirty Clean dirty disc dispose of cracked or broken disc Picture unstable on playback Distortion due to other connections Connect the recorder directly to TV not via other items DVD Not starting playback Disc incorrectly placed Ensure disc is placed with label side up Dirty or damaged disc Clean dirty disc dispose of cracked or broken disc Menu on screen Turn menu off with SETUP b...

Page 40: ...HELPLINE No UK Northern Ireland 01422 26 32 98 Rep Ireland No 1800 88 23 90 WEB SUPPORT www ekey co uk Model number 4683 Specifications GB 500 160 ...

Page 41: ...m you purchased the unit This warranty is subject to the following provisions The warranty is only valid within the boundaries of the country of purchase The product must be correctly installed and operated in accordance with the instructions contained in these operating instructions It must be used solely for domestic purposes The warranty does not cover accidental damage or misuse The warranty w...

Reviews: