EN
Operation and Storage Manual of Panel Heater
13
English
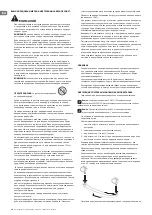
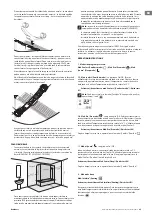
installed at the two sides ends of the panel heater in a symmetrical
manner – at the same distance from the sides ends of the panel heater.
For installation purposes – all panel heaters have got two 2x2 openings.
• Mount the first foot – by inserting first the higher part of the foot into the
panel heater (you should stand opposite of the face of the panel heater)
– the part is lower than the front metal panel. Then you should take a
Phillips screw-driver (not included in the product set) and screw in the two
3.5x9,5mm securing screws. The screw goes through the plastic foot and
gets screwed into place in the metal body of the panel heater. You should
repeat the same operation for the second foot.
• The joint is secure in case the panel heater stands upright on the floor after
its feet installation has been completed.
• Do not use the power cord as a pulling rope in order to move the panel
heater; any movement of the panel heater should be done when it is cold.
Grasp by hand the upper metal part of the appliance and by directing it
you should move it to the desired new location)!
• Position the panel heater with installed feet on the floor and before
connecting it to the power socket check if all instructions from the
very beginning of this manual have been followed correctly (Important
instructions and safety measures). The correct position is – the control
panel should be at the top of the appliance and the feet – on the floor (If
there are castor wheels installed – they should be on the floor)!
BATHROOM OPERATION
• The panel heater must be installed in accordance with the normal trade
practices and in compliance with the national legislation (EU electricity
directives and regulations concerning special installations and places of
operation including bathrooms, shower cabins HD60364-7-701(IEC 60364-
7-701:2006)).
•
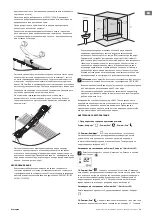
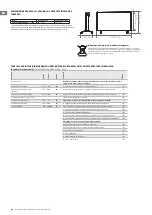
In case this panel heater is to be used in a bathroom or other similar room,
the following installation requirements must be observed: the panel heater
is with IP24 protection (water drops protection). Hence it can be installed in
“Volume 2” (see the diagram below) in order to avoid the risk of the control
board (power switch and thermo regulator) being reached by a person who
is in a shower or a bathtub. The minimum distance between the appliance
and a water source should be not less than 1 meter and it is compulsory the
appliance to be wall-mounted! If you do not feel sure about the installation
of this panel heater in a bathroom, we recommend you to consult a
professional electrician.
Note
: If the above-mentioned instructions cannot be implemented, it is
recommended to install the appliance in “VOLUME 3”.
• In wet premises the power source must be installed at a height of at least
25 cm above the floor (bathrooms and kitchens).
•
The installation must be equipped with a safety fuse, and the distance
between the fuse contacts in disconnected condition should be at least 3 mm.
Thank you for choosing CN052 panel heater. This is a product providing
heating in winter depending on the consumers’ needs for comfortable room
temperature. If operated and taken care of properly in accordance with these
instructions, the appliance will provide you with many years of useful operation.
OPERATION INSTRUCTIONS
1. Predefined functions:
Comfort mode
; Eco mode
; Sleep mode
1.1. Comfort mode
-
with On/Off option - allows the user to set a desired
temperature when being at home. After once set it and the function is
switched On, the appliance will keep the same room temperature each time of
usage. This temperature to be set at 23°C by default.
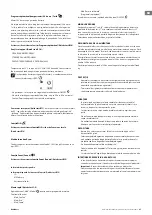
Activation and deactivation of Comfort mode - /Quick start A1/
When the convector is in „Heating mode„ ,sign „sun„
appears on
the
display.
1.2. Eco mode
- with On/Off option - allows the user to set a desired
temperature when being out of home. After once set it and the function is
switched On, the appliance will keep the same room temperature each time of
usage. This temperature will be set at 18°C by default. User could also set the
time when the appliance to switch to Comfort mode.
Activation and deactivation of Eco mode - /Quick start A2/
When the set time has elapse, the appliance going to Comfort mode
!
1.3. Sleep mode
with On/Off option – two hours after activation, the
convector decreases the set temperature with -3°C under the set temperature
in Comfort mode. User could set the time range for operating in Sleep mode
then the appliance switches to Comfort mode. By default: 6 hours.
Activation and deactivation of Sleep mode - /Quick start A3/
When the set time has elapse, the appliance going to Comfort mode!
2.
Basic modes
“Heating” mode
Activation and deactivation of Heating mode - /Quick start B1/
The set temperature is indicating in the right. If the room temperature is lower
than the set one, the heater will switch automatically on, and a heating sign
will appear on the display.
Temperature adjustment
By pushing any of the buttons:
or
the user enters “Temperature
adjustment” mode and the user can change the temperature settings in
the desired direction. The new settings are saved and the heater goes
automatically into “Heating” mode
. If any of
or
buttons get
pressed longer than 0.5 sec., the temperature settings will start automatically
increase or decrease at a rate of 6 units per second. The range of available
temperature settings is from 10 up to 30 degrees.


