5
OPERATION INSTRUCTION
Before using
Chopping
• Remove all packaging materials, from your chopper
• Clean your chopper thoroughly before using for the first time.
WARNING!
Do not immerse the Main body(Motor section) in water or any liquids. This may
cause electric shock or damage the appliance.
1. Place the bowl on a clean, dry, level surface.
2. Plug the power cord into the electrical outlet.
3. To start the appliance, press on the switch, in order to obtain a better quality of chopping, operate
the appliance by using the pulse method. If the ingredients stick to the side of the small jar, stop the
appliance, remove the main body and the Splash cover of bowl. Use a spatula to dislodge the pieces
and then replace the Splash cover of small jar and the main body. Continue processing.
4. For more efficient chopping it is recommended that the bowl should not be filled with more than
600ml.
5. Hold the bowl while depressing the switch button to ensure the unit stays in place.
6. Make sure that the blades have stopped completely before removing the Splash cover of bowl
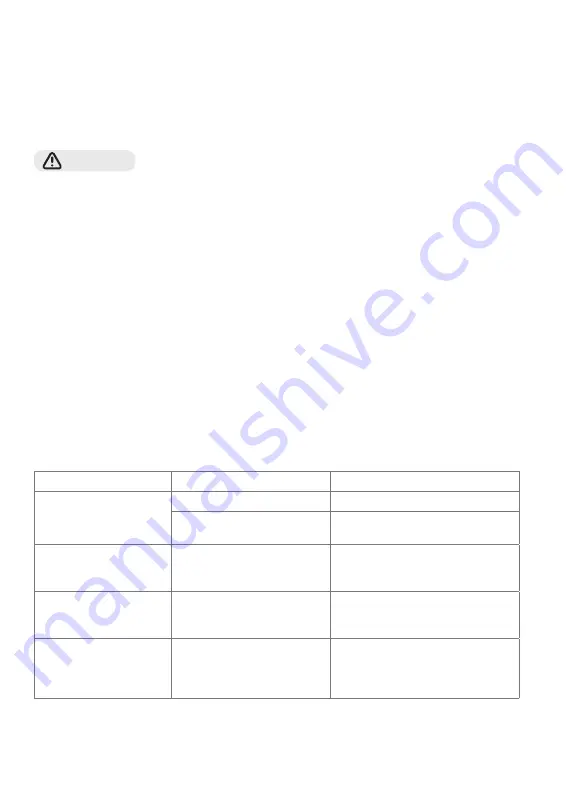
TROUBLE SHOOTING
BEFORE YOU CALL FOR SERVICE REVIEW THE TROUBLE SHOOTING TIPS FIRST.
Problem
Possible Causes
What To Do
Motor doesn’t start or
blade don’t rotate
Machine not plugged in
Check the machine is plugged in
Incorrect assembly
Reassemble the machine according to
the instructions
Food is unevenly chopped
Either you are chopping too
much food at one time or the
pieces are not small enough.
Try cutting the food into small pieces
of even size and processing smaller
amounts per batch
Food is chopped too fine
or is too watery
The food has been over
processed
Use brief pulses or process for shorter
time. Let blades stop completely
between pulses
Food collects on Splash
cover, lid or on the sides
of the jar
You may be processing too
much food
Turn the machine off. When the blades
stop rotating, remove the main body
and connect of the jar. Remove some
of the food being processed.
Summary of Contents for FC302W
Page 1: ...FOOD CHOPPER FC302W User Manual ENG HR BG GR BIH CG HU MK RO SLO SRB...
Page 2: ......
Page 11: ...11 1 2 3 4 5 6 7 8 9 10 11 12 13 14 1 15 16 17 18 BG...
Page 12: ...12 1 3 10 5 10 2x2 cm 4 5 5 10 2x2cm 1 2 5 10 2x2cm 1 3 5 10 2x2cm...
Page 13: ...13 1 2 3 4 600 ml 5 6...
Page 14: ...14 AC 220V 240V 50Hz 60Hz 400W...
Page 15: ...15 1 2 3 4 5 6 7 8 9 off 10 11 12 13 14 1 15 16 17 18 GR...
Page 16: ...16 1 3 10 5 10 2x2cm 4 5 5 10 2X2cm 1 2 5 10 2X2cm 1 3 5 10 2X2cm...
Page 17: ...17 1 2 3 pulse Splash Splash 4 600ml 5 6 Splash Splash...
Page 18: ...18 AC 220V 240V 50Hz 60Hz 400W...
Page 27: ...27 1 2 3 4 5 6 7 8 9 10 11 12 13 1 14 15 16 17 50 MK...
Page 28: ...28 1 3 10 2x2cm 4 5 5 10 2X2cm 1 2 5 10 2X2cm 1 3 5 10 2X2cm a...
Page 29: ...29 1 2 3 4 600 ml 5 6 s...
Page 30: ...30 AC 220V 240V 50Hz 60Hz 400W...
Page 43: ......
Page 44: ...tesla info...


