background image

55

6

HI/LOW

ON/OFF

FACE

BODY

HI/LOW

ON/OFF

FACE

BODY

4

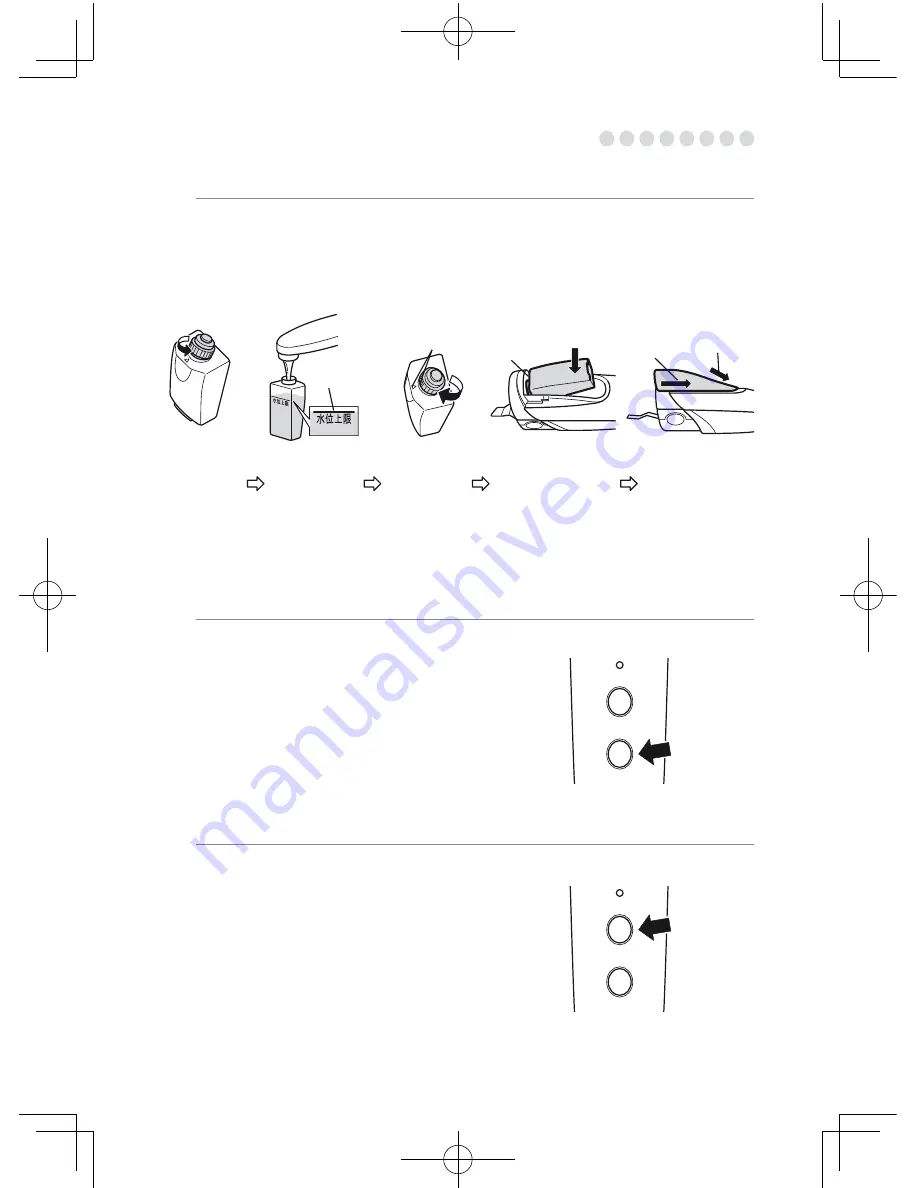
Remove the water tank cap. Then, fill the tank with purified or tap water up to 

the upper limit of the water level. Tighten the water tank cap firmly. Then, wipe 

droplets off the tank before loading it into the body.

  If your skin is wet or you do not use the mist function, you can use the appliance without putting water into the 

water tank.  

Note that without water in the tank, pressing the Mist button during peeling does not enable misting.

  No water other than purified or tap water must be used.

Turn the water 

tank cap 

counterclockwise 

to remove it.

Put water into the 

water tank.

Turn the water 

tank cap 

clockwise to 

reinstall it.

Load the water tank into 

the body in the order of 

 and then 

.

Reinstall the water 

tank cap on the 

body.

Up to here

With the marks aligned, 

insert the water tank 

cap into the water tank.

Press this down

5

Press and hold down the Power switch to turn on 

the power.

  The appliance emits a short beep [pit] and recognizes the installed 

head, causing the head indicator lamp to light up.

  The power is turned off automatically about 10 min after pressing 

the Power switch.

  If you have installed the head on the body with the head inserting 

block filled with water, pressing and holding down the Power switch 

may be unable to turn on the power owing to action of the safety 

device.

6

Select the peeling strength by pressing the 

Changeover switch.

The HI/LOW mode is toggled each time the switch 

is pressed.

Preset to "LOW" as the mode that immediately 

follows the startup.

HI: Blue   LOW: Green

  At the beginning of use, "LOW" should be set to use the appliance 

for a short time.

  Stop using the appliance if you experience any discomfort.

Slide

Press the 

Power switch.

Press the 

Changeover 

switch.

How to Use

Summary of Contents for TE210

Page 1: ...ngeover switch Green lamp lights up Head indicator lamp Green lamp lights up Lights up according to the inserting head status Pressing the switch again turns off the power Changeover switch Changes th...

Page 2: ...on exchanger resin Changes even hard tap water into soft water BODY head Body cap Attached to keep the body Subcap Attached to keep the FACE or BODY head separate Spatula FACE head List of Voltages an...

Page 3: ...d body The standard time for charging is approx 5 hours The body and power adapter may become slightly hot this does not indicate a failure A battery fully charged once enables the appliance to operat...

Page 4: ...red This appliance must not be used on any of the following regions Failure to follow these instructions may result in accident or injury A region that has beeen subjected to cosmetic surgery Eye ball...

Page 5: ...et hands or with the head faced toward your face may result in injury due to the spatula tip When removing the head do not hold the spatula Failure to follow these instructions may result in failure o...

Page 6: ...ody Up to here With the marks aligned insert the water tank cap into the water tank Press this down 5Press and hold down the Power switch to turn on the power The appliance emits a short beep pit and...

Page 7: ...eing transformed into mist In this case wipe away the droplets once before use While holding down the Mist button the spatula vibration stops This does not indicate a failure As a guide for sliding mo...

Page 8: ...he spatula gently placed on the skin slowly slide it from bottom to top While using the appliance you will hear a continuous metallic sound keeeeen this does not indicate a failure Face lines Cheeks J...

Page 9: ...When you turn on the Power switch make sure that the head indicator lamp BODY is on By pressing the Mist button spray mist will moisten your skin Take care to prevent the spatula tip from touching th...

Page 10: ...ck clean them reinstall the head in the initial position and press the Power switch to restore to normal operation Cleaning Make sure that the power is off and the power adapter has been removed Then...

Reviews: