background image

6


Read all the instructions before using the worklight

To reduce the risk of injury, close supervision is necessary when used near children.
Do not use outdoors.

Before use, ensure that the power outlet you are using matches the plug on your power tool 
and that the voltage of the outlet matches that of your power tool.
Only use grounded extension cords with power tools fitted with 3 pin plugs and if using 
outdoors ensure any extension cord is suitable for outdoor use.
Always try to avoid body contact with grounded surfaces, such as radiators, cooking ranges 
and any other fixed appliance with metal surfaces.
Do not expose your power tool to wet or damp conditions and NEVER use in rain.
Check regularly the power cord of your machine and any extension cord that you are using 
for damage.
Do not carry or pull the machine with the power cord.
Ensure the cord is clear from hot surfaces, oil or sharp objects.

Safety rules for battery worklights

Under extreme usage or temperature conditions, battery leakage may occur. If 
liquid comes in contact with your skin, wash immediately with soap and water. If liquid gets 
in your eyes, flush them with clean water for at least 10 minutes, then seek immediate 
medical attention.
Batteries can explode in the presence of a source of ignition, such as a pilot light. 
To reduce the risk of serious personal injury, never use any cordless product in the presence 
of open flame. An exploded battery can propel debris and chemicals and cause serious 
injuries.

Do not crush, drop or damage battery pack. Do not use a battery pack or charger that has
been dropped or received a sharp blow.
 A damaged battery is subject to explosion. Properly 
dispose of a damaged battery immediately. Failure to heed this warning can result in serious 
personal injury.

Electrical safety

Summary of Contents for T12VFL

Page 1: ...12V Li ion Torch Light T12VFL User Manual Please read and retain for future reference IMPORTANT Read all instructions before use...

Page 2: ...intenance Warranty 1 No Description 1 Cover 9 Host connector holder 2 Lens 10 Left cover 3 Reflector for LED 11 battery pack 4 PCB for LED 12 Cross pan heat screw 5 Cross pan head screw 13 Right cover...

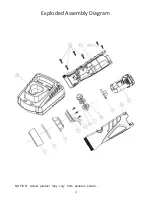
Page 3: ...2 Exploded Assembly Diagram NOTICE Actual product may vary from pictures shown...

Page 4: ...3 1 3 2 fig 1 fig 2 1 LED bulbs 2 Switch Button 3 Battery Pack 4 Charger Tabs Charge indicator Battery capacity indicator LED 4...

Page 5: ...ure to do so can result in serious injury Save this manual for future reference Copyright 2013 by ACL Group Intl Ltd All rights reserved This manual or any artwork contained herein must not be reprodu...

Page 6: ...Keep work area clean and well lit Cluttered or dark areas invite accidents Do not operate power tools in explosive atmospheres such as in the presence of flammable liquids gases or dust Power tools c...

Page 7: ...t carry or pull the machine with the power cord Ensure the cord is clear from hot surfaces oil or sharp objects Safety rules for battery worklights Under extreme usage or temperature conditions batter...

Page 8: ...ternal sparks may ignite fumes Do not store your worklight in a damp or wet location Do not store in locations where the temperature is less than below 10 C 50 F or above 40 C 104 F Do not store in ou...

Page 9: ...orklight in bed or sleeping bags This worklight lens can melt fabric and a burn injury could result Battery use and care A battery operated tool with integral batteries or a separate battery pack must...

Page 10: ...discharged Charge them fully before storing Overload Protection The power cutter is fitted with an overload overheat protection device When the tool is forced to work at an excessive load the protecti...

Page 11: ...exceed 104 F 40 C L ALWAYS operate charger on standard household electrical power 230 volts Using the charger on any other voltage may overheat and damage the charger M ALWAYS wait at least 15 minute...

Page 12: ...pack 2 To insert the battery pack align the ribs on the top of the battery with the grooves in the housing and slide it into place Always insert it all the way until it locks in place with a little cl...

Page 13: ...uilt in the tool will be activated In this case remove the battery pack and fully charge it before reuse Changing the light bulb 1 Remove the lens cover by rotating the cover counter clockwise 2 Gentl...

Page 14: ...ed of in an environmentally friendly way Only for EC countries Defective or dead batteries must be recycled according to the directive 2006 66 EC Maintenance Use only a dry soft cloth for wiping the u...

Page 15: ...Directive 2004 108 EC EMC directive EN60598 1 A11 2019 EN60589 2 4 1997 EN62471 2008 All provisions of Annex 1 of Council Directive 2006 95 EC Low Voltage Directive RoHs 20 EU Accessories CAUTION Use...

Page 16: ...mes all risk and liability arising out of his or her repairs or parts replacement to the original product 12 Months Limited Warranty If within 12 months from the date of purchase you experience any pr...

Reviews: