background image

Compact Track Loader 

5. Operator Enclosure Disassembly and Assembly 


5-4

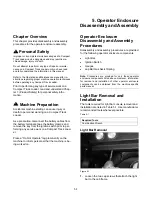
4. 

Install the light bar. Refer to 

Chapter 5.


Light Bar 

Installation

 procedure. 

Gauge Removal and Installa-
tion 

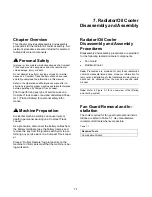
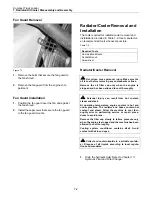
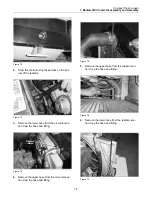
The tools required for gauge removal and installation 
are listed in Table 5-3. Use manufacturer-
recommended tools whenever possible. 

Table 5-3 

Required Tools 

Combination wrench 


Gauge Removal 

1. 

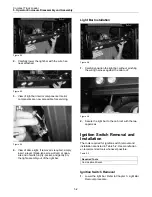
Lower the light bar. Refer to 

Chapter 5.


Light Bar 

Removal

 procedure. 


Figure 5-13 


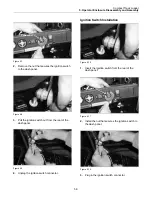
2. 

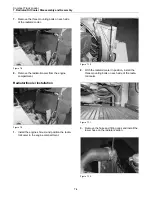
Disconnect the connector from the gauge. 


Figure 5-14 


3. 

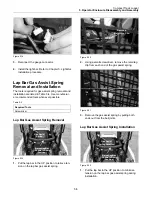
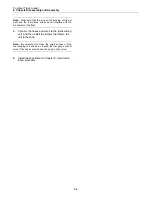
Remove the two nuts that secure the gauge to 
the retaining bracket. 


Figure 5-15 


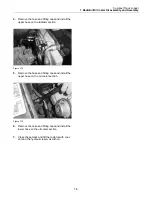
4. 

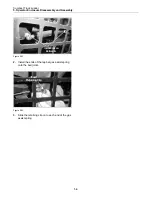
Pull the gauge out from the front of the dash 
panel. 

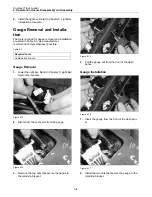
Gauge Installation 


Figure 5-16 


1. 

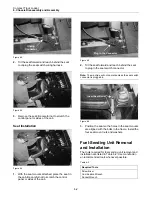
Insert the gauge from the front of the dash pan-
el. 


Figure 5-17 


2. 

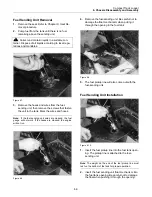
Install the two nuts that secure the gauge to the 
retaining bracket. 


Summary of Contents for R160T

Page 1: ...60T SN All English All Language Geographic Region Serial Number Range This manual is complements of TrackLoaderParts com The world s best source for Terex parts Track Loader Parts 6543 Chupp Road Atla...

Page 2: ...Removal 5 5 Lap Bar Gas Assist Spring Installation 5 5 6 Chassis Disassembly and Assembly Chapter Overview 6 1 Personal Safety 6 1 Machine Preparation 6 1 Chassis Disassembly and Assembly Procedures 6...

Page 3: ...g Removal and Installation 11 5 Bearing Removal 11 5 Bearing Installation 11 5 Drive Sprocket Removal and Installation 11 6 Sprocket Removal 11 6 Sprocket Installation 11 6 Drive Motor Removal and Ins...

Page 4: ...issing labels immediately prior to service Personal Protective Equipment Personal protection equipment is recommended when performing maintenance or service on a machine Always wear appropriate protec...

Page 5: ...yes Electrolyte solution is an acid In case of contact immediately wash skin with soap and water For eyes flush with large amounts of water for at least 15 minutes Call Physician Keep out of reach of...

Page 6: ...le in welding procedures and with the guidance of appropriate reference information Determine the type of metal being welded and select the correct welding procedure and filler material to provide a w...

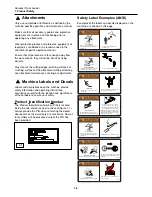
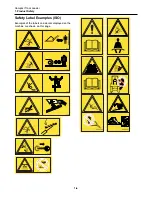
Page 7: ...ovided Safety Label Examples ANSI Examples of the labels and decals displayed on the machine are shown on this page 1 4 Compact Track Loader 1 Product Safety 1 1 Crush Hazard Death or serious injury c...

Page 8: ...l Keep the engine exhaust and chassis areas free of debris Do not use the bucket attachment as a work platform Fall Hazard Falling can result in serious injury or death 2046 299 Crush Hazard Rollover...

Page 9: ...es of the labels and decals displayed on the machine are shown on this page 1 6 Compact Track Loader 1 Product Safety 2046 146 2046 147 Carry loads low Ca arry loads low 2030 415 2030 416 2030 425 203...

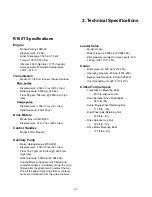
Page 10: ...16 27 gpm 61 85 lpm 2800 rpm high idle Relief pressure 3000 psi 20 684 kPa Cooling filtering Auxiliary oil is filtered and cooled at all times In Auxiliary mode the oil is filtered after the attachme...

Page 11: ...w 17 4 gpm 65 9 lpm 2800 rpm high idle Relief pressure 3000 psi 20 684 kPa Cooling filtering Auxiliary oil is filtered and cooled at all times In Auxiliary mode the oil is filtered after the attachmen...

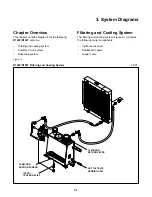
Page 12: ...system Figure 3 1 R160T R190T Filtering and Cooling System Filtering and Cooling System The filtering and cooling system Figure 3 1 contains the following major components Hydraulic reservoir Radiato...

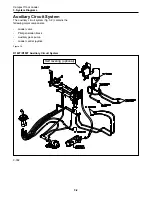
Page 13: ...em fig 3 2 contains the following major components Loader valve Pilot generation block Auxiliary gear pump Loader control joystick Figure 3 2 R160T R190T Auxiliary Circuit System 3 002 3 2 Compact Tra...

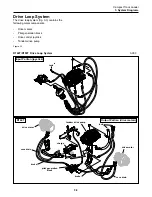
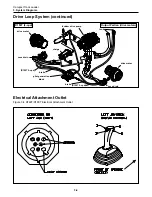
Page 14: ...ion block Drive control joystick Tandem drive pump Figure 3 3 R160T R190T Drive Loop System 3 003 3 3 Compact Track Loader 3 System Diagrams Input Portion joystick Output Portion drive motors tank dri...

Page 15: ...Attachment Outlet 3 4 Compact Track Loader 3 System Diagrams Output Portion drive motors drive motor brake R190T 2 spd case drain R190T 2 spd brake case drain drive motor tandem drive pump pilot gener...

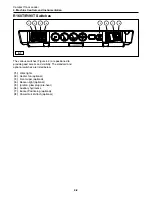
Page 16: ...igure 4 2 are positioned in the overhead dash panel for ease of access and visibility when seated inside the operator enclosure Instruments include the following components 1 Fuel Gauge 2 Tachometer o...

Page 17: ...and optional switches are listed below 1 Work lights 2 Heater fan optional 3 Front wiper optional 4 Beacon light optional 5 Ignition glow plug pre heat 6 Auxiliary hydraulics 7 Bucket Positioning opti...

Page 18: ...Loader As a precaution disconnect the battery cables from the battery terminals tape the battery clamps and remove the key from the ignition switch prior to per forming any service work on a Compact T...

Page 19: ...y pocket and gently pry the light assembly out of the light bar Light Bar Installation Figure 5 5 1 Carefully position the light bar without pinching the wiring harness against the cab roof Figure 5 6...

Page 20: ...l the ignition switch out from the rear of the dash panel Figure 5 9 4 Unplug the ignition switch connector Ignition Switch Installation Figure 5 10 1 Insert the ignition switch from the rear of the d...

Page 21: ...ossible Table 5 3 Required Tools Combination wrench Gauge Removal 1 Lower the light bar Refer to Chapter 5 Light Bar Removal procedure Figure 5 13 2 Disconnect the connector from the gauge Figure 5 14...

Page 22: ...Bar Gas Assist Spring Removal Raise Lap Bar Shown in Down Position Gas Assist Spring Figure 5 19 1 Put the lap bar in the UP position to relieve ten sion on the lap bar gas assist spring Remove Retain...

Page 23: ...Disassembly and Assembly 5 6 Install Endson Ball Joints Figure 5 23 2 Install the ends of the lap bar gas assist spring onto the ball joints Insert RetainingClip Figure 5 24 3 Slide the retaining cli...

Page 24: ...Loader As a precaution disconnect the battery cables from the battery terminals tape the battery clamps and remove the key from the ignition switch prior to per forming any service work on a Compact T...

Page 25: ...Plug in the Connector Figure 6 5 2 Tilt the seat forward and reach behind the seat to plug in the seat switch connector Note The machine will not operate unless the seat switch connector is plugged in...

Page 26: ...it wires are crossed the fuel gauge will not work If the hoses are crossed the engine will not run Figure 6 8 4 Remove the fuel sending unit Be careful not to damage the float mechanism when pulling i...

Page 27: ...movement of the float 3 Connect the hoses and wires to the fuel sending unit and then install the screws that fasten the unit to the tank Note Be careful not to cross the wires or hoses If the fuel se...

Page 28: ...rting can cause injury or death to personnel working on a Compact Track Loader As a precaution disconnect the battery cables from the battery terminals tape the battery clamps and remove the key from...

Page 29: ...personal injury Make sure the oil is cool before removing any components or lines Remove the oil filler cap only when the engine is stopped and has been allowed to cool thoroughly Personal injury can...

Page 30: ...e the lower hose from the oil cooler sec tion Cap the hose and fitting Figure 7 4 4 Remove the upper hose from the oil cooler sec tion Cap the hose and fitting Figure 7 5 5 Remove the upper hose from...

Page 31: ...engine compartment Radiator Cooler Installation Figure 7 9 1 Install the engine shroud and position the radia tor cooler in the engine compartment Figure 7 10 2 With the radiator cooler in position in...

Page 32: ...e on the radiator section Figure 7 13 5 Remove the hose and fitting caps and install the upper hose on the oil cooler section Figure 7 14 6 Remove the hose and fitting caps and install the lower hose...

Page 33: ......

Page 34: ...terminals tape the battery clamps and remove the key from the ignition switch prior to per forming any service work on a Compact Track Load er Place a Do Not Operate tag prominently on the machine to...

Page 35: ...en allowed to cool thoroughly Note During disassembly cap all hoses and fittings to prevent fluid loss and contamination of the system fluids Figure 8 1 1 Remove the screws securing the cover to the f...

Page 36: ...the filter assembly gasket in position on top of the reservoir Replace if damaged Figure 8 8 2 Position the filter head onto the gasket with the mounting holes aligned install bolts Figure 8 9 3 Reco...

Page 37: ...omponents or lines Remove the oil filler cap only when the engine is stopped and the machine has been allowed to cool thoroughly Figure 8 13 1 Slightly loosen the access cover bolt to separate the upp...

Page 38: ...Collect and contain liquids in a suitable contain er Dispose of all liquids according to local regula tions and mandates Note During disassembly cap all hoses and fittings to prevent fluid loss and co...

Page 39: ...l Hot oil can cause personal injury Make sure the oil is cool before removing any components or lines Remove the oil filler cap only when the engine is stopped and the machine has been allowed to cool...

Page 40: ...eaning The tools required for hydraulic reservoir cleaning are listed in Table 8 5 Use manufacturer recommended tools whenever possible Table 8 5 Tool Name Combination Wrench Hot oil can cause persona...

Page 41: ......

Page 42: ...orm personnel that the machine is be ing worked on Loader Transmission Controls Disassembly and Assembly Procedures Disassembly and assembly procedures are provided for the following loader transmissi...

Page 43: ...procedure is described below Note During disassembly cap and plug all hoses and fittings to prevent fluid loss and contamination of the system fluids 1 Remove the seat from the machine according to t...

Page 44: ...quipped with a heater you must disconnect the cool heater lines at the heater unit in order to remove the side panel Cap and plug hoses and ports to minimize coolant loss Loader Float Magnet Removal a...

Page 45: ...tings to prevent fluid loss and contamination of the system flu ids 1 Lower the lift arms to the ground 2 Turn the engine start switch to the OFF position 3 Relieve hydraulic pressure from the auxilia...

Page 46: ...e rear valance panel to the chassis to allow for removal Figure 9 14 8 Carefully remove the rear valance from the machine to allow access to the loader valve Figure 9 15 9 Locate the loader valve on t...

Page 47: ...emoval and Installation The tools required for loader valve removal and instal lation are listed in Table 9 4 Use manufacturer recom mended tools whenever possible Table 9 4 Note During disassembly ca...

Page 48: ...worked on Hydraulic Drive and Auxiliary Pump Disassembly and Assembly Procedures Disassembly and assembly procedures are provided for the following drive and auxiliary components Auxiliary Pump Tandem...

Page 49: ...move the access cover beneath the seat as shown Figure 10 3 8 Remove the bolts from the flange halves securing the inlet hose tube to the auxiliary pump Remove the flange halves and lay the hose tube...

Page 50: ...tion of the system fluids 1 Lower the lift arms to the ground 2 Turn the ignition switch to the OFF position 3 Release any residual pressure from the hydraulic circuits 4 Drain the hydraulic oil Refer...

Page 51: ...from the drive pump and move aside for pump removal clearance 12 Disconnect case drain hose G from the fitting on the bottom of the pump Figure 10 9 13 Support the weight of the pump from the top sid...

Page 52: ...xiliary pump Refer to Chapter 10 Auxiliary Pump Removal 7 Remove the tandem drive pump Refer to chapter 10 Tandem Drive Pump Removal Figure 10 10 8 Loosen the locking screw that secures the pump drive...

Page 53: ......

Page 54: ...the battery cables from the battery terminals tape the battery clamps and remove the key from the ignition switch prior to performing any service work on a Compact Track Loader Place a Do Not Operate...

Page 55: ...igure 11 2 3 Using a large channel lock pliers remove the wheel cap Figure 11 3 Figure 11 4 4 Using a socket remove the nut that fastens the wheel to the shaft Remove the wheel with the wheel extracto...

Page 56: ...rnbuckle as shown to lower the drive table and create slack in the track Figure 11 9 3 Remove the bolts securing the wheel to the hub Figure 11 10 4 Slide the track outward as you pull on the wheel to...

Page 57: ...k Removal and Installation The tools required for track removal and installation are listed in table 11 4 Use manufacturer recommend ed tools whenever possible Table 11 4 Removal 1 Perform the end whe...

Page 58: ...wo components Remove the mounting plate from the machine Figure 11 17 3 Use a hammer to drive a screwdriver in along the edge of the rubber cap the pry the cap out as shown the cap must be replaced af...

Page 59: ...the drive motor are listed in table 11 7 Use manufacturer rec ommended tools whenever possible Table 11 7 Removal 1 Perform the drive sprocket removal procedure as described on page 11 6 of this chap...

Page 60: ...ub assembly from the axle shaft fig 11 23 see note below Note If you are removing either of the the inner hub assemblies you must slide the axle item 30 out of the main rail weldment to remove it fig...

Page 61: ...ote Take care not to drop the metal face seal halves The sealing surfaces are surface ground and have an extremely fine finish If scratched or disfigured the seal will not function as intended Note No...

Page 62: ...e rear seal retaining ring into the assembly with tool 0403 547 and exten sion 0403 550 apply blue loc tite around the ring sealing surface in the hub prior to installation fig 11 33 11 34 12 Install...

Page 63: ...e center seal into the hub Work the lip around the bearing sleeve with your fingers prior to pressing it into place fig 11 41 18 Install the front race into the hub as shown above the seal When the ra...

Page 64: ...b as shown then reinstall the plug and tighten fig 11 46 23 The hub assembly is now ready to be reinstalled To install it onto the machine reverse steps 1 3 on page 11 7 of this procedure Make sure to...

Page 65: ......

Page 66: ...rforming any service work on a Compact Track Loader Place a Do Not Operate tag prominently on the machine to inform personnel that the machine is being worked on Loader Disassembly and Assembly Proced...

Page 67: ...rms onto a mechanical support with the arms resting about 6 inches 15 24 cm off the ground 2 Turn the ignition switch to the OFF position Figure 12 1 3 Remove the bolt on the pin assembly on the loade...

Page 68: ...w flow relief valve removal and installation are listed in Table 12 2 Use manufacturer recommended tools whenever possible Table 12 2 Required Tools Combination Wrench Socket Wrench Pressure Release V...

Page 69: ...ap all hoses Figure 12 10 5 Remove the four bolts that secure the low flow relief valve to the loader frame and remove the valve Quick Coupler Block Pressure Release Valve Installation Figure 12 11 1...

Page 70: ...Life 50 50 Antifreeze Coolant or equivalent antifreeze with the proper SCA Supplemental Cooling Additive Engine Oil Regular oil changes are necessary to maintain a strong running engine Terex recommen...

Page 71: ...fluid Before starting the procedure make sure the ma chine is in a clean working environment Precautions should be taken to prevent any debris from entering the hydrostatic system Collect and contain...

Page 72: ...m according to the proce dure at the end of this chapter Fuel Specifications In North America diesel fuel distilled from crude oil and identified as NO 1 D or No 2 D in ASTM D975 generally meets the p...

Page 73: ...am nut on the track tensioner and clean the threads thoroughly before proceeding 2 Loosen the jam nut You can use the wrench supplied with the machine but a standard wrench is preferred for shop use F...

Page 74: ...n 0 50 1 3 cm and 0 75 1 9 cm Fuse Box Figure 16 12 The fuse box is located on the left side of the engine compartment The machine should never be operat ed with the fuse box cover removed Grease Fitt...

Page 75: ...6 1 Required Tools Combination Wrench If the machine has been run out of fuel it may be necessary to bleed the fuel system Figure 11 25 1 Locate the bleed screw directly above the fuel injection pump...

Page 76: ...Chap ter 1 Product Safety for personal safety infor mation Machine Preparation Accidental machine starting can cause injury or death to personnel working on a Compact Track Loader As a precaution dis...

Page 77: ...om the test port Auxiliary Pressure Check Adjustment The service tools required for the auxiliary pressure check and adjustment are listed in Table 14 1 Use manufacturer recommended tools whenever pos...

Page 78: ...e DO NOT ex ceed 3 000 psi 20 680 kPa DA Control set procedure The service tools required for the DA Control set procedure are listed in table 14 3 Use manufacturer recommended tools whenever possible...

Page 79: ......

Page 80: ...for personal safety infor mation Machine Preparation Accidental machine starting can cause injury or death to personnel working on a Compact Track Loader As a precaution disconnect the battery cables...

Page 81: ...wires on bottom left rear side of hydraulic reservoir or inner RT loader tow er 5 Safety relay is not activating 6 Faulty safety solenoid or safety solenoid spool 7 Poor wire connections on fuse rela...

Page 82: ...has down pressure when detented into float Probable cause 1 Engine RPM too low 2 Low charge pressure 3 Pilot control malfunction 4 Loader valve malfunction Problem 14 Hot oil light illuminates hydrau...

Page 83: ...Terex Construction Americas 8800 Rostin Road Southaven MS 38671 888 201 6008 662 393 1800 www terex com...

Reviews: