background image

MAINTENANCE

34

Tennant T600 EE (04-2018)

BATTERY COMPARTMENT DRAIN HOSE

Use the battery compartment drain hose to drain liquid

from the battery compartment.

FOR SAFETY: Before leaving or servicing machine,

stop on level surface, turn off machine and remove

key.
FOR SAFETY: When servicing machine, always

follow site safety rules when disposing battery

compartment liquid.

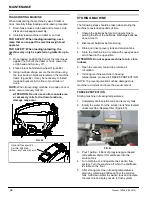
1. Position rear of machine over area where battery

compartment can be safely drained, turn off the

machine, and remove the key.

2. Pull the battery compartment drain hose from hose

holder and carefully drain liquid from battery

compartment (Figure 75).

FOR SAFETY: When servicing machine, wear

personal protection equipment as needed. Avoid

contact with battery acid.

FIG. 75

3. Firmly reconnect the drain hose to holder after

draining battery compartment.

SQUEEGEE BLADE REPLACEMENT

FOR SAFETY: Before leaving or servicing machine,

stop on level surface, turn off machine and remove
key.

Each squeegee blade has four wiping edges. When the

blades become worn, simply rotate the blades

end-for-end or top-to-bottom for a new wiping edge.

Replace blade if all four edges are worn.
1. Remove the squeegee assembly from the

machine.

2. Fully loosen the two outside knobs on squeegee

assembly. This will separate the spring loaded

blade retainer from squeegee frame (Figure 76). To

loosen the knobs quickly, squeeze the blade

retainer and squeegee frame together.

FIG. 76

3. Remove worn blade(s) from the blade retainer

(Figure 77).

FIG. 77

Summary of Contents for T600 EE

Page 1: ...or Scrubber 9016606 For the latest Parts manuals and other language Operator manuals visit www tennantco com manuals English EN Operator Manual Hygenic Fully Cleanable Recovery Tank TennantTrue Parts...

Page 2: ...of software that have various 3rd party licenses More information can be found at www tennantco com opensource Specifications and parts are subject to change without notice Original Instructions Copy...

Page 3: ...T OFF BUTTON 19 WHILE OPERATING MACHINE 20 CIRCUIT BREAKER PANEL 20 HOUR METER 21 DRAINING TANKS 21 DRAINING RECOVERY TANK 21 DRAINING SOLUTION TANK 22 SERVICE INDICATOR CODES 23 SERVICE INDICATOR COD...

Page 4: ...CONTENTS 4 Tennant T600 EE 04 2018...

Page 5: ...the state of California to cause cancer birth defects or other reproductive harm FOR SAFETY 1 Do not operate machine Unless trained and authorized Unless operator manual is read and understood Unless...

Page 6: ...gers as this may damage battery packs and potentially cause a fire hazard Inspect charger cord regularly for damage Do not plug in charger if prongs are wet Open recovery tank to vent batteries if tem...

Page 7: ...rd Disconnect battery cables before servicing machine Located above battery cable connectors WARNING LABEL Batteries emit hydrogen gas Explosion or fire can result Keep sparks and open flame away when...

Page 8: ...OPERATION 8 Tennant T600 EE 04 2018 MACHINE COMPONENTS 1 22 27 28 29 20 26 30 24 2 16 23 5 4 2 15 13 14 12 6 8 11 7 10 31 32 33 22 18 21 20 19 1 3 17 9 25...

Page 9: ...hose 21 Squeegee debris drip tray 22 Recovery tank 23 Circuit breaker panel 24 Battery compartment 25 Solution tank 26 Scrub head 27 Scrub head skirt 28 Pad release plunger 29 Wall rollers 30 Transpo...

Page 10: ...refully install the batteries into the battery compartment tray and arrange the battery posts as shown Figure 2 Insert foam spacers around batteries as shown FOR SAFETY When servicing machine use a ho...

Page 11: ...loors Buffing pad Red Used for light duty scrubbing without removing floor finish Scrubbing pad Blue Used for medium to heavy duty scrubbing Removes dirt spills and scuffs and leaves surface clean rea...

Page 12: ...the locking nut on caster and set the caster height to 3 25 in 82 7 mm Figure 9 Re tighten locking nut and repeat step for other caster 3 25 in 82 7 mm Locking Nut Caster FIG 9 6 If the squeegee blad...

Page 13: ...t supplied or approved by Tennant The use of other pads may impair safety 3 Set the yellow spring clips to the open position to make brush installation easier Press spring clips together then downward...

Page 14: ...improper detergent usage will void the manufacturer s warranty WARNING Flammable materials can cause an explosion or fire Do not use flammable materials in tank s 3 Turn off the water supply and remo...

Page 15: ...sconnect auto fill coupler from the water supply hose and store in a safe location ACCESSORY RAILS The machine is equipped with two accessory rails which straddle the control console An optional acces...

Page 16: ...RESSURE BUTTON Press the brush pressure button to increase or decrease the brush pressure Figure 25 The brush pressure LED indicator will display the pressure setting One LED Low pressure two LEDs Med...

Page 17: ...ttons 1 2 at the same time Brush pressure setting Solution flow rate Quiet Mode on or off Maximum scrub speed See Supervisor Controls SERVICE INDICATOR When the machine or on board battery charger det...

Page 18: ...ebris tray is clean Confirm recovery tank float shut off screen is clean Check machine for proper operation OPERATING MACHINE For control panel operating instructions see CONTROL PANEL OPERATION 1 Tur...

Page 19: ...ce turn off machine and remove key DOUBLE SCRUBBING Double scrubbing is the process of making two or more passes over a heavily soiled area The first pass is made with the squeegee raised off the floo...

Page 20: ...et for 3 5 minutes then scrub the area a second time with squeegee down 9 When leaving the machine unattended park on level surface turn machine off and remove key FOR SAFETY Before leaving machine st...

Page 21: ...nd clean the recovery tank after each use 1 Transport the machine to drain area 2 For models equipped with drain hose caps hold the hose upward remove cap then slowly lower hose to drain For models eq...

Page 22: ...ve key 2 To drain remaining water from solution tank pull the solution tank level hose from the accessory rail Figure 45 Firmly reconnect the hose to the accessory rail after draining tank 3 Rinse sol...

Page 23: ...nnector or control board problem Contact service S Brush motor 1 voltage loss Brush motor 2 voltage loss Contact service S S Actuator stalled Check for blockage If fault repeats contact service S S S...

Page 24: ...Check pad for floor type If fault repeats contact service Contact service S S Start bail is pulled or obstructed before turning machine on Release start bail or remove bail obstruction before turning...

Page 25: ...deflection O 5 Scrub head skirt Clean check for damage and wear O 6 Machine Clean with damp cloth O 7 Batteries Charge if necessary Weekly O 7 Battery cells Check electrolyte level O 7 Battery compar...

Page 26: ...med by trained personnel YELLOW TOUCH POINTS This machine is equipped with easy to find yellow touch points for simple service items A few examples shown below Figure 47 No tools are required to perfo...

Page 27: ...worn See SQUEEGEE BLADE REPLACEMENT FIG 54 8 Clean scrub head skirt Check for wear or damage Figure 55 Replace if worn or damaged FIG 55 9 Clean the outside surface of the machine with an all purpose...

Page 28: ...for further details FIG 59 3 Remove the drip trap cover from the squeegee assembly and clean reservoir Figure 60 FIG 60 AFTER EVERY 50 HOURS OF USE 1 Drain solution tank Remove the solution tank filt...

Page 29: ...gun Use Lubriplate EMB grease Tennant part no 01433 1 Figure 65 FIG 65 AFTER EVERY 200 HOURS OF USE Check batteries for loose battery connections and clean the surface of the batteries including term...

Page 30: ...AINTENANCE FREE BATTERIES Maintenance free Sealed AGM batteries do not require watering Cleaning and other routine maintenance is still required FLOODED WET LEAD ACID BATTERIES The flooded wet lead ac...

Page 31: ...Keep sparks and open flame away when charging 2 Park the machine on a flat dry surface turn off machine and remove key FOR SAFETY Before leaving or servicing machine stop on level surface turn off ma...

Page 32: ...s Red Red Green Green Green ex Profile Setting 4 3 Flashes Red Red Green Green Green Green pause Green Green Green FIG 70 2 To enter the battery select mode to choose a new profile setting press and h...

Page 33: ...efore charging the electrolyte level will expand and may overflow when charging 2 After charging batteries check the battery electrolyte level indicators located on the battery covers Figure 71 If the...

Page 34: ...ing machine wear personal protection equipment as needed Avoid contact with battery acid FIG 75 3 Firmly reconnect the drain hose to holder after draining battery compartment SQUEEGEE BLADE REPLACEMEN...

Page 35: ...tands Use jack or hoist that will support the weight of the machine FIG 80 PUSHING AND TRANSPORTING MACHINE PUSHING MACHINE If the machine becomes disabled it can be pushed as describe below Only push...

Page 36: ...NG MACHINE The following steps should be taken when storing the machine for extended periods of time 1 Charge the batteries before storing machine to prolong the life of the batteries Recharge batteri...

Page 37: ...eegee assembly is raised off floor Lower squeegee assembly to floor Vacuum motor fault has been detected See SERVICE INDICATOR CODES Faulty vacuum motor or wiring Contact service Circuit breaker tripp...

Page 38: ...time Low battery charge Charge batteries Batteries need maintenance See BATTERIES Defective battery or end of battery life Replace batteries Battery discharge indicator BDI programmed incorrectly See...

Page 39: ...amed fill 12 6 in 320 mm pneumatic Pressure 60 65 psi 415 450 kPA Productivity rate estimated actual 27 698 ft2 hr 2573 m2 hr Maximum operating gradient 2 Solution flow rate Low 50 gpm 1 89 L min Med...

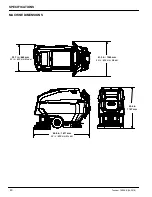
Page 40: ...SPECIFICATIONS 40 Tennant T600 EE 04 2018 MACHINE DIMENSIONS 43 6 in 1107 mm 41 3 in 1049 mm 32 in 800 mm Model 33 7 in 865 mm 32 in 800 mm Model 65 8 in 1671 mm 32 in 800 mm Model...

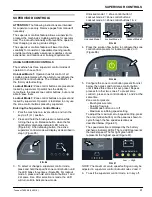
Page 41: ...discharge indicator LED turns on Figure 84 After releasing button the active supervisor control mode will display as described in step 3 Figure 85 FIG 84 3 To select or change a supervisor control mod...

Reviews: