background image

EN


-

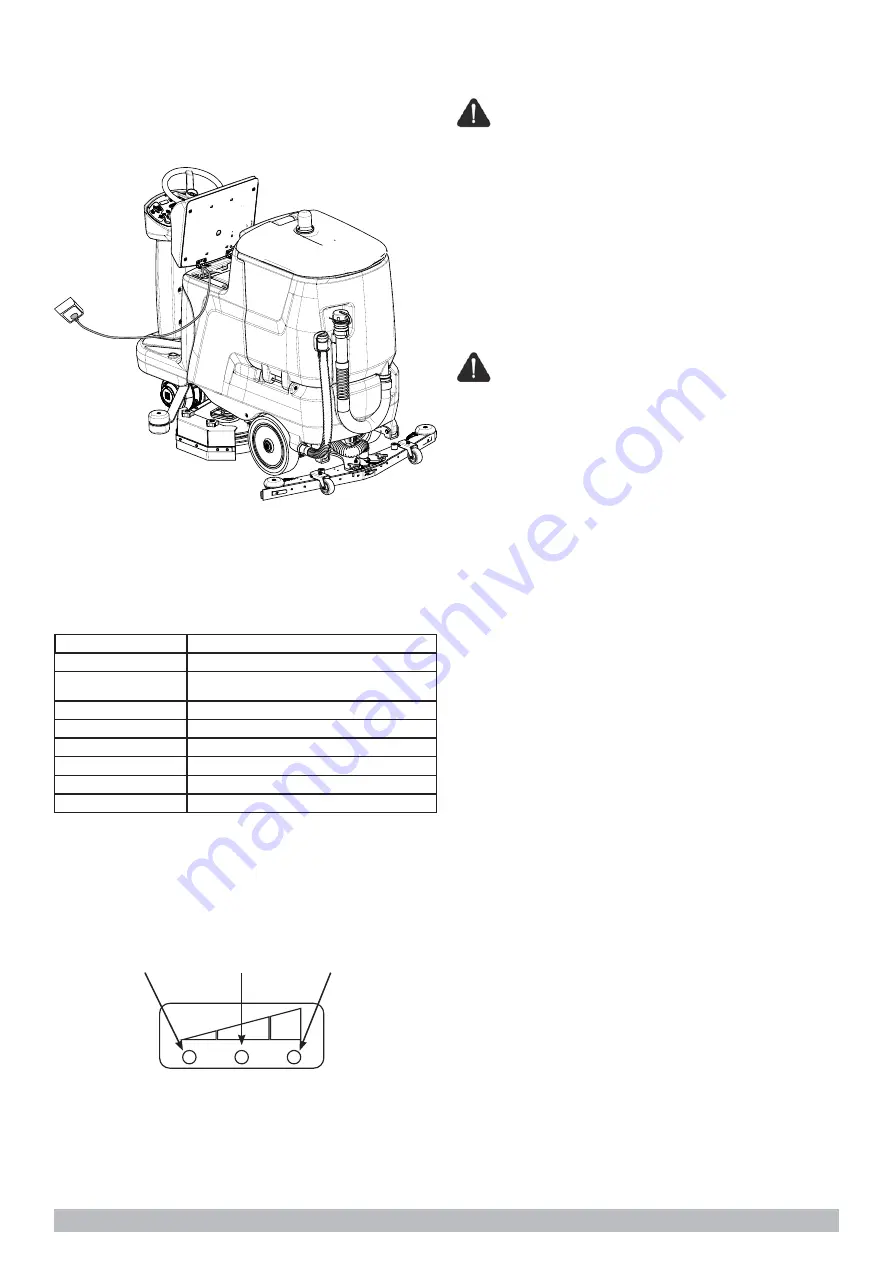
Take the battery charger plug from its housing.


-

Plug into the mains power socket.


-

Start the recharge cycle.

Battery: removal

!

'$1*(5LQWKHHYHQWRIEDWWHU\ÀXLG

OHDNDJHGRQRWWRXFKWKHÀXLGDQGREVHUYHWKH

following precautions:
Contact with the skin can cause irritation; wash 
with soap and water.
Inhalation of vapours can cause irritation to the 
airways; stay out in the open air and consult
a doctor.
Contact with the eyes can cause irritation; 

ZDVKWKHH\HVLPPHGLDWHO\ÀRRGLQJZLWKZDWHU

for at least 15 minutes, and consult a doctor.

! DANGER: When removing the batteries, the 
skilled technician must wear the Personal 
Protective Equipment (gloves, eyewear, 
overalls, etc.) needed to limit  the risk of 
accidents; remove the ignition key from the 
control panel before proceeding with the 
removal operation, keep away from naked 

ÀDPHVGRQRWVKRUWFLUFXLWWKHEDWWHU\SROHV

do not cause sparks and do not smoke.

! ATTENTION: the operation of removing the batteries 
must be carried out by a skilled technician.

! ATTENTION: when removing the batteries, ensure 
that the battery charger is unplugged from the power 
socket.

! ATTENTION: before carrying out the operations 

GHVFULEHGEHORZVWRSRQDÀDWDQGOHYHOVXUIDFH
VZLWFKRႇWKHPDFKLQHDQGUHPRYHWKHLJQLWLRQNH\


-

Disconnect the battery cables and bridge terminals 
from the battery poles.


-

,IQHFHVVDU\UHPRYHWKHGHYLFHV¿[LQJWKHEDWWHU\

to the base of the machine.


-

Lift the batteries from the compartment using 
suitable handling equipment.

Battery charger error codes

Warning

Meaning

Red Led blinking (twice)

%DWWHU\FKDUJHUFRQ¿JXUHGIRUUHFKDUJLQJOHDGDFLGEDWWHULHV

Green Led blinking (twice)

%DWWHU\FKDUJHUFRQ¿JXUHGIRUUHFKDUJLQJ*(/DQGRU$*0

batteries

Red Led permanently alight

First stage of normal charging

Yellow Led permanently alight

Second stage of normal charging

Green Led permanently alight

Charging complete or maintenance in progress

Abnormalities

Yellow Led blinking

Wrong battery, battery not connected, output short-circuit

Red LED blinking

Safety timeout exceeded, internal short-circuit

RED LED

YELLOW LED

GREEN LED

28

Summary of Contents for LPTB03308

Page 1: ...Y FLOOR SCRUBBER ANZ Model Part No LPTB03308 SCRUBBER T681 70CM CD PD ANZ To view print or download the parts manual visit www tennantco com manuals www tennantco com PLDC04602 Rev 01 07 2022 OPERATOR S MANUAL EN ...

Page 2: ...tarting the machine 20 Preparing the machine for work 20 Working 20 Dual wash 22 Picking up water without washing 22 During operation of the machine 22 Emergency stop button 23 Detergent solution tank empty indicator 23 Dirty water tank full indicator 23 Battery charge indicator 23 Emptying the dirty water tank 24 Emptying the solution tank 24 Emptying the Cylindrical Brush Model bin 24 Removing t...

Page 3: ...WKH control electronics ATTENTION make certain that the electrical VSHFL FDWLRQV RI WKH PDFKLQH YROWDJH IUHTXHQF DQG power consumption indicated on the data plate are compatible with those of the mains electricity supply Do not use the machine without having read the operating and maintenance manual without having been trained in its use ZLWKRXW KDYLQJ EHHQ VSHFL FDOO HQWUXVWHG with its use if leg...

Page 4: ...move transversely across the slope but keep the machine on a line parallel to the direction of the incline manoeuvring carefully and without making U turns The machine must not be used by persons including children with diminished physical sensory or mental capabilities or lack of experience and knowledge unless they are supervised by a person responsible for their safety and have received instruc...

Page 5: ...SXOO Never wash the machine with water jets Cleaning and maintenance operations that can be performed by the user must not be entrusted to children unless under supervision All repairs must be carried out by a TENNANT approved service technician Use only original accessories and spare parts supplied exclusively by the manufacturer as only these are able to guarantee safe and troublefree operation ...

Page 6: ...ARNING RISK OF ABRASION MAXIMUM SLOPE OPERATOR MANUAL INSTRUCTIONS FOR USE READ THE OPERATOR S MANUAL DIRECT CURRENT SYMBOL INSULATION CLASS THIS CLASSIFICATION ONLY APPLIES TO BATTERY POWERED MACHINES EXTERNAL BATTERY CHARGER CONNECTION POINT SAFETY SYMBOLS 6 ...

Page 7: ...240 942 1515 1240 1090 1515 1240 1090 Battery compartment dimensions length width height mm 589 400 380 589 400 380 589 400 380 Packed size length width height mm 1730 960 1480 1730 960 1480 1730 960 1480 Sound pressure Annex DD Emission of acoustical noise EN 60335 2 72 2012 LpA dBA 75 75 68 Measurement uncertainty K dBA 3 3 3 Vibration level hand IEC 60335 2 72 ahv m sec2 Measurement uncertainty...

Page 8: ...EN X Y Z See TECHNICAL SPECIFICATIONS table MACHINE DIMENSIONS X Y Z 8 ...

Page 9: ...GLႇHU DSSUHFLDEO IURP WKH LOOXVWUDWLRQV LQ WKLV GRFXPHQW WKH FRUUHFWQHVV DQG validity of the instructions contained in this manual are guaranteed Identifying the machine The nameplate provides the following information Name of manufacturer Model Serial number Year of manufacture Power supply voltage charging supply value Current intensity maximum charging value as prescribed by the battery manufac...

Page 10: ...FRPELQDWLRQV RI W SHV RI ÀRRU and dirt The machine incorporates a wet vacuuming system which GULHV WKH ÀRRU LPPHGLDWHO DIWHU ZDVKLQJ 7KH GU LQJ action is produced by the suction motor which generates a partial vacuum in the dirty water tank The squeegee is connected to the tank and collects the dirty water Main parts of the machine The main parts of the machine are listed below 1 Dirty water tank ...

Page 11: ...ted detergent when enabled Alarm codes Hour counter 23 Horn button 24 Suction button enables disables the suction motor Pressing and holding this button for more WKDQ YH VHFRQGV WKH VXFWLRQ PRWRU VWDUWV UXQQLQJ even without the operator on board the machine 25 Brush button enables disables operation of the brush head 26 Solution tank level indicator when there is not enough water in the solution t...

Page 12: ...XEERUQ GLUW RQ UXJJHG ÀRRUV Pad drive boards these enable use of the following disks Yellow pad for washing and polishing marble and similar surfaces UHHQ SDG IRU ZDVKLQJ UXJJHG ÀRRUV ODFN SDG IRU WKRURXJK ZDVKLQJ RI UXJJHG ÀRRUV soiled with stubborn dirt 0 26 V VWHP IRU FRQWUROOLQJ WKH ÀRZ RI concentrated detergent independently from the solution tank SPE CBHD3 battery charger 12 ...

Page 13: ... aware of the damage and before accepting the goods reserve the right in writing to request compensation for the damage Unpacking DANGER when unpacking the machine the operator must wear suitable Personal Protection Equipment gloves eyewear etc to limit the risk of injury When unpacking the machine proceed as follows Cut and remove the plastic straps using scissors or nippers Remove the cardboard ...

Page 14: ...LFDO VSHFL FDWLRQV RI WKH EDWWHU PXVW correspond to those listed in the section on the Technical VSHFL FDWLRQV of the machine The use of heavier batteries could seriously jeopardize manoeuvrability and lead to the drive motor overheating Lighter batteries of lower capacity on the other hand will need to be charged more frequently NOTICE Enter the type of battery installed in the machine software s...

Page 15: ...starting up the machine for the UVW WLPH ROORZ WKH LQVWUXFWLRQV LQ WKH Battery charging section Batteries installation and connection DANGER during installation of the batteries or any type of battery maintenance the skilled technician must be provided with the necessary personal protection devices gloves goggles overalls etc to limit the risk RI DFFLGHQWV HHS DZD IURP QDNHG ÀDPHV do not short cir...

Page 16: ... OHYHO VXUIDFH VZLWFK Rႇ WKH PDFKLQH DQG UHPRYH WKH LJQLWLRQ NH 7KH VTXHHJHH EODGHV VFUDSH WKH OP RI ZDWHU DQG GHWHUJHQW IURP WKH ÀRRU DQG SUHSDUH WKH ZD IRU SHUIHFW drying With time and the constant wiping action the edge RI WKH EODGH LQ FRQWDFW ZLWK WKH ÀRRU EHFRPHV URXQGHG DQG FUDFNHG GLPLQLVKLQJ LWV GU LQJ HႈFLHQF VR WKDW XOWLPDWHO a new blade is required The state of wear should be checked fr...

Page 17: ... of the machine Fitting the right brush or abrasive disk 5HPRYH WKH ULJKW KDQG VLGH ÀDS Position the right hand brush under the pad drive board Lift the brush and turn it clockwise so that it locks to the drive 5HSRVLWLRQ WKH ULJKW KDQG VLGH ÀDS Fitting the left brush or abrasive disk ROORZ WKH VDPH SURFHGXUH DV LQGLFDWHG IRU WWLQJ the right brush in this instance the brush must be turned counter ...

Page 18: ...mmended by the Manufacturer The use of other detergents or FKHPLFDOV FDQ DႇHFW WKH VDIHW RI WKH PDFKLQH ATTENTION the selected detergent should be utilized rationally in accordance with the directions given on the packaging of the product ATTENTION select a detergent from the range of recommended products that is most suitable for the washing operation in hand and dilute with water following the i...

Page 19: ...pered plug and hose into the neck of the tank 1 5 ÀDPPDEOH OLTXLGV FDQ EH WKH FDXVH RI H SORVLRQ RU UH R QRW XVH ÀDPPDEOH liquids ATTENTION the machine has been designed for use with detergents supplied or recommended by the Manufacturer The use of other detergents or chemicals may jeopardise the safety of the appliance ATTENTION when using the Chem Dose accessory WKH VROXWLRQ WDQN PXVW EH OOHG ZL...

Page 20: ...k Make certain that the solution tank is full and LI QRW SURFHHG WR OO LW UHIHUULQJ WR WKH VHFWLRQ Filling the water detergent tank Make certain that the tank of the Chem Dose DFFHVVRU LV IXOO DQG LI QRW OO DV UHTXLUHG referringtothesection ChemDose accessory NOTICE To make the machine more comfortable to use the tilt angle of the steering wheel can be adjusted by means of the lever shown in the i...

Page 21: ...utton repeatedly until only the CHEM DOSE Led remains alight at this point the quantity of detergent can be varied by means of the and buttons the value set in this way appears in the display Once the percentage of detergent KDV EHHQ VHW WKH DSSURSULDWH W SH RI VROXWLRQ ÀRZ must be selected STANDARD AUTOMATIC ECONOMY using the SELECT button To disable the CHEM DOSE function press and hold the SELE...

Page 22: ...possible for the brush pressure and detergent VROXWLRQ ÀRZ Check the battery charge indicator to ensure WKHUH ZLOO EH VXႈFLHQW SRZHU IRU FRPSOHWLRQ RI WKH cleaning operation Check the detergent solution level indicator to ensure that the relative tank is not empty Check the dirty water level indicator to ensure that the relative tank is not full ATTENTION do not attempt to clean surfaces on slopes...

Page 23: ...tion refer to the section Emptying the dirty water tank Battery charge indicator The indicator shows the level of charge remaining in the batteries expressed in percentage terms When the batteries are completely discharged all cleaning functions remain inhibited until recharging has taken place when undertaking this operation refer to the section Charging the batteries The battery charge status is...

Page 24: ...ean water 5LQVH WKH ÀRDW RI WKH GLUW ZDWHU WDQN UHIHUULQJ WR the directions given in the section Cleaning the dirty water tank sensor 5H W WKH SOXJ WR WKH GUDLQ KRVH DQG UHDWWDFK WKH hose to the clip Emptying the solution tank ATTENTION before carrying out the operations GHVFULEHG EHORZ VWRS RQ D ÀDW DQG OHYHO VXUIDFH VZLWFK Rႇ WKH PDFKLQH DQG UHPRYH WKH LJQLWLRQ NH The detergent solution tank can...

Page 25: ...easing the left hand brush or abrasive disk Follow the same procedure as used to remove the right brush in this instance releasing it from the drive board by turning in the clockwise direction Moving the machine when not in operation To move the machine proceed as follows Turn the ignition key to switch the machine on Depress the drive pedal for forward motion press down on the front half of the p...

Page 26: ...re washers Water could penetrate the electrical compartment or motors leading to damage or short circuits Avoid using steam as the heat could cause the deformation of plastic parts Do not use solvents or hydrocarbon based products These can damage the cowling and rubber components OHDQLQJ WKH VXFWLRQ PRWRU DLU OWHU 5DLVH WKH OLG RI WKH GLUW ZDWHU WDQN WKHQ UHPRYH WKH OWHU from its housing and wash...

Page 27: ...ER do not check the batteries by VSDUNLQJ HDG DFLG 7 EDWWHULHV JLYH Rႇ ÀDPPDEOH YDSRXUV H WLQJXLVK DQ QDNHG ÀDPHV RU HPEHUV EHIRUH FKHFNLQJ RU WRSSLQJ up the batteries DANGER carry out the operations described below in a ventilated area DANGER when charging the batteries highly explosive hydrogen gas is produced Elevate the tank for the entire duration of the battery charging cycle and carry out t...

Page 28: ...moving the batteries must be carried out by a skilled technician ATTENTION when removing the batteries ensure that the battery charger is unplugged from the power socket ATTENTION before carrying out the operations GHVFULEHG EHORZ VWRS RQ D ÀDW DQG OHYHO VXUIDFH VZLWFK Rႇ WKH PDFKLQH DQG UHPRYH WKH LJQLWLRQ NH Disconnect the battery cables and bridge terminals from the battery poles I QHFHVVDU UHP...

Page 29: ...LRQ NH 7KH VTXHHJHH EODGHV FROOHFW WKH OP RI ZDWHU DQG GHWHUJHQW IURP WKH ÀRRU DQG SUHSDUH WKH ZD IRU SHUIHFW GU LQJ LWK time and the constant wiping action the edge of the blade LQ FRQWDFW ZLWK WKH ÀRRU EHFRPHV URXQGHG DQG FUDFNHG GLPLQLVKLQJ LWV GU LQJ HႈFLHQF VR WKDW XOWLPDWHO D QHZ blade is required Remove the suction hose from the squeegee Remove the squeegee from its mount by unscrewing the ...

Page 30: ... completely During long periods of inactivity remember to recharge the batteries periodically at least once every two months so that they are kept at the maximum charge level Disconnect the batteries from the machine Unplug the battery charger if present from the mains power supply The squeegee and brushes or abrasive disks must be removed from the machine washed and stored in a dry place preferab...

Page 31: ...ter tank is full Empty the dirty water tank Blown fuse Replace 7KH EDWWHULHV DUH ÀDW Recharge the batteries Damaged motor Replace The squeegee does not clean or has poor suction 7KH HGJH RI WKH UXEEHU EODGHV LQ FRQWDFW ZLWK WKH ÀRRU LV ZRUQ Replace the blades Squeegee blocked or damaged Check 7KH GLUW ZDWHU WDQN ÀRDW LV DFWLYDWHG RU LV EORFNHG E GLUW RU is faulty PSW WKH GLUW ZDWHU WDQN FKHFN WKH ...

Page 32: ...WLRQV LQ WKH WDEOH DUH FRQVLGHUHG PRUH VHULRXV 7KH PDFKLQH PXVW EH WXUQHG Rႇ ZLWK WKH LJQLWLRQ NH DQG WKH PDOIXQFWLRQ UHFWL HG EHIRUH RSHUDWLRQ FDQ EH UHVXPHG The severity warning remains active for 10 seconds after which the status LED blinks constantly showing a two digit HUURU LGHQWL FDWLRQ FRGH XQWLO WKH VLWXDWLRQ KDV EHHQ UHVROYHG For example error code 1 4 is displayed as follows Ɓ ƁƁƁ H DPS...

Page 33: ...EAR 1020L PYU 9017813 BLADE SQGE FRONT 1020L LINATEX STANDARD 9017814 BLADE SQGE REAR 1020L LINATEX STANDARD 9017816 BRUSH ASSY DISK SCB 35CM 3 LUG PYP STANDARD 9017730 BRUSH ASSY DISK SCB 35CM 3 LUG PYP SOFT 9017818 BRUSH ASSY DISK ABR 35CM 3 LUG 120 GRIT 9017820 DRIVER ASSY PAD 35CM 3 LUG MPVR05223 FLAP LH SIDE SKIRT MPVR05222 FLAP RH SIDE SKIRT 9017792 MOTOR BRUSH T681 Comman Parts 9017687 CARB...

Page 34: ...NTACTOR 24V 100A METT45116 CONTACTOR T106P 24V RTRT00539 WHEEL REAR PYU T681 MECE00456 RELAY BRUSH HEAD MLML00327 POTENTIOMETER SPRING MECE00575 CIRCUITBOARD ASSY ACTUATOR T681 MEVR00145 FUSE 100A METT00132 FUSE 30A METT00133 FUSE 25A METT00134 FUSE 1A METT00135 FUSE 2A METT00136 FUSE 3A METT00137 FUSE 4A MECE00450 CIRCUITBOARD ASSY TRACTION T681 MECE00451 CIRCUITBOARD ASSY CONTROL T681 34 ...

Page 35: ......

Page 36: ...Tennant Company PO Box 10400 Clean Street Eden Prairie MN 55344 2650 Phone 800 553 8033 www tennantco com Copyright 2021 Tennant Company All rights reserved ...

Reviews: