TM-197 AC/DC Magnetic Field Meter
User’s Manual
HB2TM1970000
Page 1: ...TM 197 AC DC Magnetic Field Meter User s Manual HB2TM1970000 ...
Page 2: ...6 Auto Record 6 5 7 Read the record data from RAM 7 5 8 Data Hold 7 5 9 The Max Min Values Hold 7 5 10 Disable Auto Power Off Function 7 5 11 Stopping buzzer 7 5 12 Manual range mode Automatic range mode 8 5 13 AC DC Switching magnetic field 8 5 14 Setup Step 1 Step 8 8 6 Software Installation 10 7 General Specifications 12 8 Electrical Specification 14 9 Maintenance or Repair 15 10 Battery Replac...
Page 3: ... the stress after processing of stainless material Measurement for the magnetic force of magnetic materials Measurement for the various steel materials with natural magnetism Measurement for the magnetic field strength of motors in various electrical appliances Measurement for the magnetic field strength of permanent magnets Detection for the magnetic field of leakage generated from superconductiv...
Page 4: ...lammable gas or humid environments Operating altitude up to 2000M Operating environment Indoor use Pollution degree 2 Clean with soft cloth when dirty such as glasses cloth Do not clean with chemicals and other solvents EMC EN61326 1 CISPR 11 Group 1 Class B Class B Equipment for use in all establishments other than domestic Group 1 RF energy generated is needed for internal functioning ...
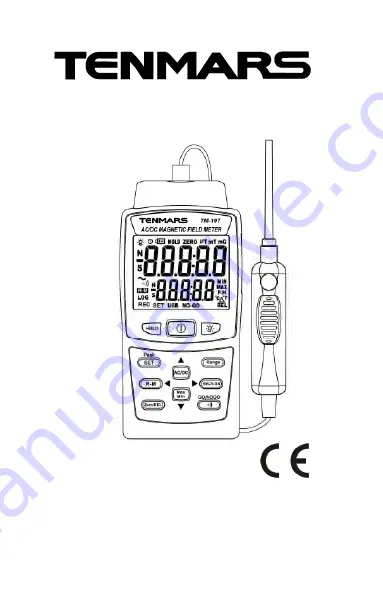
Page 5: ...from RAM R M Left 6 Set to Zero Zero Relative Value REL 7 AC DC switch Up 8 Manual range mode Automatic range mode 9 Manual record REC Auto record LOG 10 Buzzer GO NO GO 11 The max min value hold Down 12 Probe connector 13 External power DC 9V input 14 USB data output jack 15 Battery cover and tilt stand 16 LCD display ...
Page 6: ...ing Please refer to Fig 1 4 Read the measured value from the LCD display 5 Cover the cap of probe back If the probe not inserted into the host or not inserted completely will appear Please turn power off and ensure to insert the probe into the host again turn power on If the probe is disconnected with the host while working will appear for warning Fig 1 Correct Incorrect Magnet Magnet ...
Page 7: ...zeroing the value in measuring from HOST The zeroing function is unavailable for temperature 5 2 Peak Measurement Move the probe away from the magnetic field then press and hold for 2 seconds to start Peak Measurement The upper digit row presents the instant measuring the lower digit row presents the peak value x x Again press and hold to quit this function Zeroing will run automatically in prior ...
Page 8: ...urn the backlight on or off If connected via an external power supply the backlight will lit automatically and stay on The backlight will automatically turn off after being lit for 30 seconds 5 5 Manual Record for One Log Press to save one log of data the LCD will show REC and the number of logs For instance if the current number is 10 it will be increased by 1 at each pressing The number of logs ...
Page 9: ...ion again press to show the MAX and MIN values by turns Press and hold to quit The measured data can be held and updated as the measured the MAX and MIN values 5 10 Disable Auto Power Off Function With power off mode keep pressing and press to turn on power LCD will show n SL that means to disable auto power off function Re starting will reset to the auto power off function The function will be di...
Page 10: ...t between AC magnetic field and DC magnetic field 5 14Setup Step 1 Step 8 Press to enter the setup procedure from step 1 to step 8 while flashes on the LCD Step 1 Setup unit G or mT 1 Press or to select the unit G or mT 2 Again press to go to Step 2 Step 2 Setup unit or 1 Press or to select the unit ºC or ºF 2 Again press to go to Step 3 Step 3 Set up the upper limit Max for alarm GO NO GO 1 The d...
Page 11: ...e 2 Again press to go to Step 6 Step 6 Setup year month date 1 Go to the mode to setup the year month date 2 Press or to select the item to modify the digits of the selected item will flash 3 Then press or to correct the value 4 Again press to go to Step 7 Step 7 Setup hour minute 1 Go to the mode to setup the hour minute 2 Press or to select the item to modify the digits of the selected item will...
Page 12: ...ess to return to the measurement mode and clear the record while LCD shows CLEAR 6 Software Installation Windows 7 Windows 10 operating systems Place the CD included with this meter into the CD DVD ROM drive of the PC to connect to and install the desktop program Run the desktop application Connect the USB cable included with this meter to the PC as shown in the figure below ...
Page 13: ...TM 197 11 Execute the PC desktop software program Double click the left mouse button on the desktop program Thermometer Meter to execute the desktop program ...
Page 14: ...n with Automatic Measurement Conversion of units 1mT milli Tesla 10G Gauss Relative value Peak hold Real time Zeroing function Enable and disable auto power off function default power off is 15 minutes from the last operation DATA HOLD Data hold MAX MIN Maximum hold Minimum hold The GO and NO GO alarm function and its settings that can be applied to detect good and defective products on the produc...
Page 15: ...ty 5 C to 40 C 41 F to 104 F 80 RH Storage temperature and humidity 0 C to 50 C relative humidity under 70 Weight Approximately 320 grams with battery Dimensions 156 L x 73 W x 35 H mm AC to DC Adaptor External AC 100 240V to DC 9V 0 5A power supply Plug The pin in the center connects to the positive electrode and the outer case is negative electrode Diameter 5 5mm internal diameter 2 1mm ...
Page 16: ...ution Accuracy DC milli Tesla 300 00 mT 0 01 mT 4 10dgt 2000 0 mT 0 1 mT 2000 1 3000 0 mT 0 1 mT N A DC Gauss 3000 0G 0 1G 4 10dgt 20 000G 1G 20 001 30 000 G 1G N A AC milli Tesla 150 00mT 0 01 mT 5 20dgt 1500 0mT 0 1 mT AC Gauss 1500 0G 0 1G 15 000G 1G Temperatures Range 20 50 4 122 Resolution 0 1 0 1 Tolerance 1 0 1 8 ...
Page 17: ...ed for a long period of time in order to prevent battery leakage and causing damages to internal components 4 When the instrument failure only by the authorized service provider or return the original repair 10Battery Replacement 1 Turn off the power 2 Open the frame and battery cover at the back of the meter remove the batteries 3 Insert 6 pcs of new AAA 1 5V batteries according to the battery po...
Page 18: ......
Page 19: ...TENMARS ELECTRONICS CO LTD 6F NO 586 Ruiguang Rd Neihu Dist Taipei City Taiwan E mail service tenmars com http www tenmars com ...