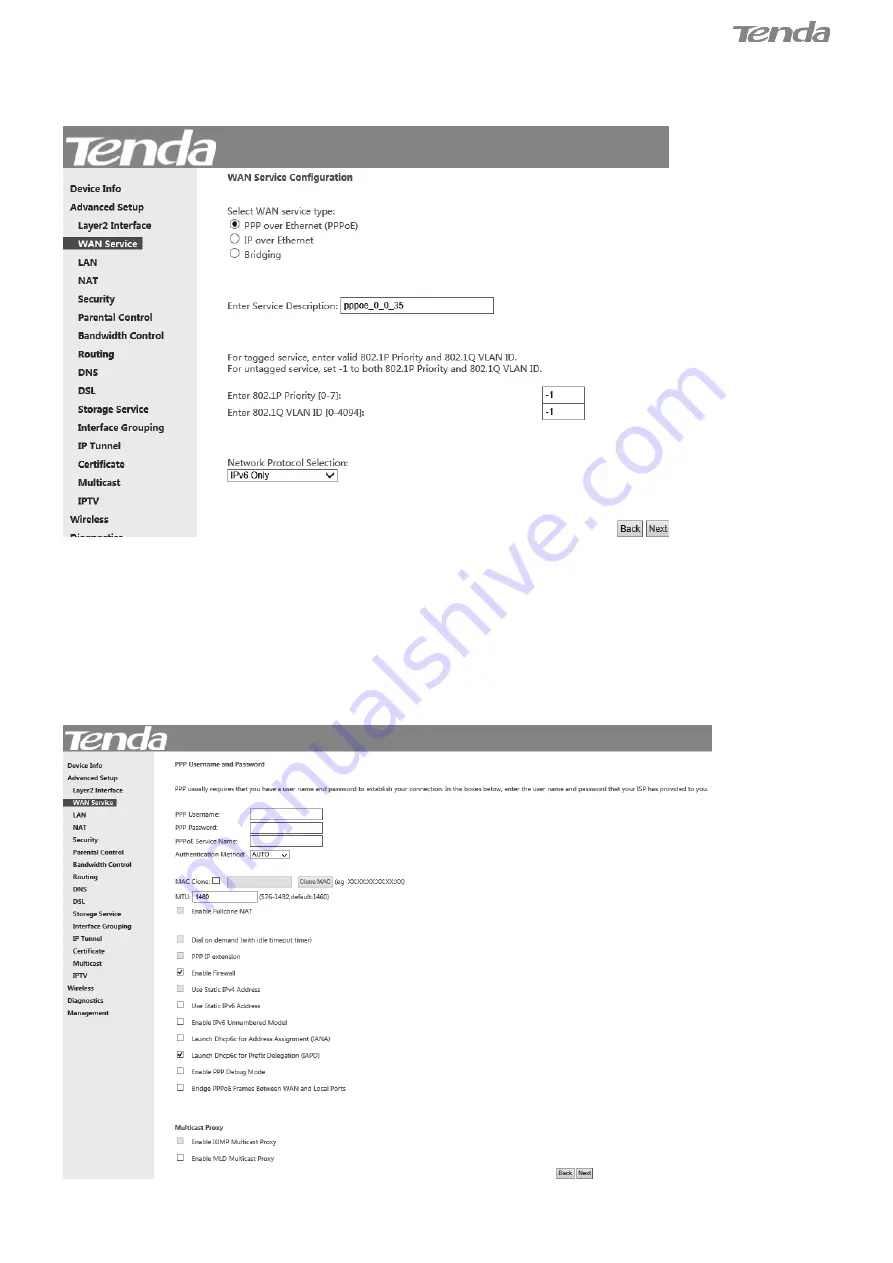
Tenda 6932849430011 User Manual Download Page 38


33 

Step 3: 

Select 

PPP over Ethernet (PPPoE)

.


Edit the 

Enter Service Description

 field which is optional. Suggest you 

keep the default.


Select a network protocol you need: 

IPv6 Only

.


Click 

Next. 


Step 4: 

Configure PPP Username and Password and other settings on the figure below. Each field with its indication is 

mentioned above in 

IPv4 Only (PPPoE) 

section.   

If ISP provides you no static IPv6 a

ddress, you just keep the default settings for it’s by default the DHCP mode.

 Check 

Launch Dhcp6c for Prefix Delegation (IAPD)

. If your ISP is using stateful DHCPv6, check

 Launch Dhcp6c for 

Address Assignment (IANA)

 also. Click 

Next

.


Summary of Contents for 6932849430011

Page 1: ...hnology Co Ltd Disclaimer Pictures images and product specifications herein are for references only To improve internal design operational function and or reliability Tenda reserves the right to make...

Page 2: ...in any form or by any means without the prior written permission of Shenzhen Tenda Technology Co Ltd Disclaimer Pictures images and product specifications herein are for references only To improve in...

Page 3: ...struction 11 3 3 Quick Wireless Security Setup 18 Chapter 4 Advanced Settings 19 4 1 Device Info 19 4 2 Advanced Setup 22 4 2 1 Layer2 Interface 23 4 2 2 WAN Service 25 4 2 3 LAN Setup 79 4 2 4 NAT 82...

Page 4: ...ions 137 Application 1 How to change SSID and wireless password 137 Application 2 How to reset the modem router 138 Method 1 WPS RST button 138 Method 2 Restore Default Settings from User Interface 13...

Page 5: ...host or client GO How to restrict a host to access your wireless network GO How to access a USB storage GO How to expand your wireless network coverage GO How to make your set top box available GO Ho...

Page 6: ...IPTV IP Tunnel and Connection Diagnostics etc create a diverse network world for you 1 2 Product Features Wireless N Speeds up to 300 Mbps for streaming HD videos and online gaming in addition to basi...

Page 7: ...prevents hacker attacks Channel auto select for optimum performance FDM technology enables telephoning faxing and surfing activities to proceed simultaneously without mutual interference Other Advanc...

Page 8: ...s connected and is working Off No USB device is connected to the device WPS Solid A wireless device is connected to the device via WPS successfully It will be off in 5 minutes Blinking It is waiting f...

Page 9: ...rt 4 iTV LAN port or IPTV port When IPTV feature is disabled it works as a LAN port which can be used to connect to a PC switch or a router when IPTV feature is enabled it works as an IPTV port and it...

Page 10: ...device and modem router This part includes the following 2 1 DSL Access 2 2 Ethernet Access 2 1 DSL Access DSL access cabling is detailed below Cable the modem router and your computer following the s...

Page 11: ...litter is used to make you active in phone service and Internet service simultaneously If you don t need the telephone service just connect the telephone line from your ISP to the DSL port 3 Make sure...

Page 12: ...get to the Internet via a modem or an Ethernet cable directly choose your access type correctly and follow the diagram a1 If you get to the Internet via a modem cable modem or fiber modem follow this...

Page 13: ...______________________________________ TIP 1 Before connecting make sure the Internet service is available 2 Disconnect the modem router from WAN or DSL connection and unplug it from the power when it...

Page 14: ...o Obtain an IP address automatically For more information see Appendix 2 Configure Your PC Launch a web browser and enter 192 168 1 1 to display the login window Enter admin in both the login User Nam...

Page 15: ...h type your Internet access is DSL is for a telephone line access which means you access Internet service with a telephone line Ethernet is for an Ethernet cable access If you are using this modem rou...

Page 16: ...orts two connection types PPPoE and IPoE Check Auto PVC scan If the scan failed uncheck this option and configure the PVC and country settings manually Click here to check PVC value or consult your IS...

Page 17: ...on types PPPoE and IPoE Configure the PVC ISP and country settings manually Click here to check PVC value or consult your ISP if you cannot locate this info Note that Auto PVC scan is not available fo...

Page 18: ...try settings manually Click here to check PVC value or consult your ISP if you cannot locate this info Select your address mode Dynamic IP or Static IP This is depending on your ISP Dynamic IP mode re...

Page 19: ...y settings manually Click here to check PVC value or consult your ISP if you cannot locate this info Note that Auto PVC scan is not available for IPoA Select your address mode Static IP And type the I...

Page 20: ...nt provided by your ISP for Internet service ________________________________________________________________________________________________ NOTE If your country and or your ISP are not covered on th...

Page 21: ...e Type the user name and password of PPPoE provided by your ISP Finish the wireless setup Recommended Click OK IPoE Select Auto or Ethernet link type and select IPoE connection type Select your addres...

Page 22: ...Finish the wireless setup Recommended Click OK When Bridge mode in Ethernet access is enabled dial up from the local PC with the account provided by your ISP for Internet service Test Internet Connect...

Page 23: ...ess SSID It is the name of your WiFi Set it as you like Wireless Key It is the key of your WiFi The WiFi is unencrypted by default but there is a preset key in the wireless key field The preset key wi...

Page 24: ...want to configure the router for unique situations This part includes the following 4 1 Device Info 4 2 Advanced Setup 4 3 Wireless 4 4 Diagnostics 4 5 Management 4 1 Device Info This section include...

Page 25: ...transmitted on LAN WAN ports Statistics LAN Displays the packets received and transmitted on the LAN ports as seen in the screenshot below ____________________________________________________________...

Page 26: ...received and transmitted on the WAN ports as seen in the screenshot below Statistics ADSL Displays the DSL port status e g packets received and transmitted on the DSL port Route Here you can view the...

Page 27: ...ding IP and MAC addresses of the PCs hostnames and remaining lease time as seen in the screenshot Note that if the DHCP server is disabled this info will be hidden 4 2 Advanced Setup This section expl...

Page 28: ...able By default system applies the ATM Interface ADSL uplink If you directly connect to the ADSL line via a phone cable first refer to To Set up the ATM interface and then skip to To Set up WAN Servic...

Page 29: ...the WAN service for Internet access _________________________________________________________________________________________________ TIP If you are unsure about the VPI VCI parameters see Appendix 5...

Page 30: ...nfigure the WAN service for Internet access 4 2 2 WAN Service This router provides two WAN services WAN Service for ATM Interface ADSL uplink WAN Service for ETH Interface Ethernet uplink To Set up WA...

Page 31: ...tton Step 2 Select the ATM interface you added just now from the pull down menu in the figure below Click Next Step 3 Select PPP over Ethernet PPPoE Edit the Enter Service Description field which is o...

Page 32: ...re is traffic transmission This saves your broadband Internet service bill PPP IP extension If enabled all the IP addresses in outgoing packets including management packets on the WAN port will be cha...

Page 33: ...the Default Gateway interface select the interface that you want to configure with the WAN gateway address in Available Routed WAN Interfaces box and move it into Selected Default Gateway Interfaces b...

Page 34: ...verything is correctly set When the PPPoE connection is successful you can access the Internet IPv4 IPv6 Dual Stack Step 1 Click Advanced Setup WAN Service and then click the Add button Step 2 Select...

Page 35: ...v4 IPv6 Dual Stack Click Next Step 4 Configure PPP Username and Password and other settings on the figure below Each field with its indication is mentioned above in IPv4 Only PPPoE section Check Launc...

Page 36: ...address in Selected WAN Interface box Then click Next Step 6 To configure the WAN DNS address check the Obtain IPv6 DNS info from a WAN interface option or select the Use the following Static IPv6 DN...

Page 37: ...is successful you can access the Internet IPv6 Only Step 1 Click Advanced Setup WAN Service and then click the Add button Step 2 Select the ATM interface you added just now from the pull down menu in...

Page 38: ...PPP Username and Password and other settings on the figure below Each field with its indication is mentioned above in IPv4 Only PPPoE section If ISP provides you no static IPv6 address you just keep t...

Page 39: ...you want to configure with the WAN gateway address in Selected WAN Interface box Then click Next Step 6 To configure the WAN DNS address check the Obtain IPv6 DNS info from a WAN interface option or...

Page 40: ...ur ISP automatically or if your ISP assigns you a static fixed IP address subnet mask and gateway you need to select the IP over Ethernet IPoE Step 1 Click Advanced Setup WAN Service and then click th...

Page 41: ...lect IP over Ethernet Edit the Enter Service Description which is optional Suggest you keep the default Select a network protocol IPv4 Only Click Next Step 4 Finish WAN IP Settings on the figure below...

Page 42: ...P for accessing the Internet WAN Subnet Mask The subnet mask address provided by your ISP for accessing the Internet WAN gateway IPAddress The gateway IP address provided by your ISP for accessing the...

Page 43: ...elect the Use the following Static DNS IP address option and enter the static DNS server IP addresses provided by your ISP At last click Next Step 8 Here you can view your configurations Click Apply S...

Page 44: ...d button Step 2 Select the ATM interface you added just now from the pull down menu in the figure below Click Next Step 3 Select IP over Ethernet Edit the Enter Service Description which is optional S...

Page 45: ...using stateful DHCPv6 check Dhcpv6 Address Assignment IANA also Or select Use the following Static IP address if your ISP provides you with an IPv6 address Click Next If ISP provides you with the sta...

Page 46: ...nt to configure with the WAN gateway address in Available Routed WAN Interfaces box and move it into Selected Default Gateway Interfaces box Then click Next Step 7 To configure the WAN DNS address che...

Page 47: ...s if everything is correctly set When the IPoE connection is successful you can access the Internet IPv6 Only Step 1 Click Advanced Setup WAN Service and then click the Add button Step 2 Select the AT...

Page 48: ...tocol you need IPv6 Only Click Next Step 4 Enter the WAN information provided by your ISP to configure the WAN IPv6 settings To obtain an IP address automatically Select Obtain an IPv6 address automat...

Page 49: ...ect the interface that you want to configure with the WAN gateway address in Selected WAN Interface box Then click Next Step 7 To configure the WAN DNS address check the Obtain IPv6 DNS info from a WA...

Page 50: ...to initiate a dialup directly from your PC for Internet access or enjoy the entire Internet connection instead of sharing it with others you can use the Bridging DSL link type and create a dialup prog...

Page 51: ...Step 3 Select Bridging Edit the Enter Service Description which is optional Suggest you keep the default Click Next Step 4 Here you can view your configurations Click Apply Save to activate your setti...

Page 52: ...face screen in Layer2 Interface you will see the screen below when you click the WAN Service tab select the configured interface and click Next IPv4 Only Step 1 Click Advanced Setup WAN Service and th...

Page 53: ...o authenticate the client that attempts to connect If you are not sure consult your ISP or select AUTO Dial on demand Connect to ISP only when there is traffic transmission This saves your broadband I...

Page 54: ...ick the Select DNS Server Interface from available WAN interfaces option Select the Use the following Static DNS IP address option and enter static DNS server IP addresses for the system And then clic...

Page 55: ...to be effective Step 8 When the PPPoA connection is successful you can access the Internet IPv4 IPv6 Dual Stack Step 1 Click Advanced Setup WAN Service and then click the Add button Step 2 Select the...

Page 56: ...mend that you keep the default Select a network protocol IPv4 IPv6 Dual Stack Click Next Step 4 Enter PPP username and its password provided by your ISP Click Next Step 5 To configure the WAN gateway...

Page 57: ...interfaces OR enter static DNS server IP addresses for the system And then click Next NOTE 1 DNS Server Interfaces can have multiple WAN interfaces served as system DNS servers but only one will be us...

Page 58: ...everything is correctly set Step 8 When the PPPoA connection is successful you can access the Internet IPv6 Only Step 1 Click Advanced Setup WAN Service and then click the Add button Step 2 Select th...

Page 59: ...s optional We recommend that you keep the default Select a network protocol IPv6 Only Click Next Step 4 Enter PPP username and its password provided by your ISP Click Next Step 5 Select a preferred wa...

Page 60: ...IPv6 DNS server addresses And then click Next NOTE Selecting a WAN interface for IPv6 DNS server will enable DHCPv6 Client on that interface Step 7 Here you can view your configurations Click Apply Sa...

Page 61: ...own menu in the figure below Click Next Step 3 Edit the Enter Service Description This field is optional It is recommended that you keep the default Click Next Step 4 Enter the WAN IP address and subn...

Page 62: ...eway interface list can have multiple WAN interfaces served as system default gateways but only one will be used according to the priority with the first being the highest and the last one the lowest...

Page 63: ...58 Step 8 Here you can view your configurations Click Apply Save to save your settings if everything is correctly set Step 9 IPoA WAN service setup parameter is shown as below...

Page 64: ...ollow steps below to configure the WAN service PPP over Ethernet PPPoE IPv4 Step 1 Click Advanced Setup WAN Service and then click the Add button Step 2 Select the ETH interface you added just now fro...

Page 65: ...e card in your computer when your account is first opened They then accept traffic only from the MAC address of that computer If so configure your router to clone the MAC address from the authorized c...

Page 66: ...is recommended Step 6 Configure the WAN DNS address according to your ISP Click the Select DNS Server Interface from available WAN interfaces option Or select the Use the following Static DNS IP addr...

Page 67: ...ccessful you can access the Internet IPv4 IPv6 Dual Stack Step 1 Click Advanced Setup WAN Service and then click the Add button Step 2 Select the ETH interface you added just now from the pull down me...

Page 68: ...you keep the default Select a network protocol IPv4 IPv6 Dual Stack And click Next Step 4 Enter PPP username and PPP password provided by your ISP Check Launch Dhcp6c for Prefix Delegation IAPD If you...

Page 69: ...server Select an available DNS server interface or use a specified DNS server configure IPv6 DNS server Obtain IPv6 DNS info from a WAN interface or use a specified DNS server and then click Next Step...

Page 70: ...d then click the Add button Step 2 Select the ETH interface you added just now from the pull down menu in the figure below Click Next Step 3 Select PPP over Ethernet Edit the Enter Service Description...

Page 71: ...IANA also Or configure a static IP address Step 5 Select a preferred WAN interface from the WAN interface list as the system default IPv6 gateway Click Next Step 6 Select the configured WAN interface...

Page 72: ...67 Step 7 Here you can view your configurations Click Apply Save to save your settings if everything is correctly set When the PPPoE connection is successful you can access the Internet...

Page 73: ...IPoE IPv4 Step 1 Click Advanced Setup WAN Service and then click the Add button Step 2 Select the ETH interface you added just now from the pull down menu in the figure below Click Next Step 3 Select...

Page 74: ...address This allows you to specify the Static IP information provided by your ISP or that corresponds with your existing networking equipment WAN IPAddress The Internet IP address provided by your IS...

Page 75: ...gure the WAN DNS address Click the Select DNS Server Interface from available WAN interfaces option Or select the Use the following Static DNS IP address option and enter static DNS server IP addresse...

Page 76: ...ck the Add button Step 2 Select the ETH interface you added just now from the pull down menu in the figure below Click Next Step 3 Select IP over Ethernet as WAN service type Edit the Enter Service De...

Page 77: ...72 Step 4 Enter information provided by your ISP to configure the WAN IP settings...

Page 78: ...ommended and then click Next Step 6 Configure a WAN interface as the default gateway Step 7 Configure DNS server Select an available DNS server interface or use a specified DNS server configure IPv6 D...

Page 79: ...ngs if everything is correctly set When the IPoE connection is successful you can access the Internet IPv6 Step 1 Click Advanced Setup WAN Service and then click the Add button Step 2 Select the ETH i...

Page 80: ...etwork protocol IPv6 Only And then click Next Step 4 Enter the WAN information provided by your ISP to configure the WAN IPv6 settings To obtain an IP address automatically Select Obtain an IPv6 addre...

Page 81: ...n using IPv6 select the interface that you want to configure with the WAN gateway address in Selected WAN Interface box Then click Next Step 7 To configure the WAN DNS address check the Obtain IPv6 DN...

Page 82: ...Internet access or enjoy the entire Internet connection instead of sharing it with others you can select the Bridging and create a dialup program from your PC Step 1 Click Advanced Setup WAN Service...

Page 83: ...ext Step 4 Here you can view your configurations Click Apply Save to save your settings if everything is correctly set After the bridging connection is successful initiate a dialup directly from your...

Page 84: ...the IP address the IP Subnet Mask allows a device to know which other addresses are local to it and which must be reached through a gateway or modem router You can change the subnet mask to fit your n...

Page 85: ...______________ TIP DHCP Dynamic Host Configuration Protocol assigns an IP address to each device on the LAN private network When you enable the DHCP Server the DHCP Server will automatically allocate...

Page 86: ...k the checkbox to enable the RADVD Enable ULA Prefix Advertisement If enabled the router will advertise ULA prefix periodically Randomly Generate If selected address prefix can be automatically genera...

Page 87: ...rtual server screen click NAT Virtual Server and then click the Add button to add rules Use Interface Select a WAN connection to which you wish to apply the rules When there is only one WAN connection...

Page 88: ...and web server via default ports To access your FTP or web server from the Internet a remote user has to know the WAN IP address of your router In this example we assume the WAN IP address of your ro...

Page 89: ...al computer that offers this service Here in this example we enter 110 5 Click Now you can view your configurations as seen in the screenshot below Your friends on the Internet will then be able to ac...

Page 90: ...button to add rules You can configure the port settings from this screen by selecting an existing application or creating your own Custom application and click Save Apply to add it Use Interface Selec...

Page 91: ...ted to a LAN port of the device Be sure to assign a static IP address to that DMZ host Warning DMZ servers pose a security risk A computer designated as the DMZ server loses much of the protection of...

Page 92: ...d _________________________________________________________________________________________________ 4 2 5 Security This section explains the following information IP Filtering MAC Filtering IP Filteri...

Page 93: ...Enter the LAN IP address to be filtered Source Port port or port port Specify a port number or a range of ports used by LAN PCs to access the Internet If you are unsure leave it blank Destination IP a...

Page 94: ...nal network to access your internal network Destination IP address prefix length Specify the internal network IP address prefix length to be accessed by the specified PCs from external network Destina...

Page 95: ...ou can create a filter to identify the MAC layer frames by specifying at least one condition below If multiple conditions are specified all of them take effect Click Save Apply to save and activate th...

Page 96: ...ame Browser s MAC Address Automatically adds the MAC address of the attached LAN device where the browser is running Other MAC Address Specify the MAC address of the computer that you want to apply In...

Page 97: ..._____________________________________________________________________________ NOTE If you have accessed the URL before you include it in a URL filter rule you must reboot the router and erase it from...

Page 98: ...______________________________ 4 2 7 Bandwidth Control When multiple devices each of which requests a different bandwidth attach to the modem router to ensure the attached devices obtaining a fair ban...

Page 99: ...and then click to activate the settings 4 2 8 Routing This section explains the following Default Gateway Static Route Default Gateway Default gateway interface list can have multiple WAN interfaces...

Page 100: ...ta in your network You can use this feature to allow users on different IP domains to access the Internet via this device It is not recommended to use this setting unless you are familiar with static...

Page 101: ...s located on your network Wrong static routes may lead to network failure 3 For system created route the Remove checkbox is disabled ___________________________________________________________________...

Page 102: ...ocol is configured Static DNS server IP addresses must be entered 2 If you are not clear about the static DNS server IP information ask your ISP to provide it 3 The default settings are recommended if...

Page 103: ...the DDNS domain name registered with your DDNS service provider Interface Specify a WAN connection interface Username Enter the DDNS user name registered with your DDNS service provider Password Ente...

Page 104: ...ASDL modulation modes to meet diversified environments You can also select phone line pair and Capability DSL parameter configurations must be supported by ISP to take effect Actual parameters see Sta...

Page 105: ...the factory default settings Wrong configurations may fail your Internet access _________________________________________________________________________________________________ 4 2 11 Storage Servic...

Page 106: ...ew one Pay attention to that your computer system will record the account you used at the first time Application How to access the USB storage device attached to the modem router Step 1 Plug USB stora...

Page 107: ...a computer Click R on the keyboard to pop up the Run dialog and type 192 168 1 1 in the blank field Click OK Step 4 Access the USB storage device with the account samba Double click and enter your acc...

Page 108: ...s to PVC and bridging groups Each group will perform as an independent network To support this feature you must create mapping groups with appropriate LAN and WAN interfaces using the Add button The R...

Page 109: ...mapping of the ports Click Apply Save button to make the changes effective immediately If you want to bypass NAT via the router s interface and obtain the public IP address automatically you need to a...

Page 110: ...erface Specify the WAN interface of the tunnel Associated LAN Interface Specify the LAN interface of the tunnel Manual If you select Manual configure the following settings also IPv4 Mask Length Speci...

Page 111: ...he LAN interface of the tunnel Manual If you select Manual enter the AFTR information also Automatic If Automatic is selected no configurations are required Apply Save Click to apply and save your set...

Page 112: ...equest button to enter the page below Specify the Common Name Organization Name and State Province Name Enter the 2 letter Country Code for the certificate Click Apply to apply your settings To Import...

Page 113: ...content and private key Click Apply to apply your settings Trusted CA Certificate Authority Certificates Here you can add view or remove CA certificates CA certificates are used by you to verify peer...

Page 114: ...y to apply your settings 4 2 15 Multicast Here you can configure the multicast feature To configure IGMP for IPv4 Check the LAN to LAN Intra LAN Multicast Enable box Check the Membership Join Immediat...

Page 115: ...110 To configure IGMP for IPv6 Check the LAN to LAN Intra LAN Multicast Enable box Keep other options unchanged from factory defaults if you are not an advanced user This is strongly recommended...

Page 116: ...ave it Enable IPTV Check to enable the IPTV service or disable it IPTV configuration for DSL Internet Access user Enable IPTV Select Layer2 interface ATM Interface Configure an available VPI VCI value...

Page 117: ..._________________________________________________________________________________________________ 4 3 Wireless This section explains the following information Basic Security MAC Filter Wireless Bridge...

Page 118: ...our country Channel Select a channel or select Auto to let system automatically select one for your wireless network to operate on if you are unsure The best selection is a channel that is the least u...

Page 119: ...de in the blank if you select this option and then click Use AP PIN AP means the modem router Select this option if you copy the PIN code of the modem router to the remote wireless client NOTE 1 WPS R...

Page 120: ...ding on the type of network authentication you select you will be prompted to enter corresponding settings WEP Encryption Select Enabled or Disabled Encryption Strength Select 128 bit or 64 bit Curren...

Page 121: ...ur wireless network Deny Block only PCs at specified MAC addresses from connecting to your wireless network Disable Disable this feature Add Click it to add a MAC address Remove To delete an existing...

Page 122: ...eck WPS status ________________________________________________________________________________________________ 4 3 4 Wireless Bridge This page allows you to configure wireless bridge also known as Wi...

Page 123: ...splays the remote device info MAC address and SSID if Bridge Action is Enabled Scan or offers you field to enter the remote info MAC address if Bridge Action is Enabled Refresh Click to refresh the Wi...

Page 124: ...1 wireless name SSID channel security mode MAC address and wireless key a Click Advanced Wireless Basic to check the SSID MAC address BSSID and Channel SSID Tenda_112252 BSSID 00 90 4C 11 22 53 Channe...

Page 125: ...PSK AES Wireless Key 12345678 View the LAN settings of Router 1 Click Advanced Advanced Setup LAN to check LAN IP address and Subnet Mask and verify that the DHCP Server is enabled LAN IPAddress 192...

Page 126: ...eck the SSID and Channel They should be the same as Router 1 s If not correct them manually Click Apply Save to save your settings Click Advanced Wireless Security to check the security mode and wirel...

Page 127: ...Tenda_112252 in Remote Bridges MAC Address field If you cannot find the SSID on the list click Refresh to refresh the list Then click Apply Save to save your settings Wireless Bridge Two ways to brid...

Page 128: ...ettings on Router 2 above do as follows Configure Router 1 Click Advanced Wireless Wireless Bridge Select Access Point in AP Mode field If you select Wireless Bridge here the wireless devices will not...

Page 129: ...dress field If you cannot find the SSID on the list click Refresh to refresh the list Then click Apply Save to save your settings The configuration is finished Then the devices can connect Router 2 wi...

Page 130: ...ss Bridge can only be implemented between 2 WDS capable wireless devices Plus SSID channel security settings and security key must be exactly the same on both such devices 4 3 5 Station Info This page...

Page 131: ...ollow the troubleshooting procedures Pass Indicates that the Ethernet interface from your computer is connected to the LAN port of the device Fail Indicates that the device does not detect the Etherne...

Page 132: ...tion explains the following information Backup Restore Backup Restore Default Backup Here you can save a copy of your device s configurations to your computer Once you have configured the device you c...

Page 133: ...efault Under some circumstances for example join a different network or unfortunately forgetting the login password you may need to remove the existing configuration and restore the factory default se...

Page 134: ...ogged Display Level Set the log display level All logged events above or equal to the selected level will be displayed Apply Save click to apply and save the system log settings To view the system log...

Page 135: ...Specify a descriptive system name System Location Specify a system location System Contact Specify a system contact Trap Manager IP Specify the IP address of the Trap Manager 4 5 4 TR 069 Client WAN...

Page 136: ...yed on serial console Connection Request Authentication Check uncheck to enable disable the connection request authentication Connection Request User Name Enter the connection request user name Connec...

Page 137: ...aintenance and to run diagnostics User Name Enter the user name of up to 16 characters The default is admin Old Password Enter the old password of up to 16 characters The default is admin New Password...

Page 138: ...dvanced user it is recommended to keep the default settings ________________________________________________________________________________________________ 4 5 7 Update Software Firmware upgrade is r...

Page 139: ...134 This modem router supports three types to update firmware Type 1 General Update To update software do as follows Obtain an updated software image file from our website www tendacn com...

Page 140: ...TP Server IP address like the right figure Type the port the FTP server used Type the user name and password to access the FTP server Copy the name of the firmware Click to start updating Type 3 Updat...

Page 141: ...136 NOTE The update process will cost 2 minutes and the device will reboot 4 5 8 Reboot Click the Reboot button to reboot the router...

Page 142: ...password Go to Wireless Basic interface Specify a SSID as you like like Tenda_myhome Click Apply Save to save the settings Go to Wireless Security interface Choose a network authentication WPA2 PSK i...

Page 143: ...figure it for Internet service Method 1 WPS RST button Press the WPS RST button on the back of the modem router for about 8 seconds to reset it to factory defaults Method 2 Restore Default Settings fr...

Page 144: ...IP address Screens to configure TCP IP properties in other Operating Systems are similar to those below Windows 8 1 Right click the icon or on the bottom right corner of your desktop 2 Click Open Netw...

Page 145: ...e click Internet Protocol Version 4 TCP IPv4 5 Select Obtain an IP address automatically and Obtain DNS server address automatically and click OK 6 Click OK on the Ethernet Properties window see Step...

Page 146: ...ows 7 1 Click the icon on the bottom right corner of your desktop 2 Click Open Network and Sharing Center 3 Click Local Area Connection Properties 4 Find and double click Internet Protocol Version 4 T...

Page 147: ...142 5 Select Obtain an IP address automatically and Obtain DNS server address automatically and click OK 6 Click OK on the Local Area Connection Properties window see Step 4 for the screenshot...

Page 148: ...143 MAC 1 Click on the Apple icon from the top left corner and select System Preferences 2 Click Network 3 Click on Ethernet 4 Select Using DHCP 5 Click Apply...

Page 149: ...ess network is connected successfully the following screen will appear TIP 1 If you cannot find the icon please move your mouse to the top right corner of your desktop select Settings Control Panel Ne...

Page 150: ...right corner of your desktop 2 Double click your SSID wireless network name and then follow onscreen instructions 3 When your SSID wireless network name displays Connected as shown below you ve conne...

Page 151: ...ick System Preferences 2 Select Network from Internet Network 3 Click WiFi 4 Turn WiFi on 5 Click No network selected 6 Select the wireless network name of your router 7 Enter the wireless password an...

Page 152: ...oll screen to find the Settings icon and click it 2 Click WiFi and turn on WiFi 3 Find the name of the wireless network you wish to connect and click it 4 Enter the wireless password and click Join Co...

Page 153: ...2 Configure Your PC hereof 3 Press the WPS RST button on the device for about 8 seconds and then re access the UI with the default login info admin 4 Change the Ethernet cable that connects your PC a...

Page 154: ...a Australia On Line 8 35 PPPOA_VCMUX Australia Connexus 8 35 PPPOE_LLC Australia Dodo 8 35 PPPOE_LLC Australia Gotalk 8 35 PPPOE_VCMUX Australia Internode 8 35 PPPOE_VCMUX Australia iPrimus 8 35 PPPOA...

Page 155: ...35 1483 Bridged IP LLC Colombia EMCALI 0 33 PPPoA VC MUX Columbia ETB 0 33 PPPoE LLC Costa Rica ICE 1 50 1483 Routed IP LLC Czech Republic 8 48 1483 Bridged IP LLC Denmark Cybercity Tiscali 0 35 PPPo...

Page 156: ...81 PPPoE LLC Iran Shatel Aria Rasaneh Tadbir 0 35 PPPOE LLC Iran Asia Tech 0 35 PPPOE LLC Iran Pars Online Tehran 0 35 PPPOE LLC Iran Pars Online Provinces 0 59 PPPOE LLC Iran Saba Net Neda Gostar Sa...

Page 157: ...a 0 35 PPPoE LLC Mexico Telmex 1 8 81 PPPoE LLC Mexico Telmex 2 8 35 PPPoE LLC Mexico Telmex 3 0 81 PPPoE LLC Mexico Telmex 4 0 35 PPPoE LLC morocco IAM 8 35 PPPOE Netherlands BBNED 0 35 PPPoA VC MUX...

Page 158: ...Saudi Arabia 6 0 35 1483 Routed IP LLC Spain Arrakis 0 35 1483 Bridged IP VC MUX Spain Auna 8 35 1483 Bridged IP VC MUX Spain Comunitel 0 33 1483 Bridged IP VC MUX Spain Eresmas 8 35 1483 Bridged IP...

Page 159: ...LC Sri Lanka Telecom SLT 8 35 PPPOE LLC Sweden Telenordia 8 35 PPPoE Sweden Telia 8 35 1483 Routed IP LLC Switzerland 8 35 1483 Bridged IP LLC Switzerland 8 35 PPPoE LLC Telef nica Argentina 8 35 1483...

Page 160: ...1 0 35 PPPoE LLC United States Earthlink 2 8 35 PPPoE LLC United States Earthlink 3 8 35 PPPoE VC MUX United States Earthlink 4 0 32 PPPoA LLC United States Eastex 0 100 PPPoA LLC United States Embar...

Page 161: ...ted States Uniserv 0 33 1483 Bridged IP LLC United States US West 0 32 PPPoA VC MUX United States Verizon 1 0 35 PPPoE LLC United States Verizon 2 0 35 1483 Bridged IP LLC United States Windstream 0 3...

Page 162: ...mus 8 35 PPPOA_VCMUX Australia Netspace 8 35 PPPOE_VCMUX Australia Southern Cross Telco 8 35 PPPOE_LLC Australia TPG Internet 8 35 PPPOE_LLC Argentina Telecom 0 33 PPPoE LLC Argentina Telefonica 8 35...

Page 163: ...Tiscali 0 35 PPPoA VC MUX Dominican Republic 0 33 1483 Bridged IP LLC Dubai 0 50 1483 Bridged IP LLC Egypt TE data 0 35 1483 Bridged IP LLC Egypt Linkdsl 0 35 1483 Bridged IP LLC Egypt Vodafone 8 35 1...

Page 164: ...59 PPPOE LLC Iran Saba Net Neda Gostar Saba 0 35 PPPOE LLC Iran Pishgaman Tose 0 35 PPPOE LLC Iran Fan Ava 8 35 PPPOE LLC Iran Datak 0 35 PPPOE LLC Iran Laser General 0 35 PPPOE LLC Iran Laser Private...

Page 165: ...OE Netherlands BBNED 0 35 PPPoA VC MUX Netherlands MXSTREAM 8 48 1483 Bridged IP LLC Netherlands BBNED 0 35 1483 Bridged IP LLC Netherlands MX Stream 8 48 PPPoA VC MUX New Zealand Xtra 0 35 PPPoA VC M...

Page 166: ...ridged IP VC MUX Spain Jazztel 8 35 IPOE VC MUX Spain Jazztel ADSL2 Desagregado 8 35 1483 Bridged IP LLC BRIDGING Spain OpenforYou 8 32 1483 Bridged IP VC MUX Spain Tele2 8 35 1483 Bridged IP VC MUX S...

Page 167: ...d IP LLC based Telef nica Per 8 48 1483 Bridged IP VC MUX Thailand TRUE 0 100 PPPoE LLC Thailand TOT 1 32 PPPoE LLC Thailand 3BB 0 33 PPPoE LLC Thailand Cat Telecom 0 35 PPPoE LLC Thailand BuddyBB 0 3...

Page 168: ...P LLC United States Frontier 0 35 PPPoE LLC United States Grande ommunications 1 34 PPPoE LLC United States GWI 0 35 1483 Bridged IP LLC United States Hotwire 0 35 1483 Bridged IP LLC United States In...

Page 169: ...PPPoE LLC United States Verizon 2 0 35 1483 Bridged IP LLC United States Windstream 0 35 PPPoE LLC United States Verizon 2 0 35 1483 Bridged IP LLC United Kingdom 1 0 38 PPPoA VC MUX United Kingdom 2...

Page 170: ...cordance with the instruction manual may cause harmful interference to radio communications Operation of this equipment in a residential area is likely to cause harmful interference in which case the...

Reviews: