background image

9

• 

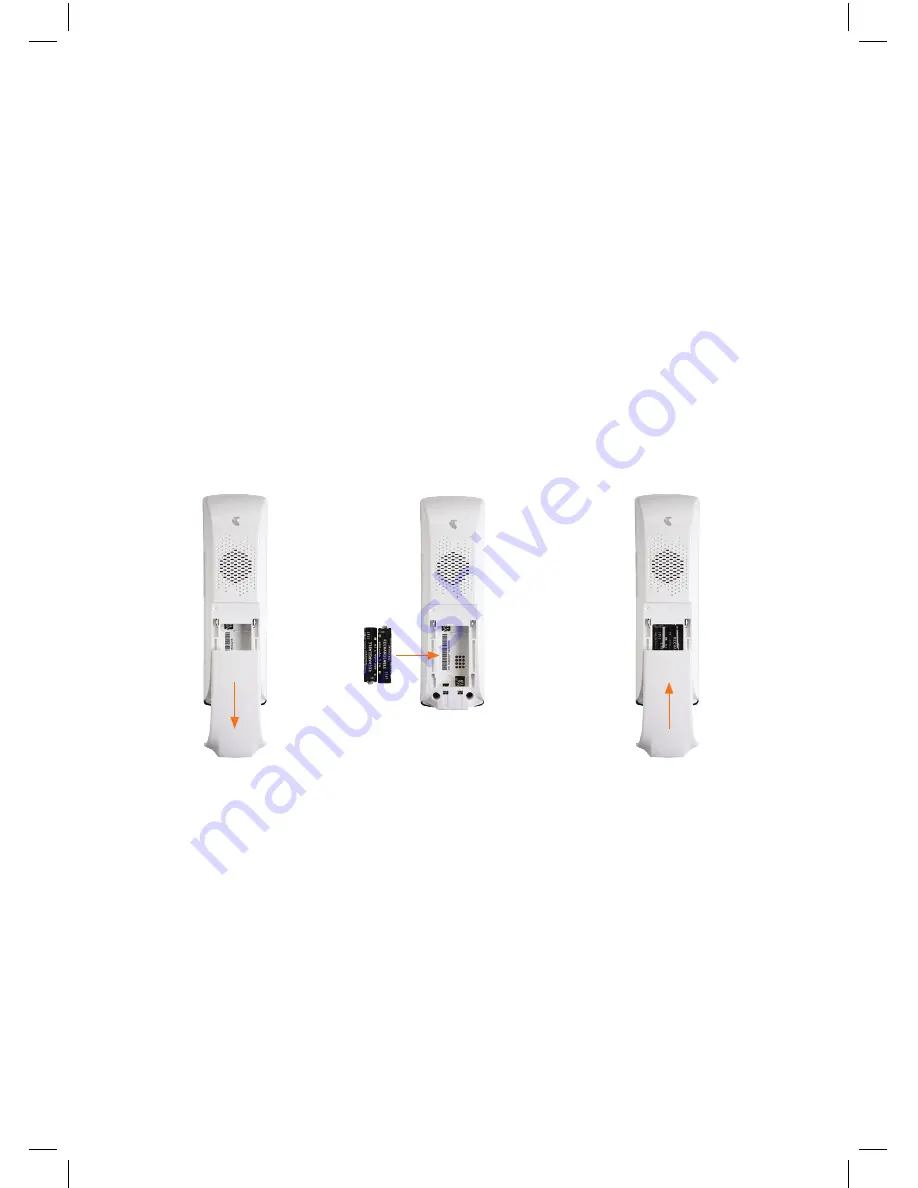
Remove handset back cover.

• 

Insert batteries in handset and replace the cover.

•  

Place the handset into the handset dock and connect the dock to mains power using 
one of the power supplies provided. 

• 

Turn the handset on by pressing and holding down the power key.

GettinG 

ConneCted

1. insert Handset battery

2.

1.

3.

Summary of Contents for T-HUB 2

Page 1: ...Getting to know your Telstra T Hub 2 ...

Page 2: ...ernet services This guide will help you get started as quickly and easily as possible It ll help you get connected and show you all kinds of ways to get the most from your T Hub 2 You ll be making calls and browsing the internet in no time For more information on using your T Hub 2 visit telstra com thub or contact T Hub Support on 1300 136 841 ...

Page 3: ...2 What s inside 03 Let s get started 05 Your T Hub 2 09 Getting connected 19 A closer look at the Tablet ...

Page 4: ... g n are compatible Please note that this is not included with the T Hub 2 MessageBank or Telstra Home Messages 101 Flashing Message Indicator a free service that enables you to view Voicemail Calling Number Display enables the Tablet to display the name of the caller as well as enabling you to take a second incoming call via the Tablet if Call Waiting is activated Contact T Hub 2 Support on 1300 ...

Page 5: ...u have the following 1 Tablet 2 Tablet Dock 3 Tablet power supply 4 Base Station 5 Base Station Handset power x 2 6 Telephone cable 7 Telephone connection adaptor 8 Handset 9 Handset batteries 10 Handset Dock 11 Ethernet cable 12 SD card key 4 ...

Page 6: ... running 2 Search Button When pressed the web search feature will appear 3 Menu Button Will bring up a menu with additional options relevant to the screen you are on 4 Back Button Use this button to take you back to the previous screen action or webpage you were viewing 5 Tablet Speakers 6 Volume Control Press to increase or decrease audio volume 7 Power Button Press this to turn the Tablet On or ...

Page 7: ...Retractable stand Behind this flap you can access the Tablet micro USB micro HDMI and DC In connections SD card slot 6 Handy Hint An SD card key has been included to help you insert and remove SD cards from the tablet ...

Page 8: ...r other Wi Fi modem A Cable broadband service with a Home Network Gateway or other Wi Fi modem An NBN broadband service with any Wi Fi modem other than a T Gateway such as a Home Network Gateway or other Wi Fi modem If you choose this option you will need to use the base station that came with your T Hub 2 kit The base station is used by the tablet handset to make calls The tablet handset in your ...

Page 9: ... Gateway device you should compare it with the following T Gateway pictures paying attention to how many coloured ports your device has If you have purchased a T Gateway start with the following steps 1 Put the base station in your kit aside for safe storage you will not need this separate base station during installation as the T Gateway already has a base station built in 2 Install your T Gatewa...

Page 10: ...set and replace the cover Place the handset into the handset dock and connect the dock to mains power using one of the power supplies provided Turn the handset on by pressing and holding down the power key Getting connected 1 Insert Handset Battery 2 1 3 ...

Page 11: ...stalling a software update Please do not remove the power or the ethernet cable from the base station during an update otherwise you may damage them Important Note It s essential for the T Hub 2 Base Station to be connected to your Home Network Gateway Wi Fi modem using the ethernet cable provided This enables the base station and handset to receive updates Your T Hub 2 Tablet and Handset will con...

Page 12: ...mply choose a location for your handset dock near a power point in your preferred room and plug it in If you want to locate your handset together with your base station follow these simple steps to dock your handset Remove the plastic cover from the bottom of the base station by pulling it towards you Push the handset dock into the cavity at the bottom of the base station it should click into plac...

Page 13: ...want to place your handset separately to your T Gateway simply choose a location for your handset dock near a power point in your preferred room and plug it in If you want to place your handset together with your T Gateway follow these simple steps to dock your handset Remove the plastic cover from the bottom of the T Gateway by pulling it towards you Push the handset dock into the cavity at the b...

Page 14: ...say Searching for base Press the left soft key select Register handset and press OK 2 On the back of the T Gateway press the white DECT button for 3 seconds The DECT LED on the front of the T Gateway should now flash orange 3 On the handset press OK to start registration this may take up to 60 seconds to complete 4 After 60 seconds the display will read Handset registered An antenna symbol should ...

Page 15: ...tionWizardwillappear Connect Power Here Handy Hint We recommended that both the tablet and the handset are charged initially overnight to get optimum battery performance Important Note The T Hub 2 Tablet and Handset require electricity to work You will not be able to make any telephone calls or use other features such as internet browsing when the power fails Alternative arrangements should be mad...

Page 16: ...our tablet will need to be registered or paired with your T Gateway using the following steps 1 As you step through the Installation Wizard screens you will arrive at a screen labelled 1 Phone setup Touch the text that says Tablet Not Connected and you will be presented with the following screen 2 Follow the instructions for Option 2 T Gateway On the rear of the T Gateway press the white DECT butt...

Page 17: ...setup 5 CHECK ALL ITEMS ARE SET UP CORRECTLY Option 1 Customers without a T Gateway Once everything is connected all the power supplies and cables should be correctly installed and the tablet handset and base station turned on Ethernet Telephone Line Wi Fi DECT Small power adapter Small power adapter Large power adapter Base Station Handset Tablet Tablet Dock Handset Dock Wi Fi Gateway DECT DECT W...

Page 18: ...l the power supplies and cables should be correctly installed and the tablet handset and T Gateway turned on Small power adapter Large power adapter DECT DECT Wi Fi Integrated Gateway Telephone Line Power adapter Ethernet DECT Wi Fi Handset Tablet Tablet Dock Handset Dock ...

Page 19: ...ageBank customer you may be prompted to enter a six digit PIN during installation It is usually the last six digits of your telephone number As it will take a minimum of 3 hours to activate your Telstra messaging service you will need to set up Voicemail after completing the Installation Wizard Telephone number Wi Fi network name or SSID usually printed on a sticker found on your Home Network Gate...

Page 20: ...pages or other applications drag your finger up to scroll down or drag down to scroll up Pinch Zoom In and Out The T Hub 2 Tablet allows you to zoom in and zoom out of web pages and photos To do this pinch two fingers together to zoom out To zoom in reverse the action Notification bar Screen location icon Wi Fi signal strength Base Station signal strength Battery level Quick launch bar ...

Page 21: ... The notification bar is located at the top of the screen and includes details such as battery life and phone Wi Fi and data signal strength From any screen on the tablet you can select the notification bar to access updates and shortcuts to some commonly used settings including Silent Lock Orientation and Bluetooth The Clear button will clear all notifications To access the notification bar touch...

Page 22: ... view your call log and more Voice Mail Access your voice messages Applications Menu Access a wide range of applications that may not be on your tablet screens SMS Compose and send your SMS messages Web Browser Browse the Internet Important Note If you connect your tablet to a T Gateway the SMS icon will not appear in the Quick Launch Bar For more information on SMS usage with a T Gateway refer to...

Page 23: ...en You can Add and Edit by selecting the Menu button on the right hand side of the Tablet Making Calls Use the on screen keypad to dial number or select from contact list Use the delete button to clear Press the Phone icon to make call You can redial by pressing the call button twice USING THE PHONE ON YOUR TABLET Select the phone icon to make a call access call log and contacts ...

Page 24: ...ssage Or touch the menu button on the right hand side of your tablet to select option to play all new messages Voicemail messages will be deleted automatically after the message expiry date according to the terms of your Telstra messaging service Receiving Calls When you receive a call both the tablet and handset will ring To answer an incoming call on the tablet press the Answer button To Ignore ...

Page 25: ...ns menu from the Quick Launch Bar Touch and hold down the selected application while slowly dragging into position Release Application to lock into place Download Apps from Google Play Use Google Play to download and install a wide range of games applications and more To access Google Play applications you will need to have a Google account Choose from thousands of free and paid applications To pu...

Page 26: ...reate a SMS Select the To field to enter a number using the on screen keyboard or select a contact by touching the Contact icon next to the To field Touch Type to compose to enter message then touch the send button When a message is received a SMS icon will appear in the notification bar Please note that you can send SMS from your T Hub 2 Tablet to most standard Australian numbers and receive SMS ...

Page 27: ...cently used applications by holding down on the Home Screen button until a pop up box appears titled Recent Select a recently used application to switch back to that application TIPS AND TRICKS Onscreen Keyboard Use the onscreen keyboard to input text when required To access the keyboard touch any text field For example touch the web address field in the web browser to bring up the keyboard ...

Page 28: ...27 A CLOSER LOOK AT THE HANDSET 1 8 6 10 5 2 3 7 11 9 4 ...

Page 29: ...e voice mails pending You are receiving a software update Solid red off dock Low charge Flashing red on dock Low charge batteries charging Flashing red off dock Very low charge batteries need charging FEATURE DESCRIPTION 2 Volume control To control the volume of the speaker on your Handset During a call use the Up Down key to increase the volume of caller s voice 3 Left soft key To select the opti...

Page 30: ...ough menus fields Right To scroll right through menus fields 6 End Power button To end a call To exit a menu When holding to switch the Handset off or on 7 Call button To make or receive a call During a call to switch to and from handsfree mode 8 Keypad To enter numbers letters 9 Voicemail Hold this button down for at least two seconds to check your Voicemail 10 Internal calls Press this button to...

Page 31: ... to select Contacts icon and press OK Scroll through Contact List and press Call button to call or press OK to select from a list of numbers receiving calls When you receive a call both the tablet and handset will ring To answer an incoming call on your handset press the Call key To turn the handset ringtone on or off hold down the key ...

Page 32: ...the scroll keys and the enter button on the handset From here you can view contacts shared between the handset and other T Hub 2 devices registered to the same base station Use the arrow keys to scroll through the Contact List To view the contact details simply select a contact and press the OK button To add a contact select Options and then the Add contact menu item Voicemail 31 ...

Page 33: ... the Call Log icon using the arrow keys and the enter button If you have missed a call a small dot will appear on the Call Log icon Once the missed call details have been viewed in the Call Log the indicator will disappear To call a number from the Call Log list highlight a name number using the Up Down scroll keys and press the Call key to call ...

Page 34: ...d listen to your messages You can also access Voicemail by holding down the 1 key for 3 seconds settings Use the Settings function to adjust the following settings Sound Display Time Call Features System Handy Hint You can also access Voicemail on the Tablet which provides a visual display of all messages Important Note Voicemail will only work if you have MessageBank or Telstra Home Messages 101 ...

Page 35: ...34 NOTES ...

Page 36: ...35 NOTES ...

Page 37: ...demark of HDMI Licensing LLC Bluetooth is a trademark of Bluetooth SIG Inc Google Play is a trademark of Google Inc and are trade marks and registered trade marks of Telstra Corporation Limited ABN 33 051 775 556 36 ...

Page 38: ...For more information CALL 1300 136 841 visit telstra com thub visit a telstra store or partner ...

Reviews: