background image


Page 3 of 31 

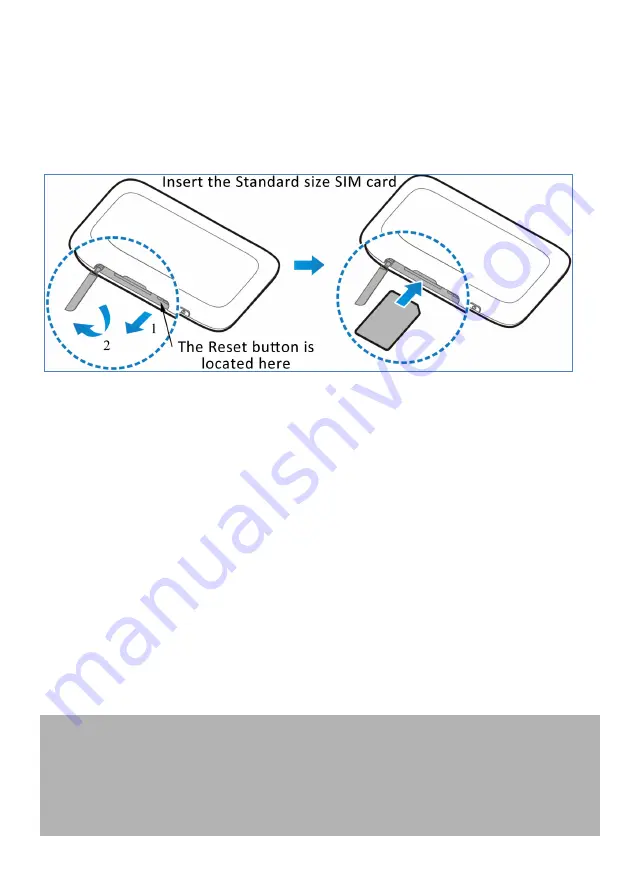
INSERT YOUR STANDARD SIZED SIM CARD


This device supports a Standard sized SIM card ONLY (2FF). Do not use a microSIM 
or SIM card adaptor which may damage your device. 
The SIM card is pre-installed and needs to be activated.  You may need this 
information if you need to replace or check your SIM card. 


1.


Locate the SIM slot on the side of the device as shown above.   

2.


Open the SIM slot cover. 

3.


Insert your SIM card carefully as shown. The gold contacts must be facing 

up


with the cut corner towards the middle of the device. 

4.


Push the SIM fully home until it clicks into place. 

5.


For reference the Reset button is also located under the SIM slot cover. 

6.


Note: If you replace the SIM card with the device powered On, it will restart to 
read the new SIM card. 
 

IMPORTANT


This device supports a standard SIM or 2FF size.   
Do not insert a micro SIM (3FF) or use a micro to mini SIM adaptor. 
Use of 3

rd

 party adaptors or non approved SIM card can damage your device. 

Physical damage to the SIM card slot is not covered by warranty and will make 
your device unusable. 
 

TIPS 

Remember to keep your Security Card handy and in a safe place. You will need it to 
log onto your device. 
Remember to keep your plastic SIM card holder. It has a record of your SIM card 
details which you should keep handy. 
The Reset button is located under the SIM slot cover. With the device switched on, 

Summary of Contents for MF910V

Page 1: ... Body Position with 10mm separation Search ZTE Australia on Facebook Google and Twitter to keep in touch Version 1 0 Jan 2016 CHECK YOUR SYSTEM REQUIREMENTS Your 4GX Wi Fi will connect to any Wi Fi enabled device that supports Wi Fi 802 11 b g n A web browser is required to log in to your Wi Fi hotspot if you wish to make any configuration changes USB driverless connection is also supported for Wi...

Page 2: ...Page 2 of 31 It is possible to start the installation process manually by clicking the Autorun icon when it appears GET TO KNOW YOUR DEVICE ...

Page 3: ...ce 5 For reference the Reset button is also located under the SIM slot cover 6 Note If you replace the SIM card with the device powered On it will restart to read the new SIM card IMPORTANT This device supports a standard SIM or 2FF size Do not insert a micro SIM 3FF or use a micro to mini SIM adaptor Use of 3rd party adaptors or non approved SIM card can damage your device Physical damage to the ...

Page 4: ...ientation of the charger lead and insert carefully into the charging port on the device Only use the genuine charger and USB lead provided Use of third party adaptors can damage your device Typical charging time is 3 4 hours using the standard charger Charging from a USB source ie laptop will take longer During periods of high continuous activity with multiple users high download rates or low netw...

Page 5: ...s To switch your device Off press and hold the power key for 5 seconds until the LED s starts to shut down LED S INDICATORS BATTERY INDICATOR Green Battery is charged Flashing Battery is charging Red Battery is low WI FI INDICATOR Green Wi Fi is active and connected DATA USAGE INDICATOR Green Data credit is healthy less than 85 used Orange Data credit is low more than 85 used Red Data credit is ex...

Page 6: ... the correct case for all letters 4 With Connect Automatically enabled your computer will remember the password and connect to your Wi Fi device when it is on and in range TIP If you cannot log on via Wi Fi connect using the USB connection where you can check your Wi Fi settings or update your password See later for details QUICK REFERENCES Browser home page http m home or http 192 168 0 1 Adminis...

Page 7: ...onto your device WEB INTERFACE MODEM HOMEPAGE The default login password is password The home page shows a brief summary of the device status and your remaining data from Telstra Software update notifications if applicable will be shown on this page as per the example above STATUS ICONS WEB INTERFACE ...

Page 8: ... a replacement SIM card No Service you are out of network coverage INTERNATIONAL ROAMING The Roaming icon indicates you are connected to a foreign network If Roaming is enabled on your data plan then roaming data charges will apply when connected via a roaming network Contact your carrier to discuss your data charges and roaming options NETWORK LOCKED DEVICE This device is network locked to Telstr...

Page 9: ...stall the modem To uninstall go to Applications and run Uninstall TELSTRA 4GX WI FI WEB INTERFACE GUIDE HOME TAB The home tab shows you how many users are connected and shows your network connection state and data usage summary The device will automatically connect to the network so it shows the Disconnect button status by default To change this behaviour press Disconnect first then go to Settings...

Page 10: ...Page 10 of 31 SETTINGS QUICK SETTINGS Step through the Quick Settings wizard to quickly review your current default settings ...

Page 11: ...ing will automatically connect to the network The setting is greyed out if you are connected Press the Disconnect button to change this setting and to enable International Roaming if required If you make any changes press Apply to save the change Press the Help icon to get in context tips ...

Page 12: ...s press Apply to save the change Press the Help icon to get in context tips There is no need to change these settings unless you change service provider or are instructed by your carrier The modem is locked to Telstra If you use a SIM card from another provider you may not be able to connect to the network Consult Telstra to obtain the unlock code for your device ...

Page 13: ...box Select the new APN profile name Click on Set as default to set the new APN as your preferred setting Press the Help icon to get in context tips There is no need to change these settings unless you change service provider or are instructed by your carrier The modem is locked to Telstra If you use a SIM card from another provider you may not be able to connect to the network Consult your new car...

Page 14: ...e security settings and password to suit your own preferences You can set the number of available connections between 1 and 10 The default setting for 5 users is to improve battery life and Wi Fi data throughput Press Apply to save your changes Press the Help icon to get in context tips The Wireless Network Name SSID and Wireless Security key WPA information can also be accessed by accessing the d...

Page 15: ...ADVANCED SETTINGS You can change the Wi Fi settings to suit your personal choices or for specific requirements of your attached devices Press Apply to save your changes Press the Help icon to get in context tips SETTINGS WI FI SETTINGS WPS ...

Page 16: ...onnect Press the Help icon to get in context tips SETTINGS DEVICE SETTINGS ACCOUNT MANAGEMENT Use the Account Management settings to change the administrator password if required The default password is password If you have changed and forgotten the password then you need to restore the device to factory defaults 1 With the device switched on open the SIM slot cover and locate the reset button nex...

Page 17: ...save the change If you enter the incorrect PIN code three times in succession you will lock your SIM card Contact your service provider to obtain your PUK code Press the Help icon to get in context tips SETTINGS DEVICE SETTINGS RESET Press Reset to reset your device to factory defaults SETTINGS DEVICE SETTINGS RESTART Press Restart to restart your device ...

Page 18: ...the Wi Fi sleep setting Set Wi Fi sleep time to Never Sleep to keep the Wi Fi always on Press the Help icon to get in context tips SETTINGS DEVICE SETTINGS SOFTWARE UPDATE With Check for New Version enabled you are notified in the web user interface if there is an update available You need to be in the Connected state to download new versions ...

Page 19: ...ng Press the Help icon to get in context tips Example software update notification SETTINGS FIREWALL PORT FILTERING Select Enable to turn on the Port Filtering settings You can apply filters based on MAC Address Source IP Address Destination IP Address and select the action to drop or accept the packets Firewall settings are for advanced users and network administrators Press the Help icon to get ...

Page 20: ...your LAN side or to translate a specific incoming port into a different destination port The destination port and address is on your local LAN side Typical applications will be for on line gaming requiring specific control and communications channels between the remote server and the local machine Firewall settings are for advanced users and network administrators Press the Help icon to get in con...

Page 21: ...ces to seamlessly discover each other s presence on the network and establish functional network services for data sharing communications and entertainment UPnP is enabled by default on the LAN side local but if you require extra security you should disable this setting UPnP is not enabled on the WAN Network side Firewall settings are for advanced users and network administrators Press the Help ic...

Page 22: ...this particular allocated IP address It is advisable to set a Static IP address for this device outside of the DHCP range eg 192 168 0 20 Press the Help icon to get in context tips SETTINGS FIREWALL SYSTEM SECURITY Enable or Disable Remote Management via WAN and PING Firewall settings are for advanced users and network administrators ...

Page 23: ...INGS Control the IP Range for your network and enable or disable DHCP is required Press the Help icon to get in context tips SETTINGS INTERNET WI FI Enable the Wi Fi router to connect to another Hotspot to share that internet connection ...

Page 24: ...ceive its internet connection from the other hotspot and share this with all your connected devices This could be useful at home where your wireless hotspot can connect to your home Wi Fi when in range and it can be used to extend your home Wi Fi range by locating the portable hotspot in another location The devices connected to your portable hotspot will get their internet connection from the oth...

Page 25: ... view your SIM card contacts Contacts are automatically read into the device but you can also copy and save on your device Select the Contact to view more details click Edit to make any changes then select the Save location as Device Contacts stored on the device can include additional fields Select New to create a new contact and choose the save location as Device or SIM card ...

Page 26: ...g external antennas It is preferred to use both ports for best quality reception and service If you only have a single antenna then use the main port shown on the diagram above The device supports dual TS9 connectors and dual antennas will provide better signal strength and higher data rates Only use the correct antenna with the TS9 termination suitable for ZTE data ...

Page 27: ...sical damage to the antenna port will render your device unusable and is not covered by the manufacturer s warranty See your warranty card for full terms and conditions HELP Click Help to access the system help Click the Help icon to see in context help Go to ztemobiles com au for FAQ s product and warranty support Search ZTE Australia on Facebook Google and Twitter to keep in touch ...

Page 28: ...rnal antenna The device uses TS9 connectors SIM card requires a PIN or PUK number SIM is not inserted correctly Contact your service provider to obtain the PIN or PUK key Check the SIM card is inserted is active and is a valid SIM Data connection failed You have no network coverage Try moving location until you get good reception The modem cannot connect to the internet when overseas You don t hav...

Page 29: ...n enclosed metallic structures eg lifts The modem is not waterproof Please keep it dry and store it in a cool dry place Don t use the modem immediately after a sudden temperature change eg from an air conditioned environment to high temperature and humidity outside In such cases there could be condensing moisture inside the modem which can cause internal damage Unplug the modem and leave it for 30...

Page 30: ... quality reception Maximum power is only used at the edge of network coverage so under most circumstances the power output is very low Under poor network conditions the modem transmits at a higher power level and may get hot DECLARATION OF CONFORMITY SPECIFIC ABSORPTION RATE SAR The Wi Fi modem is designed to be used in close proximity to the body We declare that the product detailed in this manua...

Page 31: ...r replaceable Operating Time Active battery up to 10 hours Standby time up to 200 hrs Voltage 5V Current Resting 100mA rms Max 500mA rms Operating systems Any Wi Fi enabled device 802 11b g n Supports Wi Fi MIMO Windows 10 8 7 XP SP3 Vista MAC OS X 10 7 and above Antenna ports Dual TS9 connectors SIM Card Standard size 2FF Temperature 5ºC to 45ºC Download speeds will vary due to distance from the ...

Reviews: