background image

Kenwood Radio Series

16 

F.01U.321.735

7.4 Per Line Configuration

The 

Per Line Setup

 page is used to view Line Type and Serial Mode. The Configure 

buttons allow entry to the individual line’s configuration page.

Summary of Contents for TK-150 Series

Page 1: ...2018 03 F 01U 321 735 Rev 02 Kenwood Radio Series TK x80 x90 x150 and x180 to IP 224 Remote Adapter Panel ...

Page 2: ...ail TelexDispatch us bosch com Customer Service Repair E mail repair us bosch com Phone 800 553 5992 Technical Support Knowledge Database http knowledge boschsecurity com LiveChat www telex com us dispatch support E mail TelexDispatchtechsupport us bosch com Web www telex com CLAIMS No liability will be accepted for damages directly or indirectly arising from the use of our materials or from any o...

Page 3: ...6 1 2 TK x80 Series Radio Hardware Modifications 10 6 2 TK x90 Series Radio Configuration 10 6 2 1 TK x90 Series Radio Programming 10 6 2 2 TK x90 Series Radio Hardware Modifications 11 6 3 TK x150 x180 Series Radio Configuration 12 6 3 1 TK x150 x180 Series Radio Programming 12 7 0 IP 224 Setup 14 7 1 Setting for Auto Configuration 14 7 2 Multicast Configuration 15 7 3 Hardware Configuration 16 7...

Page 4: ...4 F 01U 321 735 ...

Page 5: ...re Requirements IP 224 Ethernet Adapter Panel P N F 01U 306 547 IP 224 to Kenwood TK X150 X180 5X10 and NXDN Radios Cable P N F 01U 165 540 IP 224 to Kenwood TK X90 Cable P N F 01U 165 541 Kenwood TK x80 TK x90 TK x150 or TK x180 series radios 3 0 Software Requirements C Soft version 6 500 or later IP 224 version 2 300 or later Telex System Manager TSM 2 300 or later Windows 7 32 bit or 64 bit Win...

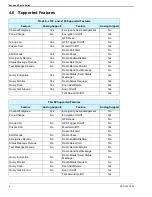
Page 6: ...e Yes Query Monitor Yes Radio Status Request Yes Query Scan Yes Scan Add Delete Yes Query Talk Around Yes Scan On Off Yes Talk Around On Off Yes TK x90 Supported Features Feature Analog Support Feature Analog Support Channel Talkgroup Yes Emergency Acknowledgement No Zone Change No Encryption On Off Yes GPS Read No Group Call No GPS Trigger On Off No Private Call No Monitor On Off Yes Radio Call A...

Page 7: ...accessory cable 5 2 TK x90 Model Cable Assembly IP 224 to TK x90 audio and serial cable connections Signal IP 224 DB 37 KCT 19 Accessory Connector Ground 29 6 PTT Common 5 6 PTT 24 8 COR 15 11 RX 20 12 TX 1 5 TXD 17 14 RXD 36 15 Signal IP 224 DB 37 TK x90 Radio DB 25 Ground 29 7 PTT Common 5 7 PTT 24 2 Aux Input Programmable COR 15 20 AOI Programmable RX 20 17 TX 1 13 TXD 17 10 RXD 36 9 ...

Page 8: ...n 20 TK x150 an output only is programmed for that function and the cable routes that signal to the IP 224 On the TK x180 the same pin is a general purpose I O and has an additional 470 Ohm series resistance added Therefore the IP 224 internal pull up voltage must be removed The Auto Configuration featurewill adjust hardware settings accordingly Ground 29 7 PTT Common 5 7 PTT 24 12 Aux Input 4 Pro...

Page 9: ...adio do the following 1 From the Com 1 Internal Port drop down menu select Data 2 Configure the Scan Information window to set up the scan functionality 6 1 2 TK x80 Series Radio Hardware Modifications To modify the radio settings do the following 1 Move R94 to R24 position NOTE For more information see the Kenwood TK 80 series manual section 1 3 ...

Page 10: ... 1 TK x90 Series Radio Programming To configure the radio do the following 1 From the edit menu select Function Port The Function Port window appears 2 Verify the Input tab is open 3 In the Radio 1 AI1 field enter Ext PTT 4 Click the Output tab 5 In the Radio 1 AO1 field enter COR ...

Page 11: ...ore information see the manufacturer s technical manual Accessory Terminal Function section R640 R641 Function 6 3 TK x150 x180 Series Radio Configuration 6 3 1 TK x150 x180 Series Radio Programming To configure the radio do the following 1 From the edit menu select Port Function The Function Port window appears 2 Using the screen shot below program the Function Port NOTE For the TK x180 the AUX p...

Page 12: ...Kenwood Radio Series 12 F 01U 321 735 3 From the Com 1 drop down menu select Data ...

Page 13: ...tch downloads or is included on the product CD received with the IP 224 With the IP 224 attached to the network and powered up login and read the settings from the desired unit using TSM 7 1 Setting for Auto Configuration The General page is used to view basic information about the IP 224 and turn on or off the Auto Configuration feature in the unit To configure the Auto Configuration do the follo...

Page 14: ...lticast Setup tab The Multicast page appears 2 Select the Enable check box for the lines you are configuring 3 In the Line Name field enter a name up to 9 characters for the line you are configuring 4 From the Line Type drop down menu select Local Mode 5 From the Serial Type drop down menu select the appropriate Kenwood radio series you are configuring 6 Configure the correct Multicast Addresses a...

Page 15: ... to configure the Line I O connector Because the Auto Configuration is enabled on the General page all I O settings have been configured as needed to control the Kenwood radio selected by the Serial Type drop down menu on the Multicast Setup page NOTE No additional steps are required on this page ...

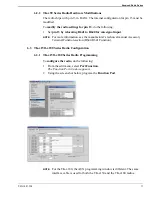
Page 16: ...wood Radio Series 16 F 01U 321 735 7 4 Per Line Configuration The Per Line Setup page is used to view Line Type and Serial Mode The Configure buttons allow entry to the individual line s configuration page ...

Page 17: ...e tab The Function Tone page appears 2 Select the Enable check box for all channels to be accessed by the IP 224 NOTE Each page supports 10 channels There are 100 pages to support 1000 channels 3 Program the System and Channel information This information should correspond with the radio programming NOTE The example shown indicates function tones 1 through 4 are mapped to system 1 channels 1 4 fun...

Page 18: ...gured for a trunking format and go ahead tones need to be heard at dispatch LAM is the only alternative To configure COR or LAM settings do the following 1 Select the LAM COR tab The LAM COR page appears 2 Select the COR Enabled check box OR Select the LAM Enabled check box NOTE Selecting both options creates an AND function both COR and LAM would need to be achieved before RX packets would be sen...

Page 19: ...s TX and RX transmission audio NOTE COR settings can affect Full Duplex operation Trunked radio systems with go ahead beeps typically require COR to be turned off Hi Pass RX Check Box If selected the Hi Pass RX check box enables a 300 Hz Hi Pass filter for the RX audio Monitor Enable Check Box If selected the Monitor Enable check box allows serial monitor commands to be sent to the radio Pre Empha...

Page 20: ...n The Gain Setup page is used to configure the input and output audio levels for line 1 and line 2 I O ports To configure the Gain do the following 1 Open TSM 2 Click the Gain Setup tab The Per Line Gain Setup page appears 3 Configure the RX Input Gain slider to 0dB for the line s to configure 4 Configure the TX Output Gain slider to 25dB for the line s to configure NOTE Fine tuning of these gain ...

Page 21: ...Kenwood Radio Series F 01U 321 735 21 Notes ...

Page 22: ...ort with suggestions or comments concerning this application guide Technical Support Email TelexDispatchtechsupport us bosch com Fax 1 402 467 3279 Phone 1 800 898 6723 Bosch Security Systems Inc 8601 East Cornhusker Highway Lincoln Nebraska 68507 ...

Reviews: