background image


Figure 3.30 

Global ICA Client Settings-Preference Tab 

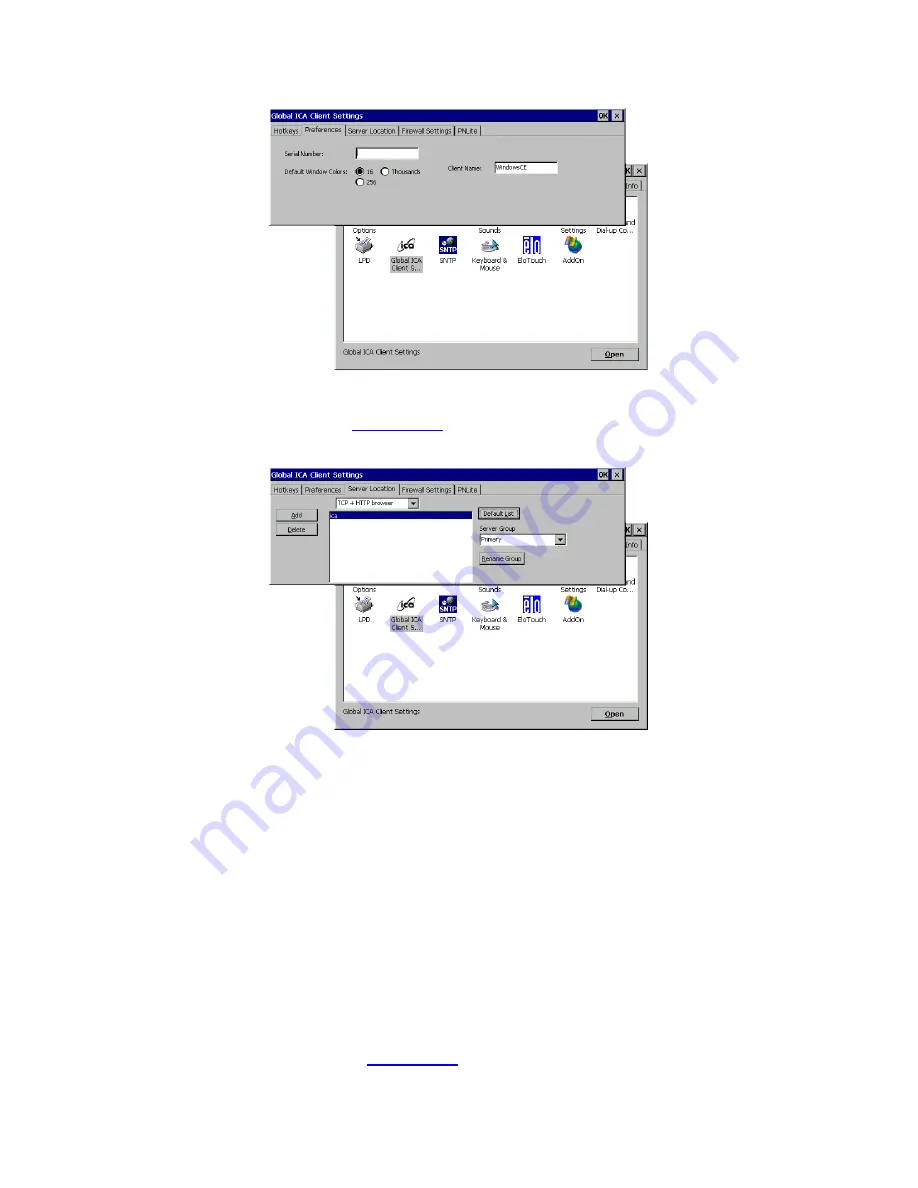
80. On the server location tab (

Figure 4.29

),  


Figure 3.31 

Global ICA Client Settings-Server Location Tab 

81. First choose the browser type.  This will decide what type of servers should be 

detected. 

82. Click 

Default List

 button to list available servers.  This will display a warning 

message that the current list will be erased.  Click 

Yes

 to proceed. 

83. If no server was detected click 

Add

 button to add a server to the list. 

84. Select the type of the server group, and rename the group if desired.  To rename, 

click on the 

Rename Group

 button and click 

OK

85. A server name may be deleted from the list:  Highlight the server to be deleted and 

click 

Delete

 button.  When prompt click 

Yes

 to confirm. 

86. On the Firewall Settings tab (

Figure 4.30

), 

Summary of Contents for TeleCLIENT TC7380 Series

Page 1: ...4 6 U S Government Restricted Rights 6 1 4 7 Declaration of Conformity 6 1 4 8 Statement of Limited Warranty 7 2 Introduction 8 2 1 Safety Instructions 8 2 1 1 Safety Notices 8 2 1 2 Other Product Saf...

Page 2: ...fo Tab 53 5 Operation 55 5 1 Powering On 55 5 2 Using the TeleCLIENT Connection Manager 55 5 3 Configuring Network Connections 56 5 3 1 Creating a New Connection 57 5 3 2 Editing Connections 68 5 3 3...

Page 3: ...6 1 3 TeleCLIENT TC7380 Software Specifications 76 6 1 4 Environmental Specifications 77 6 1 5 Regulatory Compliance Specifications 78 6 1 6 Physical Specifications 78 6 1 7 Warranty Information 78...

Page 4: ...he TeleCLIENT 1 3 How To Use This Manual This manual is designed to help you locate information quickly and easily Each chapter contains the following information Section 1 Preface Provides equipment...

Page 5: ...s a U S registered mark 1 4 3 TeleVideo Inc Software License Agreement PLEASE CAREFULLY READ THE FOLLOWING TERMS AND CONDITIONS BEFORE USING THIS SOFTWARE USING THIS SOFTWARE INDICATES YOUR ACCEPTANCE...

Page 6: ...tricted Rights This software is provided with RESTRICTED RIGHTS Use duplication or disclosure by the Government is subject to restrictions as set forth in subparagraph c 1 ii of the Rights in Technolo...

Page 7: ...power failures surges or other irregularities or 4 any statements made about TeleVideo s products by sales representatives dealers distributors or agents unless confirmed in writing by a TeleVideo off...

Page 8: ...es before using this product DANGER THIS PRODUCT USES ELECTRICAL POWER AND CONTAINS SENSITIVE COMPONENTS IT IS NOT DESIGNED FOR CONSUMER SERVICING IF YOUR TELECLIENT REQUIRES REPAIR OR YOU WISH TO ADD...

Page 9: ...perating temperature is 35 C 95 F 4 Always unplug the TeleCLIENT before cleaning Do not use liquid cleaners or aerosol cleaners Use only a damp cloth for cleaning 5 Make sure the TeleCLIENT is placed...

Page 10: ...al that empowers users to access and manage business critical applications such as Point of sale Help and reservation desk Electronic Commerce Word processing Spreadsheets All can be accessed through...

Page 11: ...s on Microsoft Windows NT Server 4 0 Terminal Server Edition Windows 2000 Terminal Services Windows Net Server or the Independent Computing Architecture ICA protocol through Citrix MetaFrame MetaFrame...

Page 12: ...Two button mouse Standard Inline power supply Universal power supply standard Power Line cord CD ROM version of TeleCLIENT User s Manual...

Page 13: ...ludes the following sections Connecting to I O Ports Powering on the TeleCLIENT TC7380 Front Panel Controls Troubleshooting PowerSaver 3 1 Rear Panel 3 1 1 I O Ports The I O ports for the TC7380 are l...

Page 14: ...to the keyboard connector 3 Connect the mouse to the mouse connector 4 Depending on configuration needs connect a printer to the parallel port USB port or other peripheral devices 5 Depending on your...

Page 15: ...mply press the power button on the front panel This will power on both the TeleCLIENT TC7380 terminal and the monitor If the monitor displays an image installation is complete WARNING TO PREVENT RISK...

Page 16: ...to see that the computer is plugged in and turned on The screen image is too light or too dark Adjust the brightness settings 3 5 PowerSaver This monitor has a built in power management system called...

Page 17: ...oftware Update Procedure 4 1 TeleCLIENT Setup Wizard NOTE TELECLIENT WILL DETECT FOR DHCP SERVER ON THE NETWORK AT POWER ON IF DHCP SERVICE IS NOT ACTIVATED THE CLIENT WILL ISSUE A DEFAULT IP ADDRESS...

Page 18: ...Properties Window 12 Depends on the TeleClient TC7380 series model the screen will show different network options However PCI DP838151 Ethernet interface is the default choice for all models To confi...

Page 19: ...an IP address and enter the static IP address for the terminal then click the Name Servers tab 14 Enter the DNS server and WINS information then click OK Figure 4 5 Figure 3 7 DNS WINS Setting 15 Figu...

Page 20: ...NNECTION BE SURE TO DISABLE PCI DP838151 TO DO THAT RIGHT CLICK PCI DP838151 ICON AND SELECT DISABLE 17 If DHCP service is available choose the DHCP option and proceed to the next tab Name Servers Oth...

Page 21: ...ting Figure 3 10 Wireless Networks Setting 19 Check the Use Windows to configure my wireless setting recommended then click Refresh to detect available access points 20 Choose an access point then cli...

Page 22: ...dard designed to make the link integrity of the wireless medium equal to wired cable Data privacy mechanism based on a 40 bits 128 bit optional shared key algorithm as described in the IEEE 802 11 sta...

Page 23: ...Networks box then highlight the chosen access point and use Move Up and Move Down buttons to prioritize the list Top of the list has the highest priority 29 Click on the Advanced button Figure 4 10 Fi...

Page 24: ...a direct connection setup skip to step 42 For a VPN connection setup skip to step 47 Figure 3 13 Making New Connection 35 On the next screen Figure 4 12 click on the drop down box and select the COM p...

Page 25: ...ons Figure 4 13 38 Set the modem connection by filling in the Connection Preferences boxes Click on Call Options tab Figure 4 14 Figure 3 16 Dialing Options 39 Set up calling options then click OK 40...

Page 26: ...An Internet protocol used to run IP over serial lines such as telephone circuits or RS 232 cables interconnecting two systems SLIP is now being replaced by PPP Point to Point Protocol Communication 4...

Page 27: ...e security options and click OK to confirm 47 Back on New Dial Up screen Figure 4 12 click Next to proceed Direct Connection Setup skip to step 46 VPN Connection Setup skip to step 51 48 Set dialing p...

Page 28: ...on name select Direct Connection and click Next Figure 4 19 Figure 3 21 Direct Connection Settings 51 On the next screen Figure 4 20 click on the drop down box and select the COM port the serial cable...

Page 29: ...n Make New Connection icon 55 Type in the connection name select VPN Connection and click Next Figure 4 21 Figure 3 23 VPN Settings 56 Type in the host name or IP address in the box 57 Click the TCP I...

Page 30: ...models with analog digital converters have more resolutions to choose from Select a resolution and color settings 63 For AD converter models Select a Resolution and Refresh Frequency setting Click Tes...

Page 31: ...e setting up the terminal 4 1 3 Control Panel Control Panel should appear Figure 4 24 Depends on the configuration and model the icons may appear differently Figure 3 26 Control Panel LPD Line Print D...

Page 32: ...er name The name of the printer is a virtual port Virtual port is a logical device assigned when you set up LPD services on your server The default for this field is PASSTHRU The Printer Name is case...

Page 33: ...CA Client Setup 77 Double click the Global ICA Client Settings icon Figure 3 29 Global ICA Client Setup 78 Setup the Hotkeys as desired Figure 4 27 79 Click on the Preference tab Figure 4 28 If desire...

Page 34: ...ble servers This will display a warning message that the current list will be erased Click Yes to proceed 83 If no server was detected click Add button to add a server to the list 84 Select the type o...

Page 35: ...a particular user from an NFuse server and add those connections to the normal WBT list of connections as if they d been added by hand using the local UI Figure 3 33 Global ICA Client Settings PNLite...

Page 36: ...ure of the printer and the Model Name Figure 4 33 Figure 3 35 Printer Setup Manufacturer and Model 94 If the desired manufacturer and model is not listed check the User Defined box Click Next and type...

Page 37: ...rwise check No and click Next 97 Click Finish Figure 4 35 The new printer icon should appear on the Printers screen Click OK Figure 3 37 Printer Setup Finish 98 To delete a printer simply highlight th...

Page 38: ...nection tab Figure 4 37 Figure 3 39 Internet Options Connection 103 Check Use LAN no autodial box if using LAN Otherwise uncheck the box and type in the Autodial name 104 If the terminal is connected...

Page 39: ...options then click OK Volume and Sounds Setup 108 Double click on Volume Sounds icon Figure 4 39 Figure 3 41 Volume and Sounds 109 Choose options as shown on the window set the system volume at a desi...

Page 40: ...cheme Date and Time Setup 111 Double click on the Date Time icon 112 Set the date and time then click OK Figure 4 41 Figure 3 43 Date and Time Regional Settings 113 Double click on the Regional Settin...

Page 41: ...ttings Locale 114 Select locale and click on the next tab Number Figure 4 43 Figure 3 45 Regional Settings Number 115 Select number systems then click the next tab Currency Figure 4 44 Figure 3 46 Reg...

Page 42: ...k the next tab Date Figure 4 46 Figure 3 48 Regional Settings Date 118 Select the date format then click OK Network and Dial up Connections Refer to section 1 1 1 Network Settings SNTP Settings 119 SN...

Page 43: ...Click Add then type in the server IP address or the host name 122 Click OK Keyboard and Mouse Setup 123 Double click on Keyboard and Mouse Figure 4 48 Figure 3 50 Keyboard 124 This section changes th...

Page 44: ...Lock On Off at Boot up option 125 Select Left handed or Right handed mouse select the pointer speed then click OK Power Button Control 126 Double click on Button Control icon 127 Select Instant Power...

Page 45: ...n saver and desktop appearance Experience Configure network connection speed start up delay setting searching for networks and miscellaneous settings Control Panel Configure the Internet options touch...

Page 46: ...set the terminal to factory default property settings 2 Click Yes when prompt NOTE WHEN YOU RESTART THE TELECLIENT TC7380 AFTER RESETTING THE FACTORY DEFAULTS YOU MUST USE THE SETUP WIZARD AGAIN REFER...

Page 47: ...cal Resources Tab Figure 3 52 Local Resources Sound Option Select the sound option Figure 4 50 Local Devices Check all the devices attached to the terminal to enable them 4 2 3 Display Tab Figure 3 53...

Page 48: ...f No Activity in minutes before the Screen Saver starts 2 Check the box Enable Video Power Down if desired in addition to Screen Saver 3 Check the box Password Protected to set a password protection u...

Page 49: ...ablish network communications and in a network with less traffic will require less time to establish network communications Setting this too low may cause some difficulty establishing network communic...

Page 50: ...e Connection Manger 6 Use Modify User button to edit these settings after this initial setup and Delete User button to delete a user 7 Click OK Terminal Properties Window Protection Check the box Enab...

Page 51: ...4 55 illustrates the Management tab which displays the support for TeleCLIENT software update functionality The property page components are as follows Edit Box Contains the Uniform Resource Locator...

Page 52: ...OR CONTACT TELEVIDEO TECH SUPPORT SNMP Configuration Figure 3 58 Management SNMP 1 To configure SNMP settings click SNMP Configuration button Figure 4 56 2 Enter the contact for the terminal usually...

Page 53: ...other Network information Figure 4 57 Ping Figure 3 60 NetInfo Ping This command allows the administrator to check the network connections Figure 4 58 This completes the terminal properties setting P...

Page 54: ...WILL MOSTLY NOT WORK WITHIN THE CURRENT NETWORK PROPER IP ADDRESS MUST BE ASSIGN TO THE UNIT BY THE NETWORK ADMINISTRATOR OR BY DHCP SERVER The drop down box is to select the network speed IP Release...

Page 55: ...k Notice the ON OFF switch located on the front panel refer to Hardware Installation Use this switch to power the TeleCLIENT TC7380 on and off To power off the TeleCLIENT TC7380 press the ON OFF switc...

Page 56: ...ections User can also set the default or auto start network connection 5 3 Configuring Network Connections Each connection uniquely identifies a host server and the client terminal used to make the co...

Page 57: ...the following steps 1 Click Add in the Configure window The New Connection window appears Figure 5 3 Figure 5 3 New Connection Window 2 Choose one of the following connection protocols for the new con...

Page 58: ...tive connection is an RDP type Figure 5 4 Connection Type Defined in TeleCLIENT Connection Manager NOTE THE REMAINDER OF THIS PROCEDURE DEPENDS UPON THE TYPE OF CONNECTION USED AS EXPLAINED BELOW Addi...

Page 59: ...Connection Requires a modem 3 Click Next For Network Connection part skip to Step 12 4 In Dial In Connection box enter the area code phone number country and check the box if it needs to dial the are...

Page 60: ...nection Preferences boxes 9 Click on Call Options tab Figure 5 8 Figure 5 8 Calling Options 10 Set the calling options then click OK 11 Click Next 12 The software will now search for and identify all...

Page 61: ...he server search criteria Follow the prompts to setup the parameter Figure 5 10 Server Location 14 Click OK then click Refresh to start the search If no server is listed try typing in the IP address o...

Page 62: ...0 can be configured to run the same application from the selected server Type in the Command Line and Working Directory or leave blank to run the Windows Terminal Server desktop Figure 5 12 Figure 5 1...

Page 63: ...or application Figure 5 13 Figure 5 13 Specify Logon Information Window 21 If Smart Card logon is available on the network check the box 22 Click Next NOTE THIS SCREEN MAYBE LEFT BLANK 23 The Select...

Page 64: ...Cache and Sound Window Compress Data Stream Choose this setting if user is connected via a modem dial up or a Wide Area Network WAN Cache Under all ICA sessions caching is enabled Therefore this sett...

Page 65: ...on Wizard window appears Figure 5 16 Figure 5 16 WTS Connection Wizard Window 2 Enter a name for the new connection in the Name field 3 Enter the server name or IP address of the computer you wish to...

Page 66: ...n configure TC7380 to run a selected application instead of the desktop Choose the Application File Name Type in the Command Line and Working Directory or leave blank to run the Windows NT desktop Fig...

Page 67: ...FOR MORE INFORMATION PLEASE REFER TO TERMINAL EMULATION USER S GUIDE 1 Select Terminal Emulation Client in the New Connection window The TeleCLIENT Terminal Emulation Connection Properties window appe...

Page 68: ...e TeleCLIENT Terminal Emulation setup the terminal is now ready to connect to the server 5 3 2 Editing Connections The procedure for editing a connection varies depending on the kind of network connec...

Page 69: ...in the TeleCLIENT Connection Manager window 2 Select the RDP connection to be edited from the Connection Name list 3 Click Edit The Properties window appears Figure 5 22 Figure 5 22 Properties Window...

Page 70: ...w Application Tab 4 Make the necessary changes in the Net Connections or Application 5 Click Apply 6 When finished click OK Editing a Terminal Emulation Connection Please refer to Adding a Terminal Em...

Page 71: ...rtup The Connection Startup window appears Figure 5 24 Figure 5 24 Connection Startup Window 3 Select one of the following Startup Options Make the selected connection the default connection Enables t...

Page 72: ...for automatic logon and the server it connects to is enabled the TeleCLIENT TC7380 makes the connection and the user is automatically logged on 3 If the logon is not automatic the Windows Logon Infor...

Page 73: ...active connections 5 5 1 Starting Multiple Connections The TeleCLIENT TC7380 allows multiple simultaneous connections The number of connections started is limited by the amount of RAM available in th...

Page 74: ...ogoff 4 Click OK in the panel that displays WTS closes any programs that are still running A new session will now start or the TeleCLIENT Connection Manager window will appear The TeleCLIENT TC7380 ma...

Page 75: ...dware Description CPU National Semiconductor Geode GX1 300MHz processor RAM Memory 64MB RAM standard Expandable to 128MB Flash Memory 8MB DOC or 32MB CompactFlash Flash upgrade utility via Ethernet Gr...

Page 76: ...Port One serial port USB Ports Two USB ports Audio Ports Audio out Microphone in Keyboard and Mouse Ports Keyboard and mouse ports PS 2 keyboard and mouse included Networking Communications and Input...

Page 77: ...3812 Printing IBM 3151 HP Suite HP 2392A 2622A 700 92 Software Specifications Terminal emulation support optional Additional emulations available by request only Please contact TeleVideo directly for...

Page 78: ...iance Specifications 6 1 6 Physical Specifications Feature Description Weight 18 0 lbs Height 15 7 inches Depth 7 2 inches Width 15 1 inches Physical Specifications 6 1 7 Warranty Information The Tele...

Reviews: