2
SCHEMA DI COLLEGAMENTO GENERICO
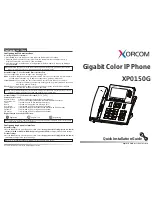
ANT1: Antenna
SMA:
SMA Antenna connector
DLV1: GREEN Led “ON”
DLR2: RED Led “LINE”
TR1:
Audio level from local phones to intercom
TR2:
Audio level from intercom to local phones
JP5:
Impedance regulation microphone
JP6:
Impedance reegulation loudspeaker
SH1:
GSM SIM Holder
PB1:
3V backup battery (CR2032) to keep RTC
CN1
1:
+ Power supply (12 Vdc)
2:
- Power supply (Ground)
CN2
1 e 2: Telephone 1 “Pit”
3 e 4: Telephone 2 “Cabin roof”
5 e 6: Telephone 3 “Engine room”
7:
Data line OUT
8:
Data line IN
CN3
1 - 2: Contact “main alarm”
(cabin alarm)
3 - 4: Contact “alarm filter” or
Auxiliary alarm
5 - 6: Contact “Technologic 1” or
GONG
7 - 8: Contact “Technologic 2” or
GONG
CN4
1:
Data OUT for battery LED
2:
DatiaOUT for battery relay
CN5
1:
Ground Intercom
2:
Loudspeaker Intercom
3:
Handsfree microphone
4:
P/S microphone (12 Vdc)
5:
Contact relay 1 NO
6:
Contact relay 1 Common
7:
Contact relay 2 NO
8:
Contact relay 2 Common
8
7
6
5
4
3
2
1
CN3
CN2
1
2
3
4
5
6
7
8
CN5
1
2
CN4
1
2
CN1
8
7
6
5
4
3
2
1
SMA
SH1
PB1
DLR2
DLV1
TR2
TR1
JP6
ANT1
JP5
1
2
V
d
c
L
u
d
sp
ea
k
er
M
ic
ro
p
h
o
n
e
G
ro
u
n
d
Power supply
12Vdc / 500mA
+
-
INTERCOM
Alarm
sent
lamp
+
-
Alarm
received
lamp
+
-
12Vcc
12Vcc
Engine
Roof
Pit
Alarm
3
SYSTEM SETTINGS
For a proper management of the Test calls (72 hours test) it is recommended to set Date and Time in the
system:
11 10 *<YYMMDDhhmm>*
In order to properly manage the device from a Call Center it is strongly recommended that the unique
System ID Code is properly programmed (unique 6 digit number)
11 04 * <System ID, 6 digit>*
MAIN ALARM
1) Program at least one of the five numbers reserved to the main alarm
2) If in addition to a voice call it is required also an SMS set the first number as SMS alarm and the follo-
wing numbers as voice alarms
Example: 11 81 *#3355954488* e 11 81 *0117070707*
2) Set the number of calling cycles (endless recommended)
11 20 *0*
REMOTE SELF TEST (72 hours test)
1)
Set the telephone number that will receive the 72 hours test calls
11 88 *<Tel. No.>*
2)
Set the time at which the test call will be generated (Hour and Minute)
11 42 *<HH>*
11 43 *<mm>*
BATTERY ALARM
1)
Set the telephone number that will receive the low battery alarm
11 89 *<Tel. No.>*
MESSAGES RECORDING
1)
Set at least the main message including the information to localize the system
11 30 *<sec>*
Parameter 30 is the number of the message to record and <sec> is the duration of the message.
Repeat until the message is satisfactory recorded.
RISPOSTA AD UNA CHIAMATA GENERATA DAL T.gsm
1)
Listen to the message including the alarm type and the location
2)
Use the following commands:
- 7 to listen again to the message
- 5 to start voice communication with the elevator cabin
- 4 to receive the alarm type and location from the system via DTMF tones
- 9 to close the communication
INSTALLATION
Connect T.gsm to a proper power supply and respect the polarity. Connect at least one local phone.
HOW TO SET AND READ PARAMETERS
From one of the local phones dial:
•
Star (*) to access to the system
•
password (default: 1 2 3 4 )
•
pound (#) to start programming
•
Program or read code according to the following syntax
Write code (11) - parameter to set - star (*) - new value - star (*)
Read code (12) - parameter to read
It is possible to set more parameters using the same sequence.
To exit press pound or hang up.
When the RED led is OFF the system is properly working.
When the RED led FLASHES quickly there is an error state (refer to the User Guide)
It is possible to program the system also when it is in error.