to start with the power supply circuit, then proceed consecu-
tively from one circuit to the next.
Once the circuit has been isolated, refer to the Circuit
Description in section 3 for a description of the normal
circuit operation.
C A U T I O N
U s e c a r e w h e n m e a s u r i n g v o l t a g e s o r w a v e f o r m s .
T h e s m a l l s i z e a n d h i g h d e n s i t y o f c o m p o n e n t s
in this instrument establishes a condition such that
an inadvertent movement of the test probe or the
use of oversized probes may short-circuit between
components.
The pin connectors to the circuit boards provide a method
to isolate circuit resistance and voltages. Check circuit condi-
tions before disconnecting voltages to make certain bias
voltages are not removed, which may cause excessive over-
loads.
Transistor Substitution and Replacement
Transistors should not be replaced unless they are actually
defective. However, temporary substitution is often a con-
venient way to detect defective transistors.
Before substi-
tuting a transistor, it is recommended that circuit conditions
be checked to be certain that an exact replacement will not
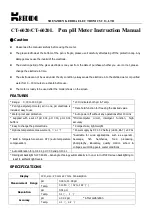
be damaged. If a transistor is removed from its socket,
make certain it is replaced in the same socket in the same
position. Some transistors can be inserted incorrectly into
their socket. Fig. 4-21 shows the correct connections and
positions for the different types of transistors used in the Type
491.
In-Circuit Diode Checks
In-circuit diode checks may be performed with a voltmeter.
A comparison check of the voltages on each side of the
diode with the typical voltages listed on the diagram will
help isolate faulty diodes. Forward-to-back resistance ratios
on some diodes can be checked by referring to the schematic
and pulling appropriate transistors and square pin connectors
to remove low resistance loops around the diode.
D o n o t u s e a n
internal current.
resistance ratios
C A U T I O N
o h m m e t e r s c a l e t h a t h a s a h i g h
Do not check the forward-to-back
of tunnel diodes or mixer diodes.
4-19
Summary of Contents for 491
Page 4: ...i i Fig 1 1 The Type 491 Spectrum Analyzer ...
Page 24: ...2 16 Fig 2 17 Control set up chart ...
Page 34: ...Fig 3 1 Function block diagram of the Type 491 3 2 ...
Page 42: ...Fig 3 10 Block diagram of the video detector and vertical amplifier 3 1 0 ...
Page 48: ......
Page 53: ...Fig 4 4 Power Supply Circuit board assembly with wiring color code 4 5 ...
Page 54: ...Fig 4 5 Horizontal Display circuit board assembly showing color code to pin connectors 4 6 ...
Page 55: ...Fig 4 6 IF Control board assembly Wiring color code to pin connector 4 7 ...
Page 64: ...Fig 4 20A Tube subassembly removal procedure 4 16 ...
Page 65: ...Fig 4 20B Tube subassembly installation procedure 4 17 ...
Page 68: ...Fig 4 22 Power supply board assembly with component call out 4 2 0 ...
Page 69: ...Fig 4 23 Vertical Amplifier and Blanking board assembly with component call out 4 21 ...
Page 70: ...Fig 4 24 IF control board assembly with component call out 4 22 ...
Page 71: ...Fig 4 24 IF control board assembly with component call out 4 23 ...
Page 72: ...Fig 4 25 Horizontal display board with component call out 4 24 ...
Page 73: ...Fig 4 25 Horizontal display board with component call out 4 25 ...
Page 74: ...Fig 4 26 Phase lock board with component call out 4 26 ...
Page 88: ......
Page 90: ...Fig 6 1 Test equipment recommended for calibration of the Type 491 6 2 ...
Page 138: ......
Page 192: ......
Page 195: ...SECTION II B 3 ...
Page 196: ......
Page 200: ......
Page 201: ...SECTION 9 DIAGRAMS MECHANICAL PARTS LIST ILLUSTRATIONS ACCESSORIES ...
Page 202: ......
Page 203: ...9 1 ...
Page 204: ...9 3 ...
Page 205: ...9 5 ...
Page 206: ...9 7 ...
Page 207: ...9 9 ...
Page 208: ...9 11 ...
Page 209: ...9 13 ...
Page 210: ...9 15 ...
Page 211: ...9 17 ...
Page 212: ...9 19 ...
Page 213: ...9 21 ...
Page 214: ...9 23 ...
Page 215: ...9 25 ...
Page 216: ...9 27 ...
Page 217: ...FIG 1 9 29 ...
Page 218: ...FIG 2 REAR 9 31 ...
Page 219: ...9 33 FIG 3 IF CHASSIS PHASE LOCK ASSEMBLIES ...
Page 220: ...FIG 4 POWER CHASSIS 9 35 ...
Page 221: ...FIG 5 TIME DIV SWITCH OSCILLATOR ASSEMBLIES 9 37 ...
Page 222: ...FIG 6 CRT SHIELD ASSEMBLY 9 39 ...
Page 223: ...FIG 7 CABINET ASSEMBLY HANDLE 9 4 1 ...
Page 224: ...FIG 8 491 STANDARD ACCESSORIES FIG 8 491 STANDARD ACCESSORIES 9 43 ...
Page 225: ......
Page 226: ...PIN 028017 000 ...