background image

 å

Carefully stand your unit upright.

 å

Slide the BACK (N) into the grooves in the ENDS (A and B)

and FIXED SHELF (D). 

Step 6

A

B

N

D

Finished 

surface

With the palm of your hand, 

tap the BACK down into  

the groove.

Page 10

Summary of Contents for Elstree 5426910

Page 1: ...NOTE THIS INSTRUCTION BOOKLET CONTAINS IMPORTANT SAFETY INFORMATION PLEASE READ AND KEEP FOR FUTURE REFERENCE Hutch with Drawer Elstree Model 5426910 Knick knack paddywhack give your stuff a home...

Page 2: ...ssembly Tools Required No 2 Phillips Screwdriver Tip Shown Actual Size Part Identification Hardware Identification Hardware Usage Guide Assembly Steps Fran ais Espa ol Safety Warranty 3 4 5 5 19 20 22...

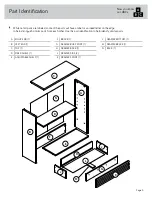
Page 3: ...milar parts from each other Use this part identification to help identify similar parts Now you know our ABCs A RIGHT END 1 B LEFT END 1 C TOP 1 D FIXED SHELF 1 E ADJUSTABLE SHELF 1 F BRACE 1 G DRAWER...

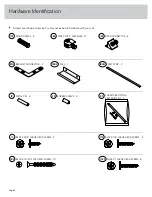
Page 4: ...HEAD SCREW 2 1S BLACK 7 8 LARGE HEAD SCREW 4 17S FURNITURE TIPPING RESTRAINT KIT 1 97 METAL PIN 4 1R RUBBER SLEEVE 4 2R SILVER 1 LARGE HEAD SCREW 8 102S 30S BLACK 1 9 16 FLAT HEAD SCREW 10 BACK CONNE...

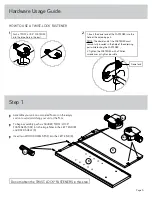
Page 5: ...are Usage Guide 1 Insert the dowel end of the FASTENER into the hole of the adjoining part NOTE The dowel end of the FASTENER must remain fully inserted in the hole of the adjoining part while locking...

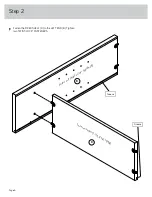
Page 6: ...Fasten the FIXED SHELF D to the LEFT END B Tighten two TWIST LOCK FASTENERS Step 2 B D Surface with TWIST LOCK FASTENERS Surface with TWIST LOCK FASTENERS Groove Groove Page 6...

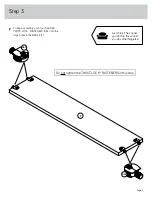
Page 7: ...tighten the TWIST LOCK FASTENERS in this step To begin assembly push four SAUDER TWIST LOCK FASTENERS 36F into the large holes in the BRACE F 36F Page 7 Just think The sooner you do this the sooner yo...

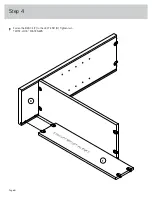
Page 8: ...Fasten the BRACE F to the LEFT END B Tighten two TWIST LOCK FASTENERS Step 4 B Surface with TWIST LOCK FASTENERS F Page 8...

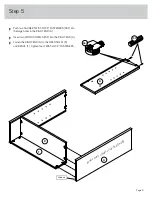
Page 9: ...the large holes in the RIGHT END A Insert two WOOD DOWELS 15F into the RIGHT END A Fasten the RIGHT END A to the FIXED SHELF D and BRACE F Tighten four TWIST LOCK FASTENERS Step 5 F A 36F 15F D A Surf...

Page 10: ...efully stand your unit upright Slide the BACK N into the grooves in the ENDS A and B and FIXED SHELF D Step 6 A B N D Finished surface With the palm of your hand tap the BACK down into the groove Page...

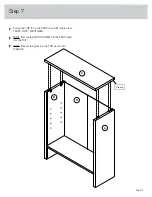
Page 11: ...e TOP C to the ENDS A and B Tighten four TWIST LOCK FASTENERS NOTE Be sure the WOOD DOWELS in the ENDS insert into the TOP NOTE Be sure the groove in the TOP inserts into the BACK Step 7 A B N C Groov...

Page 12: ...Tighten the SCREW in each BACK CONNECTOR Step 8 A B N C D Slide the lip into the groove then tighten the screw Use two BACK CONNECTORS per side 2 3 in from each corner 39F 39F 39F 39F Screw Lip Lip S...

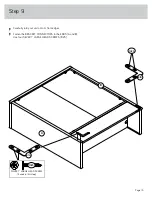
Page 13: ...turn your unit onto its front edges Fasten the BRACKET CONNECTORS to the ENDS A and B Use four SILVER 1 LARGE HEAD SCREWS 102S Step 9 81G 102S SILVER 1 LARGE HEAD SCREW 4 used in this step 81G 102S P...

Page 14: ...97 and fasten the SAFETY STRAP to the TOP C Use the short screw provided NOTE Position the SAFETY STRAP exactly as shown NOTE There is no pre drilled hole in the TOP C Use extra force when turning thi...

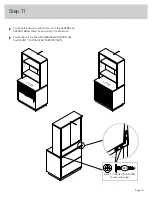
Page 15: ...to the 426908 and 426909 Below shows how to attach it to either unit Fasten the unit to either the 426908 and 426909 Use four SILVER 1 LARGE HEAD SCREWS 102S Step 11 426908 426909 102S SILVER 1 LARGE...

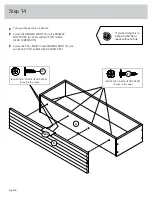
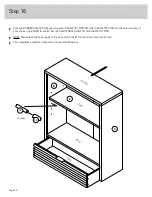
Page 16: ...the grooves in the DRAWER SIDES J and DRAWER BACK H Fasten the DRAWER BOX FRONT G to the DRAWER SIDES J Use four BLACK 1 9 16 FLAT HEAD SCREWS 30S Groove 30S Start each screw a few turns before comple...

Page 17: ...k edges of the DRAWER SIDES J as shown NOTE The FELT STRIPS should completely cover the bottom edges of the DRAWER SIDES and wrap equally around the front and back edges J J The FELT STRIPS should equ...

Page 18: ...r BLACK 7 8 LARGE HEAD SCREWS 17S Fasten the PULL 189K to the DRAWER FRONT K Use two BLACK 9 16 LARGE HEAD SCREWS 1S K G BLACK 7 8 LARGE HEAD SCREW 4 used in this step 17S BLACK 9 16 LARGE HEAD SCREW...

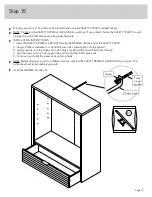
Page 19: ...SAFETY STRAP 2 Using a Phillips screwdriver or a hand drill press the screw slightly onto the drywall 3 Apply pressure turn the screw until a pilot hole is made and the nylon sheath slips through 4 T...

Page 20: ...ations of your choice in the ENDS A and B Set the ADJUSTABLE SHELF E onto the METAL PINS NOTE Please read the back pages of the instruction booklet for important safety information This completes asse...

Reviews: