


EN-8
Scope of supply
Part No. Part Description
Q'ty
A
Warming Rack
1
B
Cooking grid
2
C
Flame Tamer
3
D
Firebox Assembly
1
E
Left Side Shelf
1
F
Bracket F
1
G
Bracket G
1
H
Cart Front Brace
1
I
Cart Leg, Rear Left
1
J
Cart Side Brace
2
K
Side Burner Grid
1
L
Cart Leg, Front Left
1
M
Cart Side Panel
2
N
Caster
1
O
Locking Caster
1
P
Door Handle
1
Q
Door Stopper
1
R
Cart Bottom Panel
1
S
Door Handle Bezel
2
T
Wheel Cap
2
U
Wheel
2
V
Axle
1
W
Cart Leg, Front Right
1
X
Cart Leg, Rear Right
1
Y
Door
1
Z
Grease Tray
1
A1
Cart Rear Brace
1
B1
Bracket B1
1
C1
Bracket C1
1
D1
Side Burner Shelf
1
E1
Side Burner
1
AA
1/4"x12mm Screw
20
BB
5/32"x10mm Screw
30
CC
1/4" Spring Washer
8
DD
1/4" Flat Washer
6
EE
Cotter Pin
1
Please check the delivery for completeness and transport
damage. If any part is missing or defective, please contact
your dealer.
Complaints regarding damage or missing parts lodged upon
commencement or completion of installation will not be
recognized.
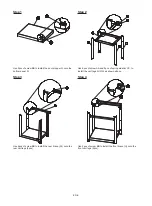
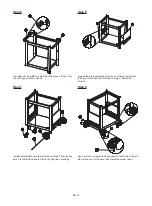
Assembly
Preparation
Before beginning assembly of product, make sure all parts
are present. Compare parts with package contents list and
hardware contents list. If any part is missing or damaged, do
not attempt to assemble the product.
Contact the dealer from whom you purchased the appliance if
you find that parts are missing or show damage.
Do not use the appliance unless missing parts have been
delivered in addition or defective parts have been replaced.
Using an incomplete or damaged appliance leads to personal
injury and property damage.
Remove and safely discard any packaging material or
promotional labels attached to the set.
1. Assemble the appliance completely and make all required
adjustments prior to operation.
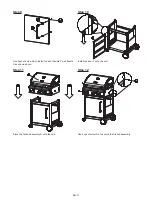
2. Follow the assembly and operation instructions closely. Use
the figures as a visual guide.
3. Pay attention to small parts such as screws and nuts
that are loosened or removed for assembly or during
adjustments. Keep them safe in order to avoid losing them.
4. The appliance is large. It is recommended to assemble by
two people.
Danger! Risk of injury!
Failure to follow these instructions can lead to
problems and risks while using the barbecue.
- Follow all assembly instructions listed here.
WARNING!
Use the appliance only after it has been completely
assembled and adjusted!
IMPORTANT:
Parts sealed by the manufacturer or the
manufacturer’s agent shall not be manipulated by the user.
Required tools
1x cross-head screwdriver
1x adjustable open-end wrench
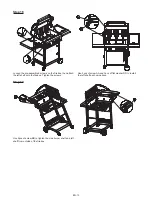
Assembling the barbecue
1. First read through the assembly instructions completely.
2. Two people are required for assembly.
3. Take your time to assemble the barbecue on a level surface
of three to four square meters.
4. Make sure the required tools are within easy reach. Small
parts such as handles may already be pre-assembled.
Summary of Contents for T-BBQ 3100 G BK-SS
Page 1: ...EN ES PT FR User Manual T BBQ 3100 G BK SS teka com...
Page 3: ...EN 3 S U V M O N H Z I L J G F D E C B A K Y U T A1 B1 C1 D1 E1 W T X J M P Q R AA BB CC DD EE...
Page 20: ...EN 20 Replacement parts...
Page 23: ...ES 2 S U V M O N H Z I L J G F D E C B A K Y U T A1 B1 C1 D1 E1 W T X J M P Q R AA BB CC DD EE...
Page 40: ...ES 19 Piezas de repuesto...
Page 43: ...PT 2 S U V M O N H Z I L J G F D E C B A K Y U T A1 B1 C1 D1 E1 W T X J M P Q R AA BB CC DD EE...
Page 60: ...PT 19 Pe as sobresselentes...
Page 63: ...FR 2 S U V M O N H Z I L J G F D E C B A K Y U T A1 B1 C1 D1 E1 W T X J M P Q R AA BB CC DD EE...
Page 80: ...FR 19 Pi ces de rechange...
Page 82: ...www teka com...


