16
9. ADJUSTMENT
9.1
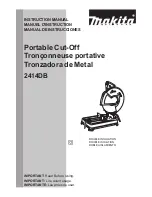
ADJUT THE COIN MECH
adjusting chip in
coin entrence
coin-return
pole
Adjusting Switch For
Coin Signal
Wavelength
switch for coin signal
Port For Power/Signal
Input
Micro-Resistance
sample
coin
chute
DC+12V
STRIC
T
SLACK
Sensit
i
vi
ty
+
-
CO
IN
Re
mo
ve
RE
PL
AC
E
Ba
ck
wa
rd
SW3
100ms SLOW
25ms FAST
NOM
正常
MGN
精准
50ms MEDIUM
WHITE
C/-)
GROUND
N.C.
SW1
SW2
N.O.
COUNTER(-/+)
COIN SIGNAL
GRAY
BLACK
RED
GRAY
Descriptions:
1): Please take out the plastic coin from sample coin chute and replace it
with token.
2): Remove the screws on back of coin entrance. Adjust the fixing chip on
back of coin entrance according to the token’s diameter, which prevent
blocking the coin mech as inserting the large coin in by mistake.
3): Turn the COIN Switch to “NO” (COIN Signal wire and GND should be
disconnected at usual time). Turning switch can be used as the coin
mech switch when the game is power on.
4): Adjust the adjusting switch of COIN Signal wave length to 50MS.
5): Adjust the micro-adjusting resistance of token tolerance. Clockwise:
increasing the sensitivity of token tolerance, that is, the range of
accepting the token tolerance will be larger. Counter clockwise: