background image

Multimedia Operation

21

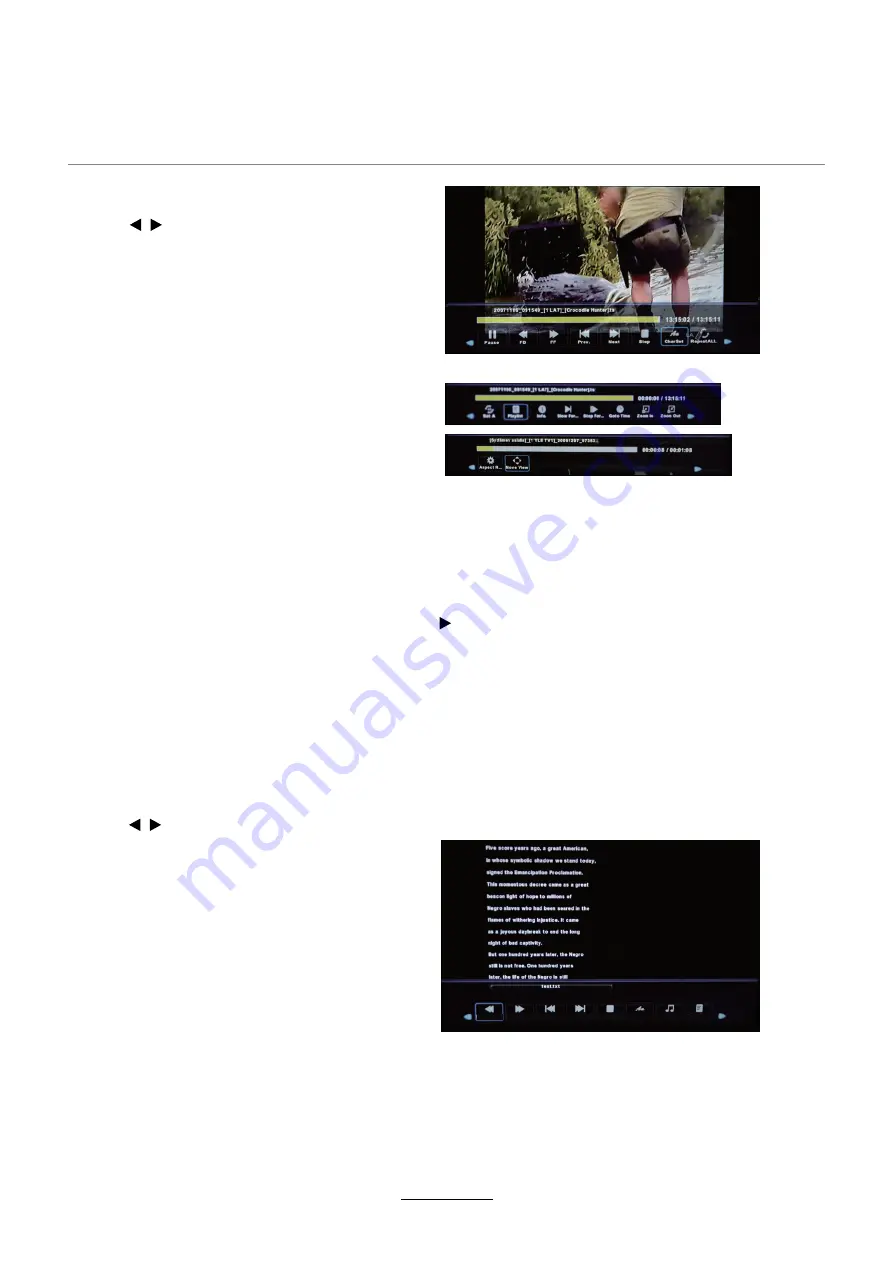
3. Movie

4. Text

Press     /     button to select the option 

on the menu, and press 

OK

 button to 

change.

Pause: 

 Play/pause the music

FB/FF: 

Fast backward/fast forward.

Prev./Next:

 Play the previous/next file.

Stop:

 Stop the movie.

Char Set: 

such as Western 

Europe(Windows).Select a switable 

character libraly of the subtitle of the 

movie that you view

Press     /     button to select the option on the 

menu, and press 

OK

 button to change.

Previous/Next page:

 Turn to previous/next 

page of the text.

Prev./Next:

 Turn to previous/next file.

Stop:

 Stop auto turning pages.

Char Set: 

Select a switable character libraly 

of corrent Text file that you view,such as

Western Europe (Windows).

Music:

 Play/pause the music programme.

Playlist: 

Display the playlist on the screen.

Info: 

Display the information of the text. 


Repeat: 

Select the repeat mode from Repeat All, Repeat 1, Repeat None.

Set A-B:

 Select and play the preferable part of the file by setting A and B at the 

beginning and end. Press 

OK

 button to cancel.

Playlist:

 Display the playlist on the screen.

Info:

 Display the information of the movie.

Slow :

 Play the movies at slow speed, press      button to cancel.

Step :

 Step quickly through the movie by using this option

Goto Time:

 Program the movie form the time you set.

Zoom out/in:

 Zoom out/in the movie screen.

Aspect Ratio:

 Select the aspect ratio of the screen display.

Move View:

 Move the photo in Zoom in mode.

Music Off

Next Page

Prev. Page

Next

Stop

CharSet

Playlist

Prev.

Summary of Contents for LED19IHRDH

Page 1: ...INSTRUCTION MANUAL LED19IHRDH LED24IFRDH...

Page 2: ......

Page 3: ...10 Overview Front View Accessories 9 Remote control 11 12 Basic Operation 13 2 PICTURE Menu 16 1 CHINNEL Menu 14 15 3 SOUND Menu 16 4 TIME Menu 17 5 SETUP Menu 17 6 LOCK Menu 18 OSD Menu Recording Op...

Page 4: ...Preface Safety Information Safety Precautions TECO LED LCD colour television 4...

Page 5: ...Safety Information Safety Precautions 5 This LED LCD television is for indoor use only...

Page 6: ...Safety Information Safety Precautions 6...

Page 7: ...ons including children with reduced physical sensory or mental capabilities or lack of experience and knowledge unless they have been given supervision or instruction concerning use of the appliance b...

Page 8: ...to falling Many injuries particularly to children can be avoided by taking simple precautions such as of the television on e supporting furniture cupboards or bookcases without anchoring both the furn...

Page 9: ...s Remote Control Batteries 2 x AAA 9 Stand Installation Instructions Power Adaptor Cigar lighter VOL VOL CH CH MENU SOURCE POWER MENU Display exit the OSD menu CH Scan through channels VOL Adjust the...

Page 10: ...IN Connect it to the audio output terminal of PC VGA For PC display Connect it to the D Sub 15 pins analog output connector of the PC COAX Digital output to AV receiver HEADPHONE Connect it to your he...

Page 11: ...ource menu DISPLAY Press to display the current mode s information In DTV mode play display one time display the basic information Play a second time display the detail information Play a third time t...

Page 12: ...ing and end of it CH Scan through channels VOL Adjust the volume 12 Media DVD Press to start record the program in DTV mode Previous chapter Next chapter Fast reverse Fast forward Stop program Play Pa...

Page 13: ...s t u p n I e h t y a l p s i d o t V T e h t n o Input Description DTV Digital TV ATV Analogue TV DVD DVD Mode AV Video AV Input YPBPR Component Video YPbPr Input PC PC VGA PC Audio Input USB USB Med...

Page 14: ...n DTV or ATV Press button to start searching and Press button to select the Search Country Tune Type Scan type Network ID Frequency Symbol ks s Sorting by LCN Australia DTV ATV Full Auto Auto Auto On...

Page 15: ...am will be deleted Rename Select a channel and press GREEN button the program will be renamed Move Select channel and press YELLOW button then you can use and buttons to change the position of the pro...

Page 16: ...Adjust Back MENU Exit PICTURE EXIT Noise Reduction SCREEN Dynamic CR Medium On Move Adjust Back MENU Exit PICTURE EXIT Face Color 0 Face Color Controls the color range Sound Mode Allows you to select...

Page 17: ...ove Adjust Back MENU Exit TIME EXIT Language Allows you to select menu language TT Language Setting the character set for teletext Audio Language can be selected in DTV mode Allows you to select first...

Page 18: ...on the TV Default Prog Select the default programme when turn on the TV Default Volume Set the default volume when the program is on Max Volume Set the Max volume for the TV Import Database Import al...

Page 19: ...ct USB source by the buttons and press OK button to enter the Multimedia menu seen below 3 Press button to select the the USB device and press OK button to enter Press buttons to select and the OK but...

Page 20: ...lay the information of the photo Rotate Rotate the photo clockwise counterclockwise Zoom Out In Zoom out in the photo Move View Move the photo in Zoom in mode Press button to select the option on the...

Page 21: ...e that you view such as Western Europe Windows Music Play pause the music programme Playlist Display the playlist on the screen Info Display the information of the text Repeat Select the repeat mode f...

Page 22: ...lay the size of the USB device The device has been formated Speed Display the speed of the USB device The device has been formated Press the MENU button select SETUP menu and select PVR File System th...

Page 23: ...DVD Operation 2 NOTE Selecting DVD Mode INPUT INPUT Inserting a DVD Disc To Eject the disc press on the TV or Playing a DVD...

Page 24: ...utton DVD SETUP OK DVD SETUP button to exit from the DVD Setup Screen General Setup Page TV Display 4 3 Pan Scan 4 3 Letter Box Wide 16 9 OSD Language Screen Saver Last Memory Audio Setup Page Speaker...

Page 25: ...the disc you can play sounds for that Subtitle If the language selected is recorded on the disc you can set the Subtitle to display in Disc Menu If the language selected is recorded on the disc you c...

Page 26: ...26 Troubleshooting...

Page 27: ...notice Panel Size LCD Panel Max Resolution Input Connector Output Connector VIDEO YPbPr VGA AUDIO L R PC AUDIO HDMI RF HEADPHONE Main Voltage Power 1366x768 COAX Mounting Bracket VESA Mounting Screw S...

Page 28: ......

Page 29: ...also includes Top Load Clothes Washers Front Load Clothes Washers Auto Sensing Vented Clothes Dryers Refrigerators Chest and Vertical Freezers Bar Fridges Televisions Air Curtains and Air Conditioner...

Page 30: ......

Page 31: ...airs to this appliance IF SERVICE IS REQUIRED If you have a problem and the problem persists after you have made the checks mentioned in this manual contact TECO Australia s Service on 1300 660 037 8...

Page 32: ...www teco com au IBI PV1...

Reviews: