background image

ENGLISH 

Battery Box 


User’s Manual


Selecting Installation Position 

It is necessary to select a proper environment to install the unit, in order to minimize the possibility of damage to the 
battery box and extend the life of the batteries. Please follow the instructions below: 

1.


Keep at least 20 cm clearance from the rear panel of the unit from the wall or other obstructions. 

2.


Do not block the air-flow to the ventilation openings of the unit. 

3.


Please  ensure  the  installation  site  environmental  conditions  are  in  accordance  with  the  unit’s  working 
specifications to avoid overheat and excessive moisture. 

4.


Do not place the unit in a dusty or corrosive environment or near any flammable objects. 

5.


This unit is not designed for outdoor use. 

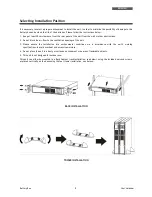
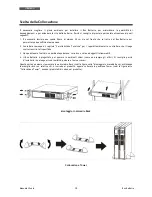
This unit can either be mounted in a Rack Cabinet (rack installation, see below), using the included ears and screws, 
or placed vertically on the desk using the feet (tower installation, see below). 


RACK INSTALLATION 


TOWER INSTALLATION 

Summary of Contents for FBBEVD4003RT Series

Page 1: ...Battery Box FBBEVD4003RT XX User s Manual Manuale Utente...

Page 2: ......

Page 3: ...Smaltimento del Prodotto 10 1 2 Batterie al Piombo 10 2 Installazione Elettrica 11 Ricevimento e Ispezione 11 Retro del Box Batterie 11 Scelta della Collocazione 12 Collegamento con l UPS e con un alt...

Page 4: ......

Page 5: ...1 Product Disposal This Battery Box cannot be disposed as an urban waste but must be treated as a separate waste Any violation is indictable with financial sanctions as per in force regulations An in...

Page 6: ...e keep the original package in a safe place for future use 2 Check the inside package Battery box unit Quick guide Battery connection cable x 1 Ear x 2 screw x 8 Feet x 2 sets Input power cord Feet Ba...

Page 7: ...t block the air flow to the ventilation openings of the unit 3 Please ensure the installation site environmental conditions are in accordance with the unit s working specifications to avoid overheat a...

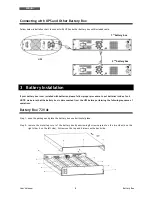
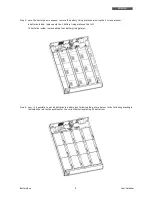
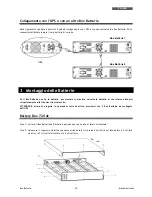
Page 8: ...ure to put batteries inside of unit NOTE make sure that the battery box is disconnected from the UPS before performing the following sequence of operations Battery Box 72 Vdc Step 1 open the package a...

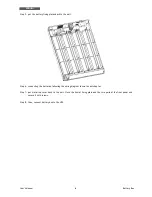
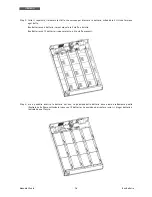
Page 9: ...nt 6 batteries inside remove only the 2 battery fixing plates on the left 12 batteries inside remove all the four battery fixing plates Step 4 now it is possible to put all batteries in battery box fo...

Page 10: ...to the unit Step 6 connecting the batteries following the wiring diagram shown in next chapter Step 7 put metal top cover back to the unit Close the frontal fixing plate and the two parts of the fron...

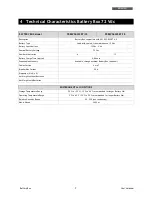
Page 11: ...ber of batteries 6 12 Battery Charge Time typical 6 8 hours Expandable Autonomy Available through external Battery Box optional Cables Section 6 mm2 Breaker Max Current 50 A Dimension W x H x D Net We...

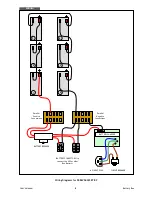
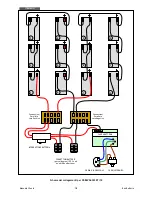
Page 12: ...Wiring Diagrams for FBBEVD4003RT 09 Parallel Positive Connections Parallel Negative Connections BATTERY CHARGER BATTERY CONNECTORS to connect the UPS or other Box Battery BATTERY BREAKER L N G AC INP...

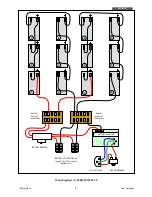
Page 13: ...Diagrams for FBBEVD4003RT 18 Parallel Positive Connections Parallel Negative Connections BATTERY CHARGER BATTERY CONNECTORS to connect the UPS or other Box Battery BATTERY BREAKER L N G AC INPUT PLUG...

Page 14: ...timento del Prodotto Il prodotto Box Batterie non pu essere smaltito come rifiuto urbano ma deve esserlo tramite raccolta separata qualsiasi violazione punita con sanzioni pecuniarie ai sensi delle vi...

Page 15: ...it futura che il prodotto dovesse essere spedito per la manutenzione 2 Accertarsi che all interno dell imballo siano presenti Il prodotto Box Batterie Il manuale utente Il Cavo Batterie 2 maniglie e 8...

Page 16: ...iche per i requisiti ambientali e controllare che il luogo scelto rientri in tali specifiche 3 Non posizionare l unit in un ambiente polveroso corrosivo o vicino ad oggetti infiammabili 4 Il Box Batte...

Page 17: ...in maniera corretta le batterie al suo interno attenersi scrupolosamente alla istruzioni riportare sotto ATTENZIONE prima di eseguire le operazioni sotto descritte accertarsi che il Box Batterie sia...

Page 18: ...Batterie con 6 batterie rimuovere solo le 2 staffe a sinistra Box Batterie con 12 batterie rimuovere tutte e 4 le staffe presenti Step 4 ora possibile inserire le batterie nel box La posizione delle...

Page 19: ...i fissaggio delle batterie Step 6 collegare le batterie seguendo scrupolosamente gli schemi dei collegamenti riportati nel prossimo capitolo Step 7 rimontare il coperchio metallico superiore del box S...

Page 20: ...rica Batterie Tipico 6 8 ore Espansione Autonomia Disponibile tramite ulteriore Box Batterie opzionale Sezione cavi 6 mm2 Max Corrente Batteria 50 A Dimensioni L x H x P Peso netto senza Batterie Peso...

Page 21: ...enti per FBBEVD4003RT 09 Connessioni Parallele Lato Positivo Connessioni Parallele Lato Negativo CARICA BATTERIA CONNETTORI BATTERIE per collegare all UPS o ad un altro Box Batterie INTERRUTTORE BATTE...

Page 22: ...r FBBEVD4003RT 18 Connessioni Parallele Lato Positivo Connessioni Parallele Lato Negativo CARICA BATTERIA CONNETTORI BATTERIE per collegare all UPS o ad un altro Box Batterie INTERRUTTORE BATTERIA L N...

Page 23: ......

Page 24: ...TECNOWARE s r l www tecnoware com...

Reviews: