background image


CSB CryoEM Facility TF20 Operating Instructions                                                                           SEC 

05/02/16 


9.

Fill the liquid nitrogen dewar. You'll need to fill it 2x initially. The first time a lot of LN2 will quickly


boil off. Wait 10­15 mins after initial fill up and then top off. This should last ~4hrs. In total, for an


8hr work day, you'll need to fill the anti­contaminator 3x.

Check every 2­4 hours

and add nitrogen


as needed. 

10.

If all these conditions are met, you are OK to proceed.  


Summary of Contents for F20

Page 1: ...as well as cryo preserved samples Three different types of holders are available for use a room temperature RT for setup and 0 degree tilt data collection a Fischione RT holder for collecting random conical tilt negative stained images and two cryo TEM holders for vitrified samples Gatan 626 The TF20 is equipped with a 4k by 4k Gatan UltraScan CCD camera for digital image collection The compustage...

Page 2: ...r will send a reminder for people to remove their data Both the support computer and the microscope computer have limited storage space and they are not for long term data storage Two pieces of software control the microscope and digital camera the Tecnai User Interface which connect the user with the microscope and Gatan Digital Micrograph DM Each day a cryo cycle or bake out cycle is run at the ...

Page 3: ... is copied nightly 4 Open the Tecnai User Interface and Digital Micrograph applications by double clicking on the icons 5 Check that the High Tension HT Operate and Power buttons are lit yellow on the Tecnai User Interface If they are not please contact the lab manager immediately do not proceed any further 6 Verify that the microscope is at the appropriate operating voltages HT at 200kV and extra...

Page 4: ...2x initially The first time a lot of LN2 will quickly boil off Wait 10 15 mins after initial fill up and then top off This should last 4hrs In total for an 8hr work day you ll need to fill the anti contaminator 3x Check every 2 4 hours and add nitrogen as needed 10 If all these conditions are met you are OK to proceed ...

Page 5: ...area The oil from your fingers will contaminate the vacuum as well as your sample This will cause the vacuum to crash or at the very least degrade the readings in IGPs 1 and 4 will not be optimal Do not touch anything beyond the O ring Schematic of the compustage from http zhanglab net tem_help tem spechand htm Alignments should be done with either a platinum iridium specimen PtIR or a waffle grid...

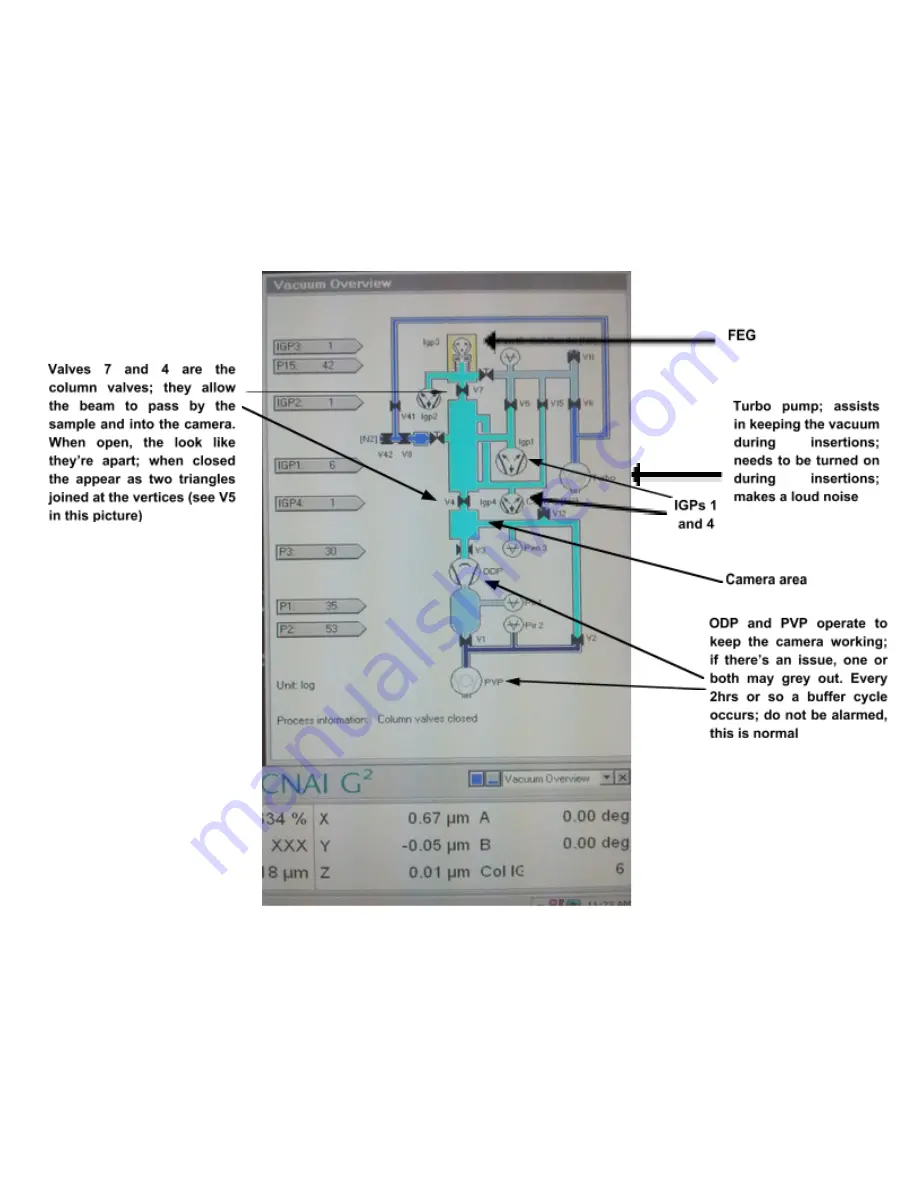
Page 6: ... are closed Setup Tab Column Valves closed is yellow 2 Verify that the red light on the compustage is off 3 Make sure the stage is at 0 0 0 in X Y and Z by going to the Search Tab Stage 2 menu flaput window and click on Holder This will Home the stage 4 Turn on the Turbo pump on the Setup Tab click on Turbo On the button will go from grey to orange and when the turbo is ready it will be yellow 5 G...

Page 7: ...astens the grid and clamp Do this with care so as to avoid jamming the ring onto the grid 9 Return the tool to its resting place Replace the plastic covering on the tip Turn the holder upside down and gently tap the back black part a few times to verify that the clamp was positioned properly and that the grid is mounted correctly and stays in place 10 Take the holder out of the plastic cover and a...

Page 8: ...oEM Facility TF20 Operating Instructions SEC 05 02 16 11 Carefully insert the holder in this position then turn to the 5 o clock position this aligns the pin to the Close word on the outside of the compustage ...

Page 9: ...ce the holder into the compustage 13 Select Single Tilt Holder on the Tecnai User Interface 14 There will be a wait time of 60 90s while the airlock is evacuated 15 Watch out for when the red light turns off and the counter on the User Interface reaches 0s 16 Securely turn the RT holder from the 5 o clock position to the 12 o clock position and gently guide the rest of the holder into the column ...

Page 10: ...0 Operating Instructions SEC 05 02 16 17 Make sure the black part of the holder is flush with the compustage 18 Turn off the Turbo pump 19 Wait 10 minutes to open the column valves so as to give time to the stage to stabilize ...

Page 11: ... Check for the beam If there is no beam try one of the following 1 Move the stage only if a sample is in the scope beam path 2 Lower the magnification 3 If you can t find the beam call find me There may be a bigger problem 7 Eucentric Focus Click on Eucentric Focus button located on the right panel this should take you within a few microns of true focus 8 Load Alignment file Go to the Alignments t...

Page 12: ...ft control pad before and after each step Repeat the entire procedure 2 3 times until the beam remains in the center Click done when finished with alignment The gun shift needs to be done with a sample in the microscope or a sample in the scope with a spacer pen cap in place IF not then the the microscope will beep and you will get an error message which says x ray safety Spotsize clipped to 5 17 ...

Page 13: ... Digital Micrograph or by inserting the small screen and adjusting the focus until all contrast has disappeared Once focus has been found select reset defocus typically R2 on the right control board start live view and go between 0 25 0 5nm underfocus negative value Observe the shape of the FFT of the image If it isn t round go to Stigmator select Objective and adjust with the multifunction knobs ...

Page 14: ...ave it properly 8 Once the Turbo turns yellow remove the dewar from the microscope and dispose of the remaining LN2 in the foam container under the table 9 Place the protective fabric underneath the anti contaminator 10 If using the RT or RT tomography holders return them to their proper receptacle 11 If using the Gatan cryo holder s return to the dry pumping station and follow the instructions th...

Page 15: ...e gathered your cryo sample in transfer dewar forceps large forceps for grid box transfer and anything else needed and place it near the transfer station 5 Add LN2 to both the cryo transfer station and the cryo holder These will boil at different times Do not overfill the holder nor the station this will only cause the holder to become icy and the transfer station to frost 6 Plug in the control un...

Page 16: ... You want to keep the temperature at least 175 C or colder to 197 C 11 Cool the following in the recessed bowl area clipring tool silver with black knobs and attached clipring and forceps for the grid transfer 12 Open the shield on the cryo holder and transfer a grid from the grid box to the recessed grid location on the cryo holder Place the clip ring on you should hear a click and then hold the ...

Page 17: ...n the position of the holder is correct the holder will slide into the airlock about 1 inch further 19 Select the ST Cryo holder option bottom of the Tecnai User Interface 20 Wait for the airlock pumping cycle to finish 60 90s as indicated by the timer on the UI 21 When the holder is upright reset the stage tilt to 0 by going to the Search tab flapout window Control tab Alpha toggle and click Set ...

Page 18: ...dispose of the remaining LN2 in the foam container under the table 21 Place the protective fabric underneath the anti contaminator 22 Dismount the specimen from the holder and dispose of it or save it properly 23 If using the RT or RT tomography holders return them to their proper receptacle 24 If using the Gatan cryo holder s return to the dry pumping station and follow the instructions there on ...

Reviews: