background image

UK - 19 -

Recommendations

Warning:

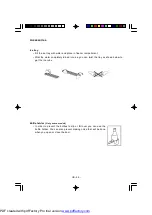
  Do not use mechanical devices or  other means to accelerate the defrosting

process,  other  than  those  recommended  by  the  manufacturer.  Do  not  use  electrical
appliances  inside  the  food  storage  compartments  of  the  appliance,  unless  they  are  of
the  type    recommended  by  the  manufacturer.  Keep  ventilation  openings,  in  the  appliance
enclosure  or  in  the  built-in  structure,  clear  of  obstruction.  Do  not  damage  the  refrigerant
circuit.

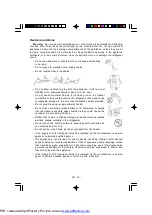
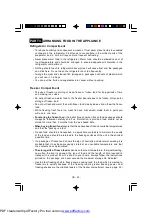
•  Do  not  use  adapters  or  shunts  which  could  cause  overheating

or  burning.

•  Do  not  plug  old,  warped  power  supply  cables.

•  Do not  twist and  bend the  cables.

•  Do  not  allow  children  to  play  with  the  appliance.  Children  must

NEVER  sit  on  drawers/shelves  or  hang  from  the  door.

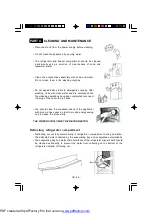
•  Do  not  use  sharp  metal  objects  for  removing  ice  on  the  freezer

compartment; they could puncture the refrigerator circuit  and cause
unrepairable  damage  to  the  unit.  Use  the  plastic  scraper  provided.

•  Do  not  plug  the power  supply with  wet  hands.

•  Do  not  place  containers  (glass  bottles  or  tin  containers)  of  liquids

into  the  freezer  especially  gassy  liquids  as  they  could  cause  the
container  to  burst  during  freezing.

•  Bottles  that  contain  a  high  percentage  of  alcohol  must  be  sealed

well  and  placed  vertically  in  the  refrigerator.

•  Do  not  touch  the  cooling  surfaces,  especially  with  wet  hands  as

you could be burnt or hurt.

•  Do  not  eat ice, which have  just been  removed from  the freezer.

•  If  the  supply  cord  is  damaged  it  must  be  replaced  by  the  manufacturer  or  service

agent  or  appointed  qualified  person.

•  The  appliance  is  not  intended  for  use  by  people  (including  children)  with  reduced

physical, sensory or mental capabilities, or lack of  experience and knowledge,  unless
they  have  been  given  supervision  or  instruction  concerning  use  of  the  appliance  by
a  person  responsible  for  their  safety.  Children  should  be  supervised  to  ensure  that
they  don’t  play  with  the  appliance.

•  If  the  supply  cord  is  damaged  it  must  be  replaced  by  the  manufacturer  or  service

agent  or  similary  qualified  people  in  order  to  avoid  a  hazard.

PDF created with pdfFactory Pro trial version 

www.pdffactory.com

Summary of Contents for 1002708

Page 1: ...ATION MIT EINFACHEM KOMPRESSOR Bedienungsanleitung 1 16 instruction booklet 17 32 COMBI REFRIGERATOR FREEZER WITH SINGLE COMPRESSOR KOELKAST VRIEZER COMBINATIE MET ENKELE COMPRESSOR Instructie handboek 33 48 KS 9310 A GT ...

Page 2: ......

Page 3: ...NZEIGELAMPEN 7 Einschalten des Geräts 7 Zubehör 8 Eisschale 8 Flaschenhalter 8 EINLEGEN VON LEBENSMITTELN IN DAS GERÄT 9 Kühlteil 9 Gefrierteil 9 REINIGUNG UND WARTUNG 10 Abtauen des Kühlteils 10 Abtauen des Gefrierteils 11 Auswechseln der Lampe im Kühlteil 11 TRANSPORT UND STANDORTWECHSEL 11 Wechseln des Türanschlags 12 BEVORSIE DEN KUNDENDIENST RUFEN 15 DIE TEILE UND FÄCHER DES GERÄTS 16 PDF cre...

Page 4: ...Wenn Sie ein altes Kühlgerät das mit Schnapp oder Riegelschloss ausgerüstet ist durch dieses Gerät ersetzen Zerstören oder entfernen Sie das Schloss um zu verhindern dass spielende Kinder sich selbst einsperren und in Lebensgefahr geraten Alte Kühlschränke und Gefriergeräte enthalten Isolier und Kühlmittel die sachgerecht entsorgt werden müssen Ihre Altgeräte sollten Sie grundsätzlich durch Ihr re...

Page 5: ...ierschrank insbesondere wenn diese kohlensäurehaltig sind da die Behälter beim Einfrieren platzen könnten Flaschen mit hochprozentigem Alkohol müssen gut verschlossen und senkrecht im Kühlteil aufgestellt werden Vermeiden Sie jede Berührung der Kälteflächen insbesondere mit feuchten Händen da Sie sich Verbrennungen oder andere Verletzungen zuziehen könnten Nehmen Sie nicht das Eis zu sich das Sie ...

Page 6: ... Gerät darf keiner direkten Sonneneinstrahlung ausgesetzt sein Das Gerät darf nicht im Freien aufgestellt werden und keinem Regen ausgesetzt sein Stellen Sie das Gerät an gut belüfteten Orten abseits von W ärmequellen auf Beim Aufstellen des Geräts müssen mindestens 50 cm Abstand zu Heizkörpern Gas oder Kohleöfen und mindestens 5 cm Abstand zu Elektroherden eingehalten werden Über dem Gerät sind m...

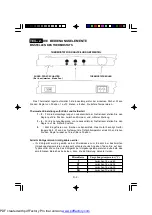
Page 7: ... auf die mittlere Position 5 Zum Eingefrieren von frischen Lebensmitteln Das Gerät benötigt hierfür längere Zeit Wenn das Gefriergut die Tiefkühltemperatur erreicht hat drehen Sie den Regler wieder auf die mittlere Position Bei bestimmten Modellen Falls Ihr Kühlgerät nicht richtig kühlen sollte Ihr Kühlgerät wurde gemäß seiner Klimaklasse zum Einsatz bei bestimmten Umgebungstemperaturen entwickelt...

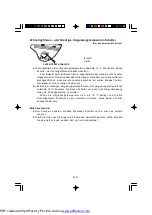
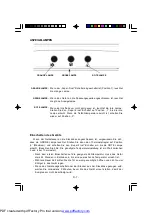
Page 8: ...rieb bei niedrigen Umgebungstemperaturen Bei Umgebungstemperaturen unterhalb 18 C benutzen Sie diesen Schalter um auch in kühlerer Umgebung eine gute Kühlungsleistung zu erzielen Wenn die Umgebungstemperatur mehr als 18 C beträgt und Sie die Schnellgefrieren Funktionen nicht einsetzen möchten muss dieser Schalter ausgeschaltet sein Bitte beachten Sie a Um Energie zu sparen schalten Sie diesen Scha...

Page 9: ...h dass die GRÜNE Lampe leuchtet Stellen Sie dann den Thermostatregler auf Position 5 Maximum und schalten Sie den Super Frost Schalter ein bis die ROTE Lampe erlischt Beachten Sie bitte Die günstigste Temperatureinstellung ist ein Wert zwischen 2 und 4 am Thermostat Nach dem ersten Einschalten auf die geeignete Kühltemperatur muss das Gerät etwa 24 Stunden in Betrieb sein bis eine ausreichende Tem...

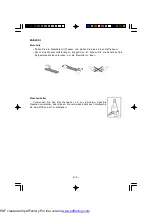
Page 10: ...efroren ist können Sie die Schale auf die dargestellte Weise verdrehen um die Eiswürfel zu lösen Flaschenhalter Verwenden Sie den Flaschenhalter um zu verhindern dass die Flaschen verrutschen oder kippen Sie vermeiden damit auch Geräusche die beim Öffnen der Tür entstehen PDF created with pdfFactory Pro trial version www pdffactory com ...

Page 11: ...aut werden Teilen Sie frische Lebensmittel z B Fleisch Fisch Hackfleisch vor dem Einfrieren in Portionen auf die Sie auf einmal verwerten können Beim Lagern von fertiger Tiefkühlkost richten Sie sich stets nach den Packungsangaben Wenn keine Informationen angegeben sind sollten Sie die Lebensmittel höchstens 3 Monate ab Kaufdatum lagern Wenn Sie Tiefkühlkost kaufen vergewissern Sie sich stets dass...

Page 12: ...ältig ab Wenn die Reinigung beendet ist stecken Sie den Netzstecker wieder mit trockenen Händen in die Steckdose ein Reinigen Sie den Kondensator Rückwand des Gerätes einmal jährlich mit einem Besen um eine bessere Leistung zu gewährleisten und Energie zu sparen ZIEHENSIE DENNETZSTECKERAUSDER STECKDOSE Abtauen des Kühlteils Das Abtauen des Kühlteils erfolgt während des Betriebs vollautomatisch Das...

Page 13: ...eine Reifschicht von mehr als 5 mm gebildet hat müssen Sie abtauen Vor dem Abtauen wickeln Sie das Gefriergut in Zeitungspapier ein und lagern es an einem kühlen Ort um die Temperatur des Gefrierguts so lange wie möglich stabil zu halten Um das Abtauen zu beschleunigen stellen Sie eine oder mehrere Schüsseln mit warmem Wasser in den Gefrierraum Reiben Sie den Gefrierraum mit einem Schwamm oder ein...

Page 14: ...Abb 2 3 Legen Sie das Gerät auf die linke Seite Bauen Sie beide Stellfüße ab und lösen Sie die Befestigungsschrauben des unteren Scharniers und entfernen Sie dieses Abb 3 Schrauben Sie den unteren Scharnierstift heraus und schrauben Sie ihn in das nächste Loch Abb 4 Dann das Scharnier an der linken Seite des Kühlschranks anbringen Schrauben Sie die beiden Stellfüße wieder an Abb 2 Abb 3 Abb 4 Die ...

Page 15: ...en Scharniers ab Abb 6 Detail A und schrauben den Stift in das linke Scharnier Abb 6 Detail A 6 Ersetzen Sie die obere Buchse und die Buchsenkappe Abb 7 Entfernen Sie die untere Buchse und bauen Sie sie in der linken Seite wieder ein Abb 7 Detail B Detail A Kühlschranktür Abb 5 Abb 6 Abb 7 Die beiden Schraubkappen groß des mittleren Scharniers anbringen PDF created with pdfFactory Pro trial versio...

Page 16: ... Seite wieder ein Abb 8 8 Drehen Sie das mittlere Scharnier um 180o Montieren Sie die Kühlschrank und Gefrierschranktür zusammen mit dem mittleren Scharnier Umgekehrter Vorgang wie in Punkt 2 Befestigen Sie das mittlere Scharnier indem Sie die Schrauben fest ziehen Abb 9 Abb 8 Abb 9 Drehen Sie das mittlere Scharnier um 180o Gefrierschranktür PDF created with pdfFactory Pro trial version www pdffac...

Page 17: ... sind der Kondensator staubfrei ist ausreichender Abstand an Rückwand und Seiten vorhanden ist Wenn das Gerät Geräusche macht Das Kühlmittel dass im Kühlkreislauf zirkuliert macht möglicherweise leise Geräusche Gluckergeräusche auch wenn der Kompressor nicht läuft Diese Geräusche sind völlig normal Wenn allerdings ungewöhnliche Geräusche vorliegen vergewissern Sie sich dass das Gerät eben ausgeric...

Page 18: ... ABDECKUNG 5 LAMPENSCHALTER 6 FLEISCHFACH 7 FRISCHHALTEFACH 8 FRISCHHALTEFACH 9 OBERES TÜRFACH 10 ABDECKUNG OBERES TÜRFACH 11 EIERFACH 12 EIERBEHÄLTER 13 AROMA BOX 14 UNTERES TÜRFACH 15 FLASCHENHALTER 16 EISSCHALE 17 FACH FÜR EISSCHALE 18 GEFRIERFACHABDECKUNG 19 GEFRIERFACH SCHUBLADE 20 GEFRIERFACH UNT SCHUBLADE 21 SCHRAUBFÜßE 22 FUßPLATTE AUF SEITE 49 PDF created with pdfFactory Pro trial version...

Page 19: ...ies 24 Ice tray 24 Bottle holder 24 ARRANGING FOOD IN THEAPPLIANCE 25 Refrigerator Compartment 25 Freezer Compartment 25 CLEANINGAND MAINTENANCE 26 Defrosting refrigerator compartment 26 Defrosting Freezer compartment 27 Replacing the Refrigerator Light Bulb 27 TRANSPORTATIONAND CHANGING OF INSTALLATION POSITION 28 Changing of Door Opening Direction 28 BEFORE CALLING YOURAFTER SALES SERVICE 31 THE...

Page 20: ...he lock as a safety measure before storing it to protect children while playing might lock themselves inside Old refrigerators and freezers contain insulation gases and refrigerant which must be disposed of properly Entrust the disposal of a scrap unit categorically to competence of your local waste disposal service and contact your local authority or your dealer if you have any questions Please e...

Page 21: ... with wet hands Do not place containers glass bottles or tin containers of liquids into the freezer especially gassy liquids as they could cause the container to burst during freezing Bottles that contain a high percentage of alcohol must be sealed well and placed vertically in the refrigerator Do not touch the cooling surfaces especially with wet hands as you could be burnt or hurt Do not eat ice...

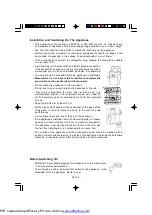
Page 22: ...pliance is positioned Manufacturer is not responsible for failure to complete the ground connection as described in this booklet Do not place the appliance in direct sunlight Do not use in open air and shall not be exposed to the rain Place the refrigerator far from heat sources and in a well ventilated position The refrigerator should be at least 50 cm from radiators gas or coal stoves and 5 cm f...

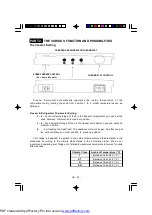
Page 23: ...5 For freezing the fresh food The appliance will work longer So after you get the cold condition you must position to previous position FREEZER REFRIGERATOR THERMOSTAT SUPER FREEZER CONTROL For Some Models THERMOSTAT CONTROL Your fridge is designed to operate in the ambient temperature intervals stated in the standards according to the climate class stated in the information label We do not recomm...

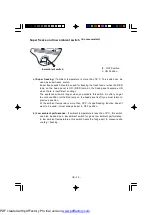
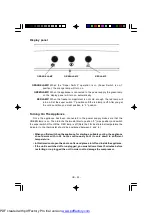
Page 24: ... on the head panel is off you must return to previous position At the ambient temperature more than 18 C if superfreezing function doesn t want to be used it must always be set to OFF position b Low ambient performance If ambient temparature is less than 18 C this switch can also be used as a low ambient switch for good low ambient performence In low ambient temperatures this switch heats the frid...

Page 25: ...t the GREEN lamp is on Then turn the thermostat dial to position 5 max position and switch the super switch ON until the RED lamp is off Note that for best internal temperature the indicator in the thermostat should be positioned between 2 and 4 When you first switch on the appliance for starting a suitable cooling the appliance should work with in 24 hours continuously until it cools down to suff...

Page 26: ...to ice you can twist the tray as shown below to get the ice cube Bottle holder In order to prevent the bottles to slip or fall over you can use the bottle holder You can also prevent making noise that will be done when you open or close the door Only some models PDF created with pdfFactory Pro trial version www pdffactory com ...

Page 27: ...at divide them in parts you will use in one time For storing the frozen food the instructions shown on frozen food packages should always be followed carefully and if no information is provided food should not be stored for more than 3 months from the purchased date When buying frozen food ensure that these have been frozen at suitable temperatures and that the packing is intact Frozen food should...

Page 28: ...completed reconnect the plug of the unit with dry hands You should clean the condenser back of the appliance with broom ones a year in order to provide energy saving and increase the productivity THE POWER SUPPLY MUST BE DISCONNECTED Defrosting refrigerator compartment Defrosting occurs fully automatically in refrigerator compartment during operation the defrosted water collected by the evaporatin...

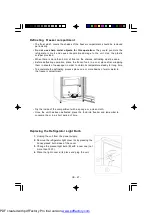
Page 29: ...er to obtain its temperature steady for long time To accelerate the defrosting process place one or more basins of warm water in the freezer compartment Dry the inside of the compartment with a sponge or a clean cloth Once the unit has been defrosted place the food into freezer and remember to consume them in a short period of time Replacing the Refrigerator Light Bulb 1 Unplug the unit from the p...

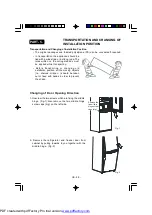
Page 30: ...SITION Transportation and Changing of Installation Position The original packages and foamed polystyrene PS can be concealed if required In transportation the appliance should be tied with a wide stripe or a strong rope The rules written on the corrugated box must be applied while transporting Before transporting or changing old installation position all the moving objects i e shelves crisper shou...

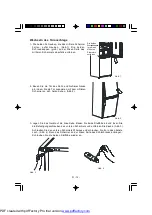
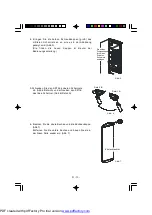
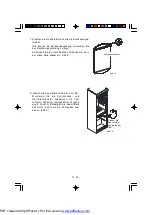
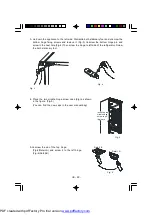
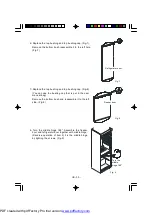
Page 31: ...ft side of the refrigerator Screw the both stationary foot Fig 3 Fig 4 4 Place the two middle hinge screw caps big as shown in the figure Fig 5 You can find the new caps in the user manual bag 5 Unscrew the pin of the top hinge Fig 6 Detail A and screw it to the left hinge Fig 6 Detail B Insert the two middle hinge screw caps big here Detail B Detail A Fig 5 Fig 6 PDF created with pdfFactory Pro t...

Page 32: ...180o Assemble the freezer door and refrigerator door together with middle hinge Reverse operation of item 2 Fix the middle hinge by tighting the screws Fig 9 Turn the middle hinge 180o Freezer door Fig 8 Fig 9 6 Replace the top bushing and top bushing cap Fig 7 Remove the bottom bush reassemble it to the left hole Fig 7 Refrigerator door Fig 7 PDF created with pdfFactory Pro trial version www pdff...

Page 33: ... no dust on the condenser There is enough place at the rear and side walls If there is noise The cooling gas which circulates in the refrigerator circuit may make a slight noise bubbling sound even when the compressor is not running Do not worry this is quite normal If these sounds are different check that The appliance is well levelled Nothing is touching the rear The stuffs on the appliance are ...

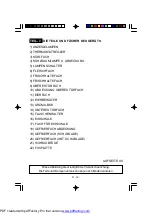
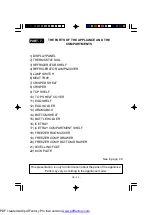
Page 34: ...IGERATOR SHELF 4 REFRIGERATOR LAMP COVER 5 LAMP SWITCH 6 MEAT TRAY 7 CRISPER SHELF 8 CRISPER 9 TOP SHELF 10 TOP SHELF COVER 11 EGG SHELF 12 EGG HOLDER 13 AROMA BOX 14 BOTTOM SHELF 15 BOTTLE HOLDER 16 ICE TRAY 17 ICE TRAY COMPARTMENT SHELF 18 FREEZER ROOM COVER 19 FREEZER COMP DRAWER 20 FREEZER COMP BOTTOM DRAWER 21 LEVELLING FOOT 22 KICK PLATE See in page 49 PDF created with pdfFactory Pro trial v...

Page 35: ...elen 39 Accessories 40 Ijslade 40 Flessenhouder 40 DE INDELING VAN HET VOEDSEL IN HET APPARAAT 40 Koelcompartiment 40 Vriezercompartiment 41 REINIGING EN ONDERHOUD 42 Ontdooien van het koelcompartiment 42 Ontdooien van het vriezercompartiment 43 Voor het vervangen van de lamp in de koelkast 43 TRANSPORT EN VERANDERING VAN PLAATS 44 Wijziging van de richting waarin de deur opent 44 VOORDAT U EEN BE...

Page 36: ...rsnellen Gebruik geen elektrische apparatuur in het koel en het vriezercompartiment van het apparaat Als dit apparaat een oude koelkast met een slot vervangt verwijder het slot dan of breek het open als veiligheidsmaatregel zodat spelende kinderen zichzelf niet kunnen opsluiten Oude koelkasten en vriezers bevatten isolatiegassen en koelmiddelen die op de juiste wijze moeten worden afgevoerd Laat d...

Page 37: ...r met name geen vloeistoffen met koolzuur aangezien zij ertoe kunnen leiden dat de container tijdens het vriezen springt Flessen met een hoog percentage alcohol moeten goed afgesloten worden en verticaal in de koelkast worden geplaatst Raak de koeloppervlakken niet aan speciaal niet met natte handen U kunt hierdoor ernstige verwondingen oplopen Eet geen ijs dat net uit de vriezer is verwijderd Ind...

Page 38: ... en 5 cm van elektrische ov ens vandaan Houd tenminste 15 cm vrije ruimte aan boven de bovenkant Monteer de plastic muurspacers op de condensor aan de achterkant van de koelkast om tegen de wand leunen te voorkomen zodat de kast goed blijft werken Plaats geen zware voorwerpen en allerlei dingen op het apparaat Indien het apparaat naast een andere koelkast of vriezer staat geďnstalleerd dient er ee...

Page 39: ...ur Instelling van de thermostaat voor koel en vriezercompartiment 1 2 Voor het bewaren van voedsel in de vriezer gedurende korte tijd kunt u de knop tussen de laagste en de mediumstand zetten 3 4 Voor het bewaren van voedsel in de vriezer gedurende langere tijd kunt u de knop in de mediumstand zetten 5 Voor het invriezen van vers voedsel Het apparaat zal langer blijven werken Dus nadat het voedsel...

Page 40: ...en deze niet wenst te gebruiken Merk op dat a Zet niet in de I positie om energie te besparen wanneer u de functie niet wilt gebruiken b Indien het rode lampje continu brandt gedurende meer dan 48 uur schakel de schakelaar uit en bel naar een servicepunt In bepaalde modellen REGELING VAN DE VRIEZER Als uw koelkast niet genoeg koelt Uw koelkast is ontworpen om te werken in een omgevingstemperatuur ...

Page 41: ...citeitsnet Zet vervolgens de thermostaatknop van de vriezer op stand 5 hoogste stand en zet de knop Supervriezen op Aan totdat het rode lampje uitgaat let op voor de optimale temperatuur in het vriezercompartiment moet de indicator van de thermostaat tussen de stand 2 en 4 staan Als u het apparaat de eerste keer inschakelt dan moet het apparaat eerst 24 uur continu werken zodat de temperatuur laag...

Page 42: ...Jsvorming ontstaat gewoonlijk in de koudste gedeelten van de verdamper en het apparaat zal dan in de loop van de tijd vaker ontdooid moeten worden Plaats nooit warm voedsel in de koelkast Warm voedsel moet eerst tot kamertemperatuur afkoelen en moet zodanig in de koelkast worden geplaatst dat er voldoende luchtcirculatie is Er mag niets tegen de achterwand komen omdat dit dan kan bevriezen en tege...

Page 43: ...esvoedsel moet in een goede verpakking worden vervoerd zodat de kwaliteit van het voedsel gehandhaafd blijft en moet zo snel mogelijk weer in de vriezer worden gelegd Als een verpakking met diepvriesvoedsel tekenen van vochtigheid laat zien of abnormaal bol staat dan is dit voedsel voorheen waarschijnlijk bij een te hoge temperatuur bewaard gebleven en is de inhoud ervan niet langer goed De houdba...

Page 44: ...n de stekker weer in het stopcontact steken De condensor achterzijde van apparaat dient minimaal een keer per jaar met een bezem te worden schoongemaakt voor een laag energieverbruik en een verbeterde werking HET APPARAAT MAG DAN NIET AANGESLOTEN ZIJN OP HET ELEKTRICITEITSNET Ontdooien van het koelcompartiment Het ontdooien in de koelkast verloopt automatisch als het apparaat in werking is het ont...

Page 45: ...g mogelijk stabiel te houden Om het ontdooiproces te versnellen kunt u één of meerdere bakjes met warm water in het vriesvak plaatsen Droog de binnenzijde van het vak met een spons of een schone doek Van zodra het apparaat ontdooid is plaatst u de etenswaren in de diepvries en denk eraan niet te lang te wachten voor u ze bereidt Voor het vervangen van de lamp in de koelkast 1 Verbreek eerst de aan...

Page 46: ...ats moeten alle bewegende objecten bijv schappen groentevak verwijderd worden of vastgezet met banden zodat ze niet heen en weer gaan schuiven Wijziging van de richting waarin de deur opent 1 Schroef beide schroeven los die het middelste scharnier bevestigen Afb 1 Verwijder ook beide schroefdoppen groot van het middelste scharnier aan linkerzijde 2 Verwijder de deur van de koelkast en diepvriezer ...

Page 47: ...f beide stationaire voeten vast Afbeelding 3 Afbeelding 4 4 Plaats beide schroefdoppen groot van de het middelste scharnier big zoals weergegeven in de afbeelding Figuur 5 U vindt de nieuwe doppen in de tas met de handleiding 5 Schroef de pin los van het bovenste scharnier Afb 6 Detail A en schroef ze vast op het linkse scharnier Afb 6 Detail B Detail B Detail A Voer beide schroefdoppen groot van ...

Page 48: ...leiding is voorzien Verwijder de onderste lager en monteer hem op de linkerzijde Figuur 8 8 Draai het middelste scharnier 180o Monteer de deur van de diepvriezer en koelkast samen met het middelste scharnier Omgekeerde procedure van item 2 Bevestig het middelste scharnier door de schroeven aan te draaien Figuur 9 Draai het middelste scharnier 180o Diepvriezerdeur Afbeelding 8 Afbeelding 9 PDF crea...

Page 49: ... vrije ruimte is aan de achterzijde en de zijkanten van het apparaat Als er een geluid wordt geproduceerd Het koelgas dat circuleert in het koelcircuit kan een zacht geluid produceren bubbelgeluid ook als de compressor niet actief is Maakt u zich geen zorgen dit is normaal Als u een ander geluid hoort controleer dan of het apparaat waterpas staat of er iets is dat het apparaat aan de achterzijde r...

Page 50: ... DEURSCHAP 11 SCHAP VOOR EIEREN 12 EIERHOUDER 13 VAK MET GEURKLEP 14 ONDERSTE SCHAP 15 FLESSENHOUDER 16 IJSLADE 17 SCHAP VOOR IJSLADE 18 AFDEKKING VRIESVAK 19 LADE VRIEZERCOMPARTIMENT 20 ONDERSTE LADE RIEZERCOMPARTIMENT 21 STELVOET 22 SCHOPPLAAT Deze presentatie is alleen bedoeld als informatie over de onderdelen van het apparaat Onderdelen kunnen afhankelijk van het toestelmodel variëren PDF crea...

Page 51: ...NL 49 1 3 2 4 1 3 6 7 8 17 18 19 20 21 22 16 17 14 11 13 12 11 9 15 10 5 4 2 PDF created with pdfFactory Pro trial version www pdffactory com ...

Page 52: ...52037249 ...
Reviews: