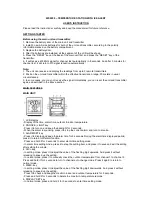
- In time setting mode, press it to step the setting item, and press and hold it for 3 seconds to save and
exit the setting.
7. °C/°F slide switch
- Slide it to switch temperature unit between °C/°F.
8. SENSOR key
- Press it to manual receiving 433 MHz signal for channel test.
- During the reception test, press and hold it for 3 seconds to turn off the channel test.
9. RCC key
- Press it to manually receiving RC signal.
- During the RC reception, press and hold it for 3 seconds to turn off the reception.
10. RESET key
- In case of mal-function, press it by using a metal wire to reset all the values.
11. Battery door
TRANSMITTER:
1. LED indicator
- Flashes when the remote unit transmits a reading.
2. CHANNEL slide switch
- Assign the transmitter to Channel 1, 2 or 3.
3. RESET key
- Press it to reset the transmitter.
4. Wall-mounting holder
- Use it to support the transmitter on the wall.
5. Battery compartment
SIGNAL STRENGTH INDICATOR
The signal indicator flashing means time signals are being received. If the RC temperature station
receives signal successfully, a sync-
time symbol “
” appears on the LCD and the unit has already
received the time signal. Otherwise, the signal strength symbol will disappear from the LCD display.
Note:
You may press “RCC” key to receive the time signal manually. The receive mode will be off
automatically after 6-16 minutes. Receive mode consumes more battery power that may reduce
battery lifetime.
DAYLIGHT SAVING TIME(DST)
The temperature station has been programmed to automatically switch when daylight saving time is in
effect. Your temperature station
will display “DST” on the LCD during the summer.
TIME AND CALENDAR SETTING
If the temperature station does not receive the time signal successfully, you can set the time manually.
As soon as the transmitter is received again, the temperature station will automatically synchronize
with the received time.
1. In normal mode, press and hold “DISPLAY SET” key for 3 seconds until the Hour format digit
flashing.
2. Press “+” / “-” key to select 12/24 hour format.
3. Press “DISPLAY SET” key again to step the setting item to Hour with the Hour digit flashing.
4. Press “+” / “-” key to adjust the value of the flashing digit.


