background image

New Wellness Expert: Service & Maintenance manual - rev. 1.1 


8.  ADJUSTMENTS 

8.1.   TOUCH SCREEN CALIBRATION 

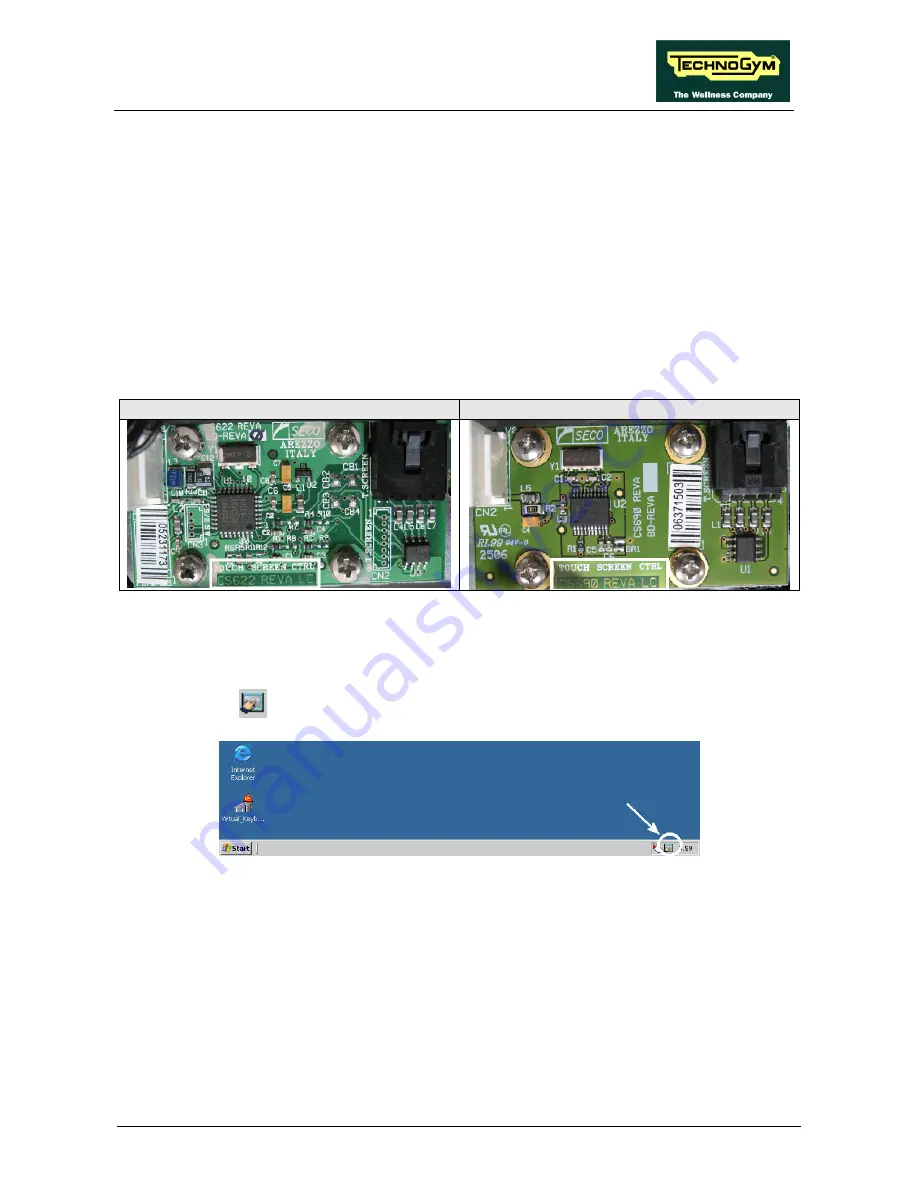
Two different Touch Screen models are mounted on the products we have on the market, the first 
model used was a SEMTECH and the actual one an HAMPSHIRE. 
The two models can be distinguished by the revision printed on the Touch Screen interface board 

CS622 REVA LC

” on the SEMTECH models and “

CS690 REVA LC

” on the HAMPSHIRE 

models. 
 

SEMTECH 

HAMPSHIRE 


Depending on the touch screen model, it has to be used the proper calibration SW. 
Unfortunately it is not possible to know which of the two models is mounted on the machine, if you 
don’t open the display. Then we can suggest you to proceed as follow, to perform the calibration. 
 

Check if the icon 

 is shown in the right bottom corner toolbar of the desktop. 


If the icon is not present, carry out the calibration procedure 8.1.1. Touch screen first model 
“SEMTECH”; 


If the icon is present, carry out the calibration procedure 8.1.2. Touch screen second model 
“HAMPSHIRE”. If the calibration doesn’t have any effect carry out the calibration procedure 
8.1.1. Touch screen first model “SEMTECH”. 

Page 8.1 

Summary of Contents for Wellness Expert

Page 1: ...SERVICE MAINTENANCE MANUAL REV 1 1 ...

Page 2: ......

Page 3: ...N WHEN THE MACHINE IS SHUT OFF NOTICE The information in this manual is subject to change without notice Technogym does not guarantee this material in any way Technogym may not be held liable for any errors contained herein or for accidental damages or those caused by the provision and use of this material This document contains proprietary information covered by copyright All rights reserved No p...

Page 4: ......

Page 5: ...er 3 2 3 1 3 LCD display 3 3 3 1 4 Touch screen interface board 3 3 3 1 5 TGS reader 3 3 3 1 6 Fan 3 3 3 1 7 Power supply 3 3 3 1 8 AUX input board 3 3 3 1 9 Power entry module 3 3 4 ACCESSORIES 4 1 5 INSTALLATION INSTRUCTIONS 5 1 5 1 SPECIFICATIONS AND REQUIREMENTS 5 1 5 2 INSTALLATION 5 1 5 3 FIRST POWER ON 5 2 6 TROUBLESHOOTING 6 1 6 1 THE MACHINE DOES NOT ILLUMINATE 6 2 6 2 THE MACHINE DOES NO...

Page 6: ... first model SEMTECH 8 2 8 1 2 Touch screen second model HAMPSHIRE 8 3 8 2 DISPLAY COLORS CALIBRATION 8 6 9 MACHINE CONFIGURATION 9 1 9 1 CONFIGURING THE CONSOLE INI FILE 9 1 9 1 1 Language 9 1 9 1 2 IdCen and IdCat 9 2 9 1 3 Using the printer 9 2 9 1 4 Enabling messages 9 2 9 1 5 Unit of measure 9 3 9 1 6 Date format 9 3 10 SCHEDULED MAINTENANCE 10 1 10 1 DAILY MAINTENANCE OPERATIONS 10 1 10 1 1 ...

Page 7: ...bservance may cause damage to the machine Information about the operation in progress OBSERVE observation about the operation in progress 1 2 RECOMMENDATIONS Technogym recommends the following steps for planning repair procedures Carefully evaluate the customer s description of the machine malfunction and ask all the necessary questions to clarify the symptoms of the problem Clearly diagnose the c...

Page 8: ...These can in most cases damage the electronic components so it is necessary to adopt the special preventive measures and procedures described below 1 4 1 ESD WRIST STRAPS These are grounded conductive straps worn on the wrist that continually channel any static electricity build up to ground The elastic strap fits snugly on the wrist and has a clip connecting it to a grounding cable that reaches t...

Page 9: ...ford optimal protection unless used in conjunction with ESD dissipative wrist straps or conductive shoes For example if the gloves tear and the operator inadvertently touches the circuit board through the hole there is the risk of damaging the electronic components Always request immediate replacement of gloves that have become ripped damaged or torn 1 4 4 ESD STATIC SHOES These are worn by all op...

Page 10: ...New Wellness Expert Service Maintenance manual rev 1 1 Page 1 4 Page intentionally left blank ...

Page 11: ...tage 100 240 VAC Frequency 50 60 Hz Consumption 800 Watt 7 5 A 800 Watt 3 5 A 2 3 AMBIENT SPECIFICATIONS Operating from 10 to 25 C Temperature Storage from 10 to 25 C Operating from 30 to 80 non condensing Humidity Storage from 20 to 90 non condensing 2 4 CONFORMITY TO REGULATIONS The equipment conforms to the following directives Europe USA EMI EN 55022 EN 55024 EN 61000 3 2 EN 61000 3 3 Safety E...

Page 12: ... CN1 J5 J10 U10 INVERTER CN03 CN02 CN1 J8 ETX BOARD RAM MEMORY U7 LVDS BOARD CN1 CN1 J9 POWER ENTRY MODULE VAC POWER SUPPLY CN1 CN2 WE 1 WE 2 AUX INPUT BOARD TOUCH SCREEN INTERFACE BOARD TOUCH SCREEN CN5 CN1 Keyboard JS1 Ethernet J3 USB 0 1 CN1 USB 2 3 CN2 J2 Ethernet GND J4 J1 USB 0 3 Keyboard GND H1 FAN J4 CPU J3 WE 4 WE 7 WE 6 WE 5 WE 3 ...

Page 13: ...board Power supply CN2 Signal Color Base Board J5 1 5 Vdc Red 1 2 5 Vdc Red 2 6 Gnd Black 3 7 Gnd Black 4 8 Gnd Black 5 9 Gnd Black 6 11 12 Vdc Orange 7 12 12 Vdc Orange 8 WE 3 Keybord USB cable AUX input board Base board AUX input board J1 Signal Color Base board J2 1 VCC White 1 2 USB 0 Brown 2 3 USB 1 Black 3 4 USB 2 Grey 4 5 USB 3 White 5 6 GND White 6 7 GND Blue 7 8 VCC Pink 8 9 USB 0 White 9...

Page 14: ...t used 13 14 not used 14 WE 6 Touch screen interface cable Touch screen interface board Base board Touch screen interface board CN5 Signal Color Base Board J10 1 5 Vdc 1 8 MS DATA 2 9 MS CLOCK 3 10 GND 4 WE 7 LCD inverter power supply cable Main board LCD inverter Main board J8 Signal Color LCD inverter CN1 1 12 Vdc power supply Black 1 2 Reference Black 3 3 3 3 Vdc power supply Black 5 4 Referenc...

Page 15: ...Wellness Expert Service Maintenance manual rev 1 1 TRM 32 TGS Cable Main Board TGS reader Main Board J12 Signal Color TGS CN1 1 12 Vdc power supply Yellow 1 3 Rx White 8 5 Tx Green 7 9 Gnd Brown 3 Page 2 5 ...

Page 16: ...New Wellness Expert Service Maintenance manual rev 1 1 Page 2 6 Page intentionally left blank ...

Page 17: ...1 3 PRINCIPLES OF OPERATION 3 1 BLOCK DIAGRAM The figure below shows the block diagram for the machine POWER ENTRY MODULE DISPLAY DISPLAY BOARD TGS READER POWER SUPPLY VAC AUX INPUT BOARD NET FAN USB Keyboard TOUCH SCREEN LCD DISPLAY LCD INVERTER Page 3 1 ...

Page 18: ...ly PC fan It has a connector linking it to the CPU board for transferring the collected signals The board also includes an indicator LED LED name Color Description D3 green POW LED if ON the 12 Vdc power supply provided by the brake board correctly reaches the board and one Faston Name Description H1 GND denotes a ground node on the circuit board where the cable coming from the AUX input board is ...

Page 19: ... if the device is powered and a red one that lights if read write operations are in progress 3 1 6 FAN There are 2 fans powered with 12 Vdc used to cool down the PC 3 1 7 POWER SUPPLY Receives the incoming line voltage and outputs the direct currents 12 Vdc and 5 Vdc to power all the electronic boards and the devices of the machine 3 1 8 AUX INPUT BOARD This is a circuit board situated on the base...

Page 20: ...New Wellness Expert Service Maintenance manual rev 1 1 Page 3 4 Page intentionally left blank ...

Page 21: ...ed in paragraph 6 4 Updating SW to use it The code of the USB key is CODE DESCRIPTION R0003562AC CN USB key containing an image of the operating system in Chinese R0003562AC JP USB key containing an image of the operating system in Japanese R0003562AC RU USB key containing an image of the operating system in Russian R0003562AC UK USB key containing an image of the operating system in English Page ...

Page 22: ...New Wellness Expert Service Maintenance manual rev 1 1 Page 4 2 Page intentionally left blank ...

Page 23: ...specified on the machine rating plate 6 The electrical system must be provided with an efficient ground connection 7 The wall outlet used should be reserved for the machine and have a rating of at least 800 Watts 8 Position the mains lead and network cable where is will not be underfoot For this purpose it is recommended to use the special trackways 5 2 INSTALLATION For proper installation of the ...

Page 24: ...on 1 to power the equipment The Windows operating system is launched when the PC is turned on log in as system administrator which is the default option Launch the Wellness Expert program found on the PC desktop Make sure the program starts and especially that no error messages appear from the data client Insert a TGS programmed by the Technogym System Trainer in the network and make sure that the...

Page 25: ...ype of box corresponds to a step in the troubleshooting procedure where an ACTION must be carried out It typically contains a description of the ACTION necessary to resolve the problem Therefore after executing the specified ACTION 1 Check whether the problem has been resolved 2 If the problem persists it is recommended to resume the troubleshooting procedure from the point before the action was c...

Page 26: ...e Is the mains lead OK Is the voltage at the output of the machine s power entry module correct Plug the machine into a working electrical outlet Replace the mains lead Replace the power entry module on the machine THE DISPLAY DOES NOT ILLUMINATE NO YES NO YES NO YES A 1 Replace the f uses YES NO Are the f uses OK Continued on the following page ...

Page 27: ... Replace cable WE 2 YES NO YES 4 Are the DC voltages at the output of the base board to the LCD inverter correct NO 5 Replace the base board YES Are the DC voltages at the input to the LCD inverter correct Replace cable WE 7 NO 6 YES B Replace power supply Does the mains voltage reach the input to the power supply YES NO 2 Replace cable WE 1 Continued on the following page Page 6 3 ...

Page 28: ...Follow the procedure step by step to correctly diagnose the problem Take particular care with the checks highlighted by circled numbers which are described in detail below To speed up the troubleshooting procedure check the state of the power indicator LEDs on the various circuit boards 1 Place the tester probes across the ends of the cable from the power entry module The measured voltage should b...

Page 29: ...aph 2 6 Wiring 4 As for step 3 but on connector J5 on the base board 5 As for step 3 but on connector J8 on the base board 6 As for step 3 but on connector CN1 on the LCD inverter board 7 Place the tester probes across the 2 pins of the connector CN02 and CN03 of the LCD inverter board The measured voltage should be approximately 340 VAC on CN02 and 180 VAC on CN03 Page 6 5 ...

Page 30: ...y board THE MACHINE DOES NOT READ THE TGS Does the supply voltage correctly reach the input to the TGS reader Is the supply voltage correct at the output to the base board correct Replace cable CBQ 32 1 2 YES NO YES Replace the base board NO A Replace the TGS reader and check if it works Replace the base board and check if it works Base board def ective YES NO YES Replace the TGS reader NO A TGS r...

Page 31: ...e problem Take particular care with the checks highlighted by circled numbers which are described in detail below 1 Place the tester probes across pins 1 and 3 of connector CN1 of the TGS reader The measured value should be 12 Vdc 2 As for step 1 but across pins 1 and 9 of connector J12 on the base board Page 6 7 ...

Page 32: ...New Wellness Expert Service Maintenance manual rev 1 1 Page 6 8 6 3 SW ERRORS 6 3 1 THE OPERATING SYSTEM DOESN T WORK Carry out the procedure 6 4 Updating SW using the USB key delivered with the machine ...

Page 33: ... A 2GB USB KEY Be sure that the PC BIOS version is equal or greater than 1 4 You can check this version in two different ways Looking at the first line on the screen during the startup procedure Directly entering the BIOS by clicking on the CANC button during the startup procedure In case that the BIOS version is not the one mentioned before carry out the following procedure Switch on the machine ...

Page 34: ...k is automatically launched 6 4 1 FORMATTING PROCEDURE This procedure should be carried out in cases where the system locks out completely during the boot stage after the Bios screen which may be due to a system crash damaged hard disk sectors inability to restart the operating system from hard disk At this point the partitioning and formatting sequence is automatically initiated The procedure whi...

Page 35: ...ge restore to finish turn off the machine remove the USB key restart the system If the error message Image not found appears it is necessary to restart the system and launch the restore from USB key procedure described in paragraph 6 4 3 System restore from USB key below At the end carry out the touch screen calibration procedure as described in paragraph 8 1 Touch screen calibration 6 4 3 SYSTEM ...

Page 36: ...edure is complete If there are problems restoring the Ghost image of Windows XP Embedded due to damaged clusters on the hard disk it is necessary to restart the system and then use the formatting procedure described in paragraph 6 4 1 Formatting procedure At the end carry out the touch screen calibration procedure as described in paragraph 8 1 Touch screen calibration ...

Page 37: ...ness Expert Video files after the machine reboot insert the Wellness Expert Videos CD Click OK 7 A dialog prompting to restart the computer appears on the screen Choose Yes I want to restart my computer now 8 In the shared CD ROM drive replace the CD containing the Wellness Expert software with the Wellness Expert Video CD 9 Return to the Wellness Expert PC and use My Network to access the shared ...

Page 38: ...ible with Microsoft Windows XP Professional and automatically recognised and installed by the operating system The procedure is as follows 1 Connect the CD ROM drive to one of the four ports provided on the base of the machine 2 Insert the CD containing the Wellness Expert software into the drive 3 Use Windows Explorer to access the CD ROM drive and install the software by launching the Setup inst...

Page 39: ...cord from the wall socket 2 Back off the 4 screws a using a medium Phillips screwdriver and remove the covering plate Figure 7 1 2 3 It s now possible to disassemble The power supply box b The AUX input board c The power entry module d Figure 7 1 3 To disassemble the power supply box 1 Back off the 4 screws e using a small Phillips screwdriver Continued on following page Page 7 1 ...

Page 40: ...er entry module 1 Unplug the fastons directly connected to it 2 Press the two tabs f and extract the module by pushing it outward Figure 7 1 5 To disassemble the AUX input board 1 Unplug the cables indicated in the picture 2 Back off the screws g using a small Phillips screwdriver To reassemble the lower electronic carry out the above steps in reverse order ...

Page 41: ...g the power cord from the wall socket 2 Use a medium Philips screwdriver to unscrew the 4 screws a Figure 7 2 2 3 Unplug the connectors b indicated in the picture to side 4 Remove the display Figure 7 2 3 Then place the display on a work bench It is now possible to disassemble its three circuit boards The LCD inverter c The touch screen interface board d The main board e The TGS key reader f Conti...

Page 42: ...5 Touch screen interface board 1 Unplug the cables i indicated in the figure coming from the touch screen and CPU respectively 2 Back off the screws l using a small Phillips screwdriver 3 Remove the touch screen interface board from the display Figure 7 2 6 Main board 1 Unplug the 4 connectors indicated in the picture at side 2 Back off the 8 screws m using a small Phillips screwdriver 3 Slowly pu...

Page 43: ...f the screws p using a small Phillips screwdriver 5 Remove the TGS key reader Figure 7 2 9 To disassemble the LCD 1 Unplug the connectors of the cables indicated in the figure 2 Back off the 6 screws q securing the plate and all the display boards to the front cover Figure 7 2 10 3 Back off the 4 screws r using a small Phillips screwdriver 4 Lift up and remove the LCD To reassemble the circuit boa...

Page 44: ...r cord from the wall socket 2 Use a medium Philips screwdriver to unscrew the 4 screws 1 Figure 7 2 12 3 Unplug the connectors 2 indicated in the picture to side 4 Remove the display Figure 7 2 13 Then place the display on a work bench It is now possible to disassemble its three circuit boards The LCD inverter 3 The touch screen interface board 4 The main board 5 The TGS key reader 6 Continued on ...

Page 45: ... LCD inverter Figure 7 2 15 Touch screen interface board 1 Unplug the cables indicated in the figure coming from the touch screen and CPU respectively 2 Back off the screws 9 using a small Phillips screwdriver 3 Remove the touch screen interface board from the display Figure 7 2 16 Main board 1 Unplug the 4 connectors indicated in the picture at side 2 Back off the 8 screws 10 using a small Philli...

Page 46: ...emory 3 Back off the 4 screws 14 using a small flat screwdriver from the back of the board Figure 7 2 18 4 Unplug the ETX board dissipator assembly from the 4 connectors on the main board see the figure Remember to insert again the 4 plastic spacers highlighted in the picture to side during the reassembly procedure Figure 7 2 19 1 Separate the dissipator 15 from the ETX board which are kept togeth...

Page 47: ... the screws 18 using a small Phillips screwdriver 5 Remove the TGS key reader Figure 7 2 22 To disassemble the LCD 1 Unplug the connectors of the cables indicated in the figure 2 Back off the 5 screws 19 securing the plate and all the display boards to the front cover Figure 7 2 23 3 Back off the 4 screws 20 using a small Phillips screwdriver 4 Lift up and remove the LCD To reassemble the circuit ...

Page 48: ...ps described in paragraph 7 2 Disassembling the display board 1 Back of the screw a using a medium Phillips screwdriver Figure 7 3 2 2 Back of the 2 screws b using an 8 mm hex wrench 3 Remove the rear display support 4 Remove the footboard c from the top To reassemble the footboard carry out the above steps in reverse order ...

Page 49: ...ouch screen model it has to be used the proper calibration SW Unfortunately it is not possible to know which of the two models is mounted on the machine if you don t open the display Then we can suggest you to proceed as follow to perform the calibration Check if the icon is shown in the right bottom corner toolbar of the desktop If the icon is not present carry out the calibration procedure 8 1 1...

Page 50: ...ng dialog appears on the display Figure 8 1 1 4 Check that the calibration offset is set for 10 and launch the procedure by clicking on CALIBRATE If the system freeze after the calibration procedure has been launched it means that the HAMPSHIRE Touch Screen is mounted on the machine Restart the system and carry out the procedure 8 1 2 Touch screen second model HAMPSHIRE 5 The following appears on ...

Page 51: ...ess than 10 as specified in the previous setting or Calibration rejected Error in pixel X If X is greater than 10 in which case the calibration carried out will be ignored 8 1 2 TOUCH SCREEN SECOND MODEL HAMPSHIRE To access the touch screen calibration function proceed as follows 1 Click START PROGRAMS then start the program Hampshire TSHARC Control Panel Figure 8 1 3 2 In the window which appears...

Page 52: ...ep pressed the centre of each target with an object that is pointed but not sharp as long as the Release message appearson the screen Figure 8 1 5 4 The operation will be repeated three times with the target in three different positions of the screen 5 At the end of the procedure the following window will appear on the screen ...

Page 53: ...ng 7 Accept or refuse the calibration of the touch screen according to the feedback of the test by pressing the Accept or Cancel button If the calibration procedure doesn t have any effect it means that the SEMTECH Touch Screen is mounted on the machine Restart the system and carry out the procedure 8 1 1 Touch screen first model SEMTECH Page 8 5 ...

Page 54: ...lour contrast brightness and gamma level proceed as follows 1 Click START select SETTINGS and then CONTROL PANEL 2 In the window which appears double click the Display icon 3 The following dialog appears on the display Figure 8 2 1 4 Select the Settings tab then click the Advanced button as illustrated in the figure below Figure 8 2 2 ...

Page 55: ...the colour contrast brightness and gamma level using 3 virtual knobs The effects of the changes made are shown in a preview window which can be expanded to full screen mode with various choices of test background 7 When the adjustments are complete click the Apply button or OK to confirm the changes made Click Cancel to exit the function without saving the changes Page 8 7 ...

Page 56: ...New Wellness Expert Service Maintenance manual rev 1 1 Page 8 8 Page intentionally left blank ...

Page 57: ...e made even while the program is running but will become effective only the next time it is launched The pages that follow describe the main configuration parameters Many other parameters are available offering a wide range of possible system configurations Contact the TGS Hot Line for any further questions or information 9 1 1 LANGUAGE You may set the program language by changing the value of the...

Page 58: ...e contact the TGS Hot Line for the values to be assigned 9 1 3 USING THE PRINTER The print functions may be enabled or disabled from the program by toggling the value of the parameter FlagNoPrint in the Options section as shown in the box below Options FlagNoPrint 0 The following options are available 0 to enable printing 1 to disable printing 9 1 4 ENABLING MESSAGES The message sending functions ...

Page 59: ...gDate ShortDate and DayMonth respectively in the section System as shown in the box below System Sezione di configurazione del formato della data del sistema dd giorni mm mesi yy anni in forma breve ad es 97 yyyy anni in forma estesa ad es 1997 Il formato di tale data dovrebbe rispecchiare quello previsto nel WIN INI date format Formato della data con giorno mese anno e anno in formato esteso Long...

Page 60: ...New Wellness Expert Service Maintenance manual rev 1 1 Page 9 4 Page intentionally left blank ...

Page 61: ...ribe the recommended procedures 10 1 DAILY MAINTENANCE OPERATIONS These operations can be carried out by the machine owner and do not require any special skills The daily machine maintenance consists of simple external cleaning for the purposes of general hygiene For the daily maintenance of the machine proceed as follows 10 1 1 SETTING UP THE OPERATION 1 Turn off the machine by placing the switch...

Page 62: ...ve checking the functioning wear and tension of the mechanical components so as to ensure the correct and safe operation of the machine For the twice yearly maintenance of the machine proceed as follows 10 2 1 SETTING UP THE OPERATION 1 Turn off the machine by placing the switch in position 0 OFF 2 Unplug the mains lead from the wall outlet 10 2 2 CHECKING THE WIRING AND CONNECTIONS 1 Check the co...

Page 63: ......

Page 64: ...TECHNOGYM S p A Via G Perticari 20 47035 Gambettola FC ITALIA Tel 39 0547 650638 Fax 39 0547 650150 e mail service technogym com 0SM00339AA UK ...

Reviews: