background image

5 Installation

Now that you have connected your new receiver, and have commenced operating it, you
can, if necessary, optimize its functions for your needs. 

5.1 OSD Language

This menu point gives you the option of setting the language according to your preferences.
In order to select a different OSD language, proceed as follows:
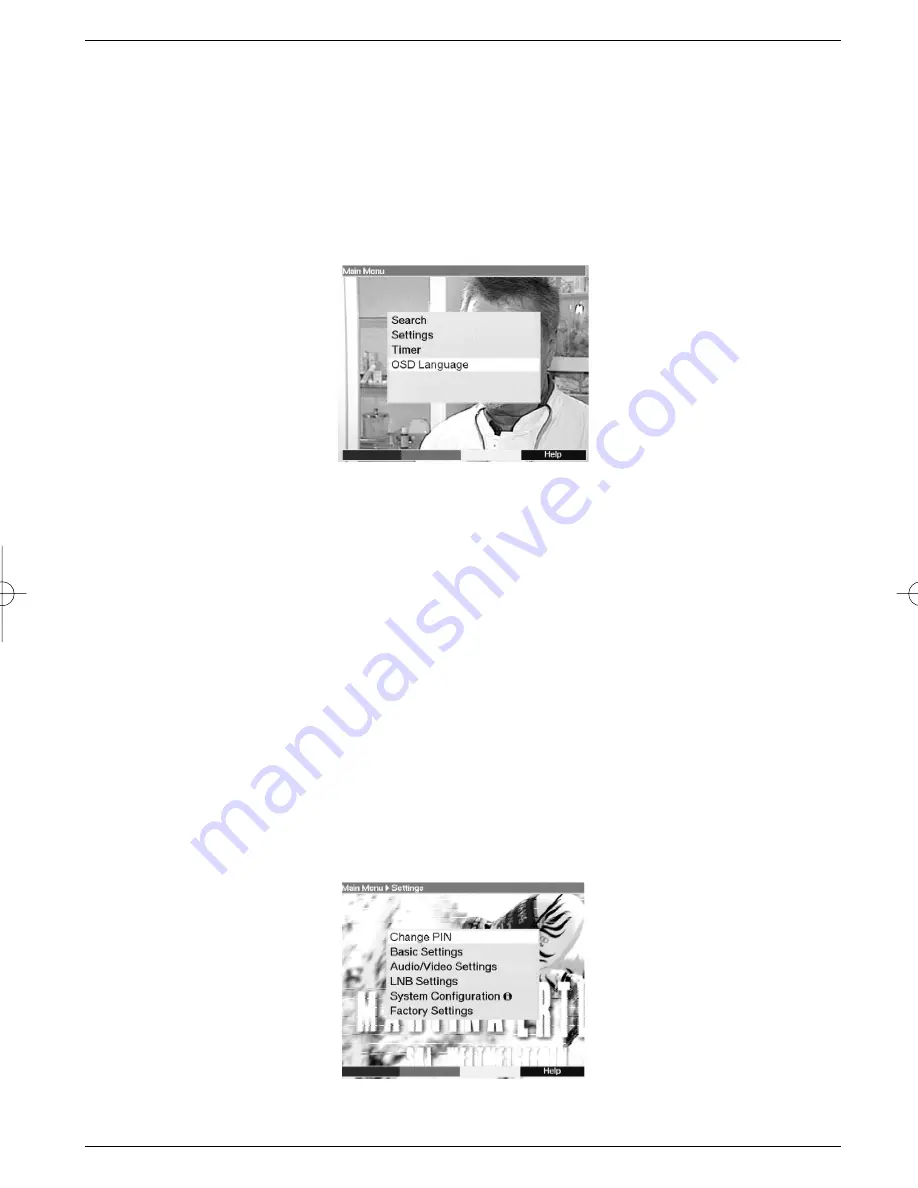
>

Press the 

Menu

key to display the 

Main Menu

.

>

Now select the menu line 

OSD Language

, which you can mark by means of the

arrow up/down keys

.

>

Confirm by pressing 

OK

.

The sub-menu 

OSD Language 

will be displayed.

>

Use the 

arrow up/down keys

to mark the language selected. Use the 

arrow

up/down keys

to move the marker up or down one line at a time, or use the

arrow left/right keys

to move forward or back one page at a time.

>

Store the selection by pressing the 

OK

key.

>

Press the 

Back

key to return to the 

Main Menu

.

5.2 Basic settings

In order to obtain optimum use from your DVB receiver, you should adjust it to your personal
preferences.
>

Press the 

Menu

key to display the 

Main Menu

.

>

Select the menu line 

Settings

by means of the 

arrow up/down keys

.

>

Confirm by pressing 

OK

.

The sub-menu 

Settings 

will be displayed.

>

Select the menu line 

Basic settings

by means of the 

arrow up/down keys.

>

Confirm by pressing 

OK

.

10

DIGIBOX1_englisch.qxd  26.09.01  09:55  Seite 10

Summary of Contents for DigiBox1

Page 1: ...Operating manual DigiBox1 for reception of Free To Air DVB satellite programmes Art Nr 0000 4612 Digital satellite receiver Timer ...

Page 2: ... on off Back Menu on off Sound on off EXTERNAL Language selection Programme Multifunction keys Volume Programme TV Radio Operation EPG MONO1 MONO2 OK Volume Arrow key right Arrow key left Arrow key up Arrow key down Remote control unit Info ...

Page 3: ...t satellite selection 13 5 4 1 Switching DiSEqC on and off 14 5 4 2 Setting the switching matrix and LNB properties 14 6 Operation 16 6 1 Switching on and off 16 6 2 Programme selection 16 6 3 Adjusting volume 17 6 4 Selecting a different language 18 6 5 TV Radio switching 18 6 6 Return to previous programme selected 18 6 7 Display clock and programme information 18 6 8 Additional programme inform...

Page 4: ...g from main memory list 25 7 1 4 Sorting programmes 25 7 1 5 Blocking barring programmes parental control 25 7 2 Changing PIN 26 7 3 Unblocking individual blocked programmes 26 7 4 Searching for programmes 26 7 4 1 Satellite 27 7 4 2 Transponders 28 7 4 3 Manual Serch 29 7 5 Restore basic programming delete all 29 7 5 1 Activate factory default setting 30 7 5 2 Delete all programmes 31 7 6 System ...

Page 5: ...Mains connection SCART connector VCR Audio output left right RS 232 interface LNB input SCART connector TV ...

Page 6: ...s connected Chapter 6 describes all functions required for everyday use such as programme selection or setting the volume In Chapter 7 you will find information on how to set new programmes and on how to change the order of programmes in the list The technical terms used in the operating manual are explained in Chapter 8 The technical data can be found in Chapter 9 A troubleshooting guide assistin...

Page 7: ...perating instructions The use of a so called On Screen Display information presented on TV screen see exam ple simplifies the operation of the receiver and reduces the number of keys required on the remote control unit All functions are displayed on the screen and can be adjusted with a few key strokes Related functions are grouped together in a MENU The function selected is highlighted in a diffe...

Page 8: ...g the DVB receiver atellite installation a Connection from LNB to LNB IN connection on DVB receiver b Mains connection c SCART connection between a VCR and the VCR SCART connection on the DVB receiver d SCART connection between the DVB receiver and the TV set ...

Page 9: ...will switch automatically to AV and thus to satellite reception when the receiver is switched on 4 4 Video cassette recorder VCR c Connect the video player to the SCART socket VCR During Play mode the video player will send a switching signal to the receiver and the Video player signal will automatically be sent to the TV set If your video player does not transmit a switching signal use the EXTERN...

Page 10: ... will be displayed Use the arrow up down keys to mark the language selected Use the arrow up down keys to move the marker up or down one line at a time or use the arrow left right keys to move forward or back one page at a time Store the selection by pressing the OK key Press the Back key to return to the Main Menu 5 2 Basic settings In order to obtain optimum use from your DVB receiver you should...

Page 11: ... 5 2 2 Time difference GMT hrs Your unit is equipped with a clock This is synchronised by means of satellite reception with Greenwich Mean Time Thus all you have to do is to correct the time in accordance with your local time by means of the OK key For germany this means 1 hour and 2 hours during Daylight Savings time summer 5 2 3 Country This function provides for automatic switching between summ...

Page 12: ...related on screen displays The following settings adjustments may be made 5 3 1 Picture image format of TV set Use the arrow keys left right to select the appropriate picture format for your TV set 4 3 or 16 9 This function will automatically adjust the picture format to that of your TV set 5 3 2 Language Audio signal In this menu line use the arrow left right keys to select your preferred languag...

Page 13: ... terms These programmes can be received without any further adjustments if your receiving equipment permits this If however you wish to receive signals from another satellite or if you are using a different type of LNB then you must adjust the receiver as follows Press the Menu key in order to display the Main menu Use the arrow up down keys to mark the line Settings Confirm by pressing OK The men...

Page 14: ...rking this line in blue Confirm by pressing OK A list of various satellites will now be displayed Use the arrow up down keys to mark the satellite selected The arrow up down keys will move the marker up or down one line at a time while using the Parrow left right keys will jump to the previous or next page If the satellite you are looking for is not specifically listed select one of the spare posi...

Page 15: ...ponder test The following points of this menu should only be entered if you want to test the satellite sig nal by means of a self configured satellite User 1 to 14 Transponder frequency When this line is marked use the numeric keys to enter a frequency on which digital pro grammes are broadcast Polarisation Use the arrow up down keys to enter the desired polarisation plan horizontal or verti cal S...

Page 16: ...ing of several digits you have approx 3 seconds time after pressing a key to complete the entry If you wish to enter a programme number consisting of only one or two digits you can speed up the selection process by keeping your finger pressed down on the last digit a little longer 6 2 3 Using the programme list on screen Press the OK key A programme list will now be displayed When TV mode is selec...

Page 17: ... to make things convenient for viewers the PIN number need be entered only once per operational cycle The child proof feature is only activated again the next time the set is switched on 6 2 5 Information box Each time the programme is changed an information box is briefly displayed showing the programme name as well as the list number In addition other programme characteristics are shown such as ...

Page 18: ...he Back key on the remote control unit to go back to the previous programme vie wed Press this key again to again go back to the programme viewed before the current one i e to switch back and forth between two programmes 6 7 Displaying clock and programme information This function enables you to view the programme information relating to the programme cur rently selected Press the blue Tkey in ord...

Page 19: ...icture contents you should set your receiver to FBAS mode Point 5 3 6 11 Electronic Programme Guide The EPG function Electronic Programme Guide allows you to display various programme selections and the contents of various programmes on the TV screen This enables you to gain a quick overview of the programmes of the day and their contents and where availa ble also of the next few days 6 11 1 Calli...

Page 20: ...f the arrow left right keys Press the Back key to return to the previous table of information 6 11 4 Switching EPG off Press the Back key to return to normal operation 6 12 Timer Your receiver is equipped with a timer This allows you to make video recordings even in your absence Timer operation is indicated by a blinking light on the LED display Timer ope ration can be switched off by pressing the...

Page 21: ...on of programming the timer via the EPG yoi can also programme the timer manually In order to do this proceed as follows Select the next programme list to get to the programme you wish to record Point 6 2 3 1 Press the Menu key to call up the Main Menu The Main Menu will be displayed Mark the line designated Timer Confirm by pressing OK The menu Main Menu Timer will be displayed Press the yellow f...

Page 22: ...t Use the arrow key right to mark the column Start Use the numeric keys to enter the starting time for the timer in this line Stop Repeat the steps as described under Start to enter the stopping ending time In order for all events to be considered there should be a break of at least one minute between the stopping time of one timer setting and the starting time of the next timer setting Repeat opt...

Page 23: ...our user programme lists This means that for instance you can programme one list exclusively with sports program mes another with news programmes etc Each user programme list contains all programmes that you have specifically included using the procedure described below This chapter also describes how you can delete programmes from the list and how you can block programmes from unauthorised use ch...

Page 24: ...ay a list of providers from which one can be selected Use the arrow keys to mark the provider selected Confrim by pressing OK A list of programmes relating to the selected provider will be displayed Programmes that have already been entered in the selected user list are marked with a check sign a Selecting programmes In order to add a programme to a user list or to delete a programme proceed as fo...

Page 25: ...d Press the arrow left right keys to select Yes or No Confirm entry by pressing OK 7 1 4 Sorting programmes In order to sort the programmes in a user programme list in the order most convenient to you proceed as follows Call up a programme list display by pressinf the OK key Use the green function key to select the programme list you wish to change sort Point 7 1 1 Press the blue function key edit...

Page 26: ... to mark the line Settings Confirm by pressing OK The sub menu Settings will be displayed Use the arrow up down keys to mark the line Change PIN Confirm by pressing OK Now use the numeric keys to enter the current PIN number factory setting 0000 Now use the numeric keys to enter the desired new personal PIN number Repeat this entry When you have completed entering the PIN number in this manner pre...

Page 27: ...he user lists as described in Point 7 1 Call up the Main Menu in order to commence your programme search Use the arrow up down keys to mark the line Search Confirm by pressing OK The sub menu Search will be displayed Now use the arrow up down keys to select the search method you wish to employ 7 4 1 Satellite When you activate this search mode all active satellites Point 5 4 and transponders will ...

Page 28: ...nsponder will be displayed Satellite In this line mark the satellite on which the selected transponder is installed Use the arrow up down keys to mark the line Satellite Press the OK key to display a table of active satellites Use the arrow up down keys to mark the desired satellite Confirm by pressing OK The selected satellite will now be displayed in the line Satellite Transponder frequency Use ...

Page 29: ...the numerical keys 7 4 5 After the scan You can follow the scan of the transponder on screen while it is in progress When the scan is completed the number of transponders found the total number of programmes found as well as the number of new programmes found will be displayed Press the yellow function key Select to access the main memory programme list in order to configure the programme lists Pr...

Page 30: ...ctory settings will be displayed 7 5 1 Activating default setting This function allows you to go back to the default setting programmed in the factory at the same time deleting your own settings Use the arrow up down keys to mark the menu line Restore Factory Set tings Press the OK key The prompt Really restore factory settings will be displayed Use the arrow left right keys to select Yes or Abort...

Page 31: ...ines and an image repeating frequency of 50 Hz one arrives at a digital data volume of 216 MBit s This would require enormous bandwidths not available either with terrestrial nor with satellite broadcast technology A data compression system is thus employed to reduce the amount of data transmitted In Europe MPEG 2 has been defined as the worldwide standard for data compression MPEG 2 is an expansi...

Page 32: ...n frequency of the receiver Broadcast frequency of the satellite LOF Modulation at 22 KHz This in addition to 14 18 Volt switching serves to switch between two LNBs In Universal LNBs it serves to switch to high band Modulator Switching mechanism in a satellite receiver or video recorder serves to facilitate connection via antenna cable Mode determines whether a mono or stereo programme is received...

Page 33: ...hieve this the receiver supplies a voltage of 14 or 18 Volt Transponder This has the task of processing one or more programmes on board the satellite It receives data from the ground station amplifies them and broadcasts them back to earth Universal LNB Term used to describe a three band LNB capable of receiving the ranges FFS 10 70 11 70 GHz BBS 11 70 12 50 GHz and FFS High Band 12 50 12 75 GHz T...

Page 34: ...l L R 0 5 V r m s nominal Output impedance 600 Ohm THD 60 dB 1 kHz Crossover 65 dB Initial volume Memorizes last set value Video Parameters Input Input level FBAS 1 Vs s 0 3 dB into 1 kOhm Input level RED 0 7 Vs s 0 1Vp p into 75 Ohm Input level GREEN 0 7 Vs s 0 1Vp p into 75 Ohm Input level BLUE 0 7 Vs s 0 1Vp p into 75 Ohm Video Tele text Tele text filtering corresponding to ETS 300 472 standard...

Page 35: ...ositions max 4 DiSEqC 1 0 SAT POSITION SAT OPTION EPG Data EPG preview Timer 32 events up to 1 year ahead OSD Languages German English Remote control system RC 5 Modulation frequency 36 kHz Infrared wavelength 950 nm Power supply Power supply switch Power consumption 11 5 W in operation horizontal polarisation 400 mA LNB current 9 5 W in operation without LNB 8 3 W Standby mode Input voltage 180 V...

Page 36: ...tion Object blocking line of sight bet ween satellite and dish e g tree Radio mode on Scart plug not properly inserted in Scart socket Antenna alignment out or defective Programme is being broadcast on another transponder Programme is no longer being bro adcast Batteries are spent Wrong programme list selected Interference from DECT telephones Defective data stream unit blocked Solution Check main...

Page 37: ...d picture frozen Disconnect the mains plug for about 5 seconds Then switch the receiver on again If the problem still persists contact your customer services Your unit carries the CE logo and complies with all appropriate EU standards Subject to alterations and errors Correct as of 09 01 Copying and reproduction only with permission by the publisher TechniSat and DigiBox are registered trademarks ...

Page 38: ...on process by holding down the key of the last digit for a little longer Volume control You have the facility to adjust the volume of your receiver This facilitates use of the receiver as it combines all important functions on the receiver remote control unit so that you will rarely have to use your TV set remote control unit When the receiver is switched on sound will be reproduced at the volume ...

Reviews: