background image

48

Operations

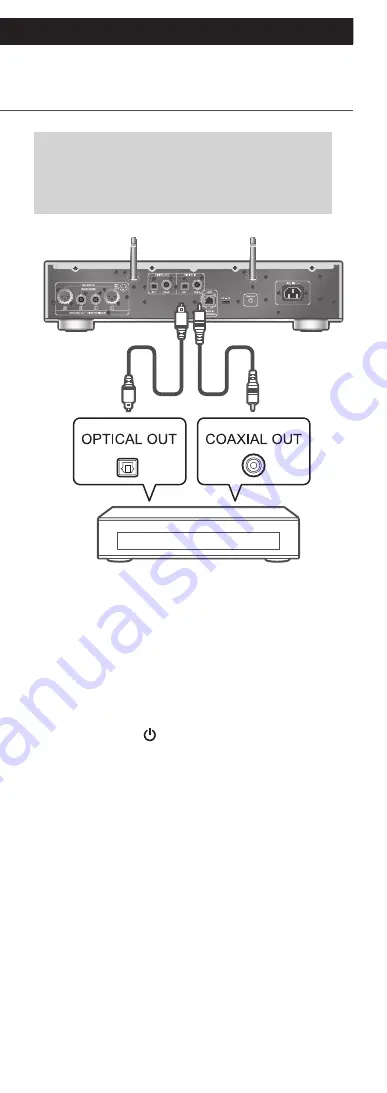
Using digital audio output 

device

(Continued)

You can connect a digital audio output 

device with coaxial digital cable (not 

supplied) or optical digital audio cable (not 

supplied) to this unit and play back music.

Digital audio output device 

Optical digital 

audio cable 

(not supplied)

Coaxial digital 

cable  

(not supplied)

1 Disconnect the AC mains lead.
2 Connect this unit and a digital audio 

output device.

3 Connect the AC mains lead to this unit. 

(

 27)

4 Press [NWP 

] to turn this unit on.

5 Press [>INPUT<] repeatedly to select 

“COAX” or “OPT”.


You can also select the input source by turning 

the multi control knob after pressing [INPUT] on 

the unit.

6 Start playback on the connected device.

Summary of Contents for SL-G700

Page 1: ...Operating Instructions Network Super Audio CD Player SL G700 ...

Page 2: ...ical and emotional relationship between people and music We want people to experience music as it was originally intended and enable them to feel the emotional impact that enthuses and delights them Through delivering this experience we want to support the development and enjoyment of the world s many musical cultures This is our philosophy With a combination of our love of music and the vast high...

Page 3: ...229 Monday Friday 9 00 am 5 00 pm Excluding public holidays For further support on your product please visit our website www technics com uk Features Wide compatibility of music source Supports Super Audio CD SACD drive newest network module MQA decoding function and lots of streaming services using Chromecast enabled app High Quality Audio Technologies for Technics Digital Players Employed Reduce...

Page 4: ...ecautions of this manual before use Control reference guide 15 This unit Remote control Connections 24 AC mains lead connection Network settings Operations 37 Playing back CD SACD etc Settings 69 Sound adjustment Other settings Others 85 Troubleshooting Specifications etc ...

Page 5: ...System connection cable 1 K2KYYYY00233 Analogue audio cable 1 K2KYYYY00257 Remote control 1 N2QAYA000143 Batteries for remote control 2 Product numbers provided in these operating instructions are correct as of April 2019 These may be subject to change Do not use AC mains lead with other equipment ...

Page 6: ...d first Safety precautions 07 Warning 07 Caution 07 Installation 13 Installation 13 Unit care 13 Using Technics Audio Center 13 Firmware updates 13 To dispose of or transfer this unit 14 Table of contents 04 ...

Page 7: ... body when disconnecting the plug Do not use a damaged mains plug or socket outlet The mains plug is the disconnecting device Install this unit so that the mains plug can be unplugged from the socket outlet immediately Ensure the earth pin on the mains plug is securely connected to prevent electrical shock An apparatus with CLASS I construction shall be connected to a mains socket outlet with a pr...

Page 8: ...eplaced Replace only with the type recommended by the manufacturer Mishandling of batteries can cause electrolyte leakage and may cause a fire Remove the battery if you do not intend to use the remote control for a long period of time Store in a cool dark place Do not heat or expose to flame Do not leave the battery ies in a car exposed to direct sunlight for a long period of time with doors and w...

Page 9: ... mark or the BSI mark on the body of the fuse If the plug contains a removable fuse cover you must ensure that it is refitted when the fuse is replaced If you lose the fuse cover the plug must not be used until a replacement cover is obtained A replacement fuse cover can be purchased from your local dealer Before use Remove the connector cover How to replace the fuse The location of the fuse diffe...

Page 10: ...selstrømnett Nettstøpselet er trukket ut fra denne enheten Installer denne enheten slik at nettstøpselet umiddelbart kan trekkes fra stikkontakten FORSIKTIG Produkt Dette produktet anvender en laser Betjening av kontroller eller justering eller andre inngrep enn de beskrevet i denne bruksanvisning kan føre til farlig bestråling Plasser ikke åpen ild slik som levende lys oppå apparatet Denne enhete...

Page 11: ...se it complies with the requirement set by the Directive for the chemical involved Panasonic Corporation a company having its registered office of 1006 Oaza Kadoma Kadoma City Osaka 571 8501 Japan automatically collects personal data such as IP address and or Device ID from your device as soon as you connect it to the Internet We do this to protect our customers and the integrity of our Service as...

Page 12: ...l DoC to our RE products from our DoC server http www ptc panasonic eu Contact to Authorised Representative Panasonic Marketing Europe GmbH Panasonic Testing Centre Winsbergring 15 22525 Hamburg Germany Type of wireless Frequency band Maximum Power EIRP WLAN 2412 2472 MHz 5180 5320 MHz 5500 5700 MHz 20 dBm 20 dBm 20 dBm Bluetooth 2402 2480 MHz 10 dBm 5 15 5 35 GHz band is restricted to indoor oper...

Page 13: ...e thinner alcohol kitchen detergent chemical wiper etc Doing so may cause the exterior case to be deformed or the coating to come off Using Technics Audio Center If you install the dedicated app Technics Audio Center free of charge on your tablet smartphone you can stream music files from the device on your network to this unit and configure the settings of sound quality etc For details visit www ...

Page 14: ...s SETUP Press repeatedly to select Initialization and then press OK Press to select Yes and then press OK A confirmation screen appears Select Yes in the following steps to restore all the settings to defaults Press to select Yes and then press OK again Before you dispose of or transfer this unit to a third party be sure to log out of your music streaming services accounts to prevent unauthorised ...

Page 15: ...15 Control reference guide This unit front 16 This unit rear 18 Remote control 19 Using the remote control 22 Remote control mode 22 Table of contents 04 ...

Page 16: ...03 Headphones jack Excessive sound pressure from earphones and headphones can cause hearing loss Listening at full volume for long periods may damage the user s ears 04 USB A terminal USB Front DC 5 V 500 mA 45 05 Remote control signal sensor Reception distance Within approx 7 m directly in front Reception angle Approx 30 left and right 06 Disc tray 39 07 Display Input source playback status etc a...

Page 17: ...able for adjusting the headphone volume Press and hold the headphone volume button while displaying to keep the headphone volume adjusting screen displaying Press again to exit Volume range dB min 99 0 dB to 0 dB max Set PHONES VOL Limitation to On so that the headphones output is automatically lowered if the volume is extremely high when turning this unit or starting playback 73 Press 2 times to ...

Page 18: ...nna 30 03 Optical digital output terminal OPT 26 04 Coaxial digital output terminal COAX 26 05 Optical digital input terminal OPT 48 06 Coaxial digital input terminal COAX 48 07 Product identification marking The model number is indicated 08 LAN terminal 29 09 USB A terminal USB Rear DC 5 V 1 A 47 10 System terminal CONTROL 82 11 AC IN terminal 27 ...

Page 19: ... In standby mode the unit is still consuming a small amount of power The input source also switches for each selector switches to the last selected input source when NWP 02 NWP CD Select the device to be operated The playing layer switches by pressing CD while the playback stops for Hybrid Super Audio CD SACD Press and hold CD to switch to Pure Disc Playback mode 44 03 INPUT Switch the input sourc...

Page 20: ...econds again to set the function to Off 10 MENU Enter menu 1 11 SETUP Enter setup menu 1 12 Adjust the volume 2 3 13 Mute the sound 2 3 14 Playback control buttons 39 46 51 54 58 68 15 Numeric buttons etc To enter 2 digits or more Example 16 10 1 6 124 10 10 1 2 4 CLEAR Clear the entered value 1 Press NWP CD first to operate this unit The remote control works only for the devices supporting system...

Page 21: ...21 Continued 04 Measure the output signal when speakers are connected and correct its output ...

Page 22: ...e the remote control mode The factory default is Mode 1 1 Press NWP 2 Press SETUP 3 Press to select Remote Control and then press OK The current remote control mode of this unit is displayed 4 When Set Mode 1 2 is displayed change the remote control mode of the remote control To set Mode 1 Press and hold OK and 1 for at least 4 seconds To set Mode 2 Press and hold OK and 2 for at least 4 seconds 5...

Page 23: ...23 When Remote 1 or Remote 2 is displayed When Remote 1 or Remote 2 is displayed the remote control modes of this unit and remote control are different Perform step 4 above ...

Page 24: ... Connecting to an amplifier with digital input terminal 26 AC mains lead 27 AC mains lead connection 27 Network settings 28 Wired LAN connection 29 Wireless LAN connection 30 This unit s name on the network Friendly Name 35 To check the MAC address of this unit MAC Address 35 To make network related settings 36 Table of contents 04 ...

Page 25: ...balanced input terminals We recommend using cables with a length of 3 m or less For details refer to the operating instructions of the connected device Do not use any other analogue audio cables except the supplied one When you connect a power amplifier etc set A Output Level to Variable for volume control with this unit When you connect a pre amplifier etc set A Output Level to Fixed for volume c...

Page 26: ...al input terminal etc Optical digital audio cable not supplied Coaxial digital cable not supplied For details refer to the operating instructions of the connected device Note Audio signal of Super Audio CD and Super Audio CD layer of Hybrid Super Audio CD cannot be output from the digital audio output terminal of this unit Connect the device to the analogue audio output terminal When enjoying vide...

Page 27: ...ed all the way in Do not bend cables at sharp angles Wi Fi function switching screen is displayed following Wi Fi Setup when this unit is turned on If you stop the Wi Fi setting set to Off and press OK To keep the Wi Fi setting start the Google Home app and follow the on screen instructions 28 30 Note Press NWP CD first to operate this unit The remote control works only for the devices supporting ...

Page 28: ...can set up a connection using the application When using the Chromecast enabled apps to play music on this unit set up a connection using the Google Home app Make sure that the Wi Fi function and Bluetooth feature are activated on your smartphone tablet 1 Install the Google Home app on your smartphone tablet To download the Google Home app visit https www google com cast setup 2 Connect your smart...

Page 29: ... the LAN cable must be connected or disconnected Use category 7 or above straight LAN cables STP when connecting to peripheral devices Inserting any cable other than a LAN cable in the LAN port can damage the unit After turning on this unit it may take some time until this unit is activated After the network connection is set up Updating may be displayed and the firmware for this unit may be updat...

Page 30: ...til this unit is activated After the network connection is set up Updating may be displayed and the firmware for this unit may be updated After the update has finished successfully and Success is displayed turn this unit off and then on The setting will be cancelled after the set time limit In that case try the setting again blinks while the network setting is not complete and blinking stops after...

Page 31: ...ng in the middle press or turn the unit to standby mode When this unit is switched to standby mode and turned on before the Wi Fi setting is complete Wi Fi Setup is displayed Perform the Wi Fi setting or select Off For other connection methods 31 Setting the network from the setup menu When not using the Chromecast enabled apps with this unit Using the WPS button WPS If your wireless router suppor...

Page 32: ...methods 7 Press OK to exit the setting Using the WPS PIN code WPS PIN If your wireless router supports WPS you can set up a connection by entering the WPS PIN code For details on how to enter the PIN code refer to the operating instructions of the wireless router Complete the settings within 2 minutes while WPS PIN and the PIN code are displayed When Wi Fi Setup is displayed when turning on this u...

Page 33: ...wireless router Setting the network from the setup menu When using the Chromecast enabled apps with this unit Using the Google Home app Wi Fi Setup When using the Chromecast enabled apps to play music on this unit you need to set up a network connection using Google Home app When the network has been set up with another method try the setting again with the following procedure When Wi Fi Setup is ...

Page 34: ...rom the setup menu If Fail is still displayed try other methods 7 Press OK to exit the setting Note This unit will be displayed as Technics SL G700 if the device name is not set stands for characters unique to each set You can check your network information SSID MAC address and IP address from the Google Home app or Technics Audio Center app Some items on the Google Home app are irrelevant to this...

Page 35: ...f the Friendly Name is selected Press CLEAR to delete a letter Press 10 to insert a letter A Default name is Technics SL G700 stands for a number that is unique to each set 6 Press OK to apply the settings 7 Press RETURN to exit the settings When Friendly Name is not displayed properly delete and input the friendly name again If the problem still persists restore all the settings to the factory de...

Page 36: ... disable DHCP Do not play back music while changing these settings 1 Press NWP 2 Press SETUP 3 Press repeatedly to select Network and then press OK 4 Select and input the details 5 Press OK to apply the settings 6 Press RETURN to exit the settings 7 Press NWP to switch the unit to standby Wait until Please Wait disappears 8 Perform the network setting 28 ...

Page 37: ...ing Bluetooth 50 Pairing a Bluetooth device 50 Operations during playback 51 Disconnecting a Bluetooth device 52 Bluetooth transmission mode 52 Playing back music files on the media server 53 Playing back content stored on the media server by controlling it from this unit 54 Operations during playback 54 Repeat playback 55 Random playback 55 Operations using the dedicated app Technics Audio Center...

Page 38: ...38 Playing audio using Spotify Connect 59 Using TIDAL 61 Using Deezer 63 Listening to music using Chromecast enabled app 65 Using AirPlay 67 Operations during playback 68 Table of contents 04 ...

Page 39: ... insert a CD Place label up in the proper position in the middle of the disc tray DO DO NOT 12 cm CD DO DO NOT 8 cm CD Press again to close the disc tray 3 Press Note Be careful not to get your finger caught in the disc tray when opening closing it Operations during playback Stop Pause Press again to resume Skip Search Searches only in the track View available information INFO Press repeatedly to ...

Page 40: ... All tracks are repeated Setting contents are stored even when the input source is switched Random playback 1 Press NWP 2 Press RND Press again to cancel Setting contents are stored even when the input source is switched During random playback you cannot skip to the previous track ...

Page 41: ... in the stop mode You cannot select and clear a desired programmed track Press PGM in the stop mode to cancel the programme mode and the programme memory will be stored To cancel the programme mode The programme memory will be cleared Press in the stop mode Press to select Yes and then press OK Note The programme memory will be cleared in the following conditions When turning on off this unit when...

Page 42: ... CD discs MQA decoding This unit includes the MQA Master Quality Authenticated technology which enables playback of MQA audio files and streams delivering the sound of the original master recording To deliver the master quality audio of MQA MQA decoding function needs to be set to On Switch the MQA decoding function to On or Off in the following steps The default setting is Off 1 Press NWP 2 Press...

Page 43: ...ing of the connected digital audio device For details refer to the operating instructions of the connected device For information of Technics devices refer to the following website www technics com support Set the MQA decoding function to Off when playing back the files or streams other than those of MQA When setting the Direct mode or the Re master function to On the MQA decoding function will be...

Page 44: ...d You can also set Pure Disc Playback to On from the setup menu Press NWP Press SETUP Press repeatedly to select Pure Disc Playback and then press OK Press to select On and then press OK Note Operating from Technics Audio Center app etc are not available after setting The programme playback cannot be set Press again for 5 seconds or longer to cancel and return to the normal mode The display is tur...

Page 45: ...ect a USB device to the USB A terminal USB Front on the front of this unit 2 Press NWP 3 Press INPUT repeatedly to select USB Front You can also select the input source by turning the multi control knob after pressing INPUT on the unit The folder content selection screen will be displayed 4 Press to select an item and then press OK Repeat this step to make further selections Press RETURN to return...

Page 46: ...ats Repeat playback 1 Press NWP 2 Press 1 Only plays the selected track All tracks are repeated Setting contents are stored even when the input source is switched Random playback 1 Press NWP 2 Press RND Press again to cancel During random playback you cannot skip to the previous track During random playback tracks may be played more than once Setting contents are stored even when the input source ...

Page 47: ...ng a USB HDD with this unit connect a USB HDD to the USB A terminal USB Rear on the rear of this unit and switch the input source to USB Rear Note Do not connect a USB HDD to the USB A terminal USB Front on the front of this unit ...

Page 48: ...put device Optical digital audio cable not supplied Coaxial digital cable not supplied 1 Disconnect the AC mains lead 2 Connect this unit and a digital audio output device 3 Connect the AC mains lead to this unit 27 4 Press NWP to turn this unit on 5 Press INPUT repeatedly to select COAX or OPT You can also select the input source by turning the multi control knob after pressing INPUT on the unit ...

Page 49: ...tal audio input terminals of this unit can only detect the following linear PCM signals For details refer to the operating instructions of the connected device Sampling frequency Coaxial digital input 32 44 1 48 88 2 96 176 4 192 kHz Optical digital input 32 44 1 48 88 2 96 kHz Number of quantisation bits 16 24 bit ...

Page 50: ...luetooth feature is activated on the device Registering the Bluetooth device 1 Press NWP 2 Press INPUT repeatedly to select Bluetooth You can also select the input source by turning the multi control knob after pressing INPUT on the unit 3 Press MENU 4 Press repeatedly to select Pairing and then press OK 5 Press to select Yes and then press OK Pairing is displayed and this unit waits for registeri...

Page 51: ...unit If a 9th device is paired the device that has not been used the longest may be replaced Refer to the operating instructions of the Bluetooth device for details 1 stands for a digit that is unique to each set 2 The device name can be changed with the dedicated application Technics Audio Center free of charge Operations during playback Stop Pause Press again to resume Skip Note To use this unit...

Page 52: ...l be disconnected if a different audio source is selected Bluetooth transmission mode If a Bluetooth device is already connected disconnect it 1 Press NWP 2 Press MENU 3 Press repeatedly to select Link Mode and then press OK 4 Press to select the mode and then press OK Mode 1 Emphasis on connectivity Mode 2 Emphasis on sound quality default Note Select Mode 1 if the sound is interrupted ...

Page 53: ...is unit Preparation Complete the network settings 28 Connect the device to be used to the network of this unit To use Windows Media Player Add the contents and folder to the libraries of the Windows Media Player 11 or 12 or a smartphone etc Playlist of Windows Media Player can play back only the contents that are stored in the libraries To use Windows Media Player for streaming you need to configu...

Page 54: ... further selections Folders content may be displayed in different order from the order on the server depending on its specifications 4 Press to select an item and then press OK Note The connected server and its contents may not be displayed properly depending on its condition e g soon after adding the contents to the server etc Please try again later For details refer to the operating instructions...

Page 55: ...ing random playback you cannot skip to the previous track During random playback tracks may be played more than once Setting contents are stored even when the input source is switched Operations using the dedicated app Technics Audio Center If you install the dedicated app Technics Audio Center free of charge on your tablet smartphone you can control this unit using a wide variety of functions For...

Page 56: ...For details on how to use DMC compatible devices refer to the operating instructions of the devices or the software Note When you operate the media server playback of other audio sources will stop and media server output will have priority Depending on the contents and the connected equipment operations or playback may not be possible This unit does not guarantee connection with all DMC applicatio...

Page 57: ...Start Technics Audio Center on your device smartphone tablet etc 2 Select Internet Radio Podcasts from Technics Audio Center 3 Press to select a station and then press OK Internet Radio is displayed while playing back the internet radio station Podcasts is displayed while playing back Podcasts For operation details refer to the operating instructions of Technics Audio Center For details visit www ...

Page 58: ...58 Operations during playback Stop Pause Podcasts Press again to resume Skip ...

Page 59: ...y music from the music streaming service of Spotify by operating your smartphone tablet etc Preparation Complete the network settings 28 Make sure that the network is connected to the Internet Connect the device to be used to the network of this unit Use your phone tablet or computer as a remote control for Spotify Go to spotify com connect to learn how ...

Page 60: ...e device name is set on the Google Home app the set name is displayed Registration subscription is required Services icons and specifications are subject to change 1 stands for a number that is unique to each set 2 The device name can be changed from This unit s name on the network 35 ...

Page 61: ...ing website www tidal com Preparation Install the latest Technics Audio Center on your device smartphone tablet etc For details visit www technics com support Connect this unit and your device on which Technics Audio Center has been installed to the network connected to the internet For details refer to their operating instructions 1 Start Technics Audio Center on your device smartphone tablet etc...

Page 62: ... registration is required paid service For operation details refer to the operating instructions of Technics Audio Center For details visit www technics com support Note If this unit is playing other input sources the input is switched and the playback of TIDAL is prioritised Depending on the country or region playback may not be available ...

Page 63: ...For details visit www technics com support Connect this unit and your device on which Technics Audio Center has been installed to the network connected to the Internet For details refer to their operating instructions 1 Start Technics Audio Center on your device smartphone tablet etc 2 Select Deezer from Technics Audio Center 3 Follow the on screen instructions and start playback If you do not hav...

Page 64: ...64 Note Depending on the country or region playback may not be available ...

Page 65: ...tphone tablet etc Connect the device to the network currently used at home 1 Start the Chromecast enabled app on your device smartphone tablet etc and select this unit as the connecting device The input source is automatically switched to Casting 2 Play back the music Not all music streaming services are available in all countries regions Registration subscription may be required or fees may be ch...

Page 66: ...66 Important notice Before you dispose of or transfer this unit to a third party be sure to log out of your music streaming services accounts to prevent unauthorised use of your accounts ...

Page 67: ...network as this unit 1 iOS device Start the Music or iPod app PC Start iTunes 2 Select Technics SL G700 1 2 from the AirPlay icon e g If the device name is set on the Google Home app the set name is displayed 3 Start play Check the volume settings before starting the playback When AirPlay is used for the first time the volume may be output at the maximum setting The playback will start with a slig...

Page 68: ... the required settings in iTunes Playback of other audio sources will stop and AirPlay output will have priority With some iOS and iTunes versions it may not be possible to restart the AirPlay playback if the selector is changed or the unit is turned to standby mode during the AirPlay playback In this case select a different device from the AirPlay icon of the Music app or iTunes and then re selec...

Page 69: ...analogue audio output A Output Level 72 Adjusting the sound quality of analogue audio output Filter 73 Setting the limitation of headphones output PHONES VOL Limitation 73 Playing back CD more natural sounding audio 73 Direct mode 74 Other settings 75 Sleep timer SLEEP 75 Auto off function AUTO OFF 76 Network standby Network Standby 76 Network settings Network 76 Changing the character encoding E ...

Page 70: ...ite station 80 Deleting the favourite station or playlist 81 Operations using the dedicated app Technics Audio Center 81 System control connection 82 Using system connection cable and audio cable 83 Switching this unit and the connected device to on standby simultaneously 83 Adjusting BASS MID TREBLE Tone Control 84 Table of contents 04 ...

Page 71: ... the unit Use the remote control for setting some items Adjusting the volume of headphones PHONES VOL You can adjust the volume of headphones 17 dB min 99 0 dB to 0 dB max The factory default is 60 0 dB Using this unit exclusively for the playback of CDs Pure Disc Playback By disabling the network functions etc this unit operates exclusively for the playback of CD SACD for the higher quality sound...

Page 72: ... an upper limit on the output sampling frequency range Please note that the range that can be processed differs depending on the amplifier with digital input terminal For details refer to the operating instructions of the connected device The factory default is 32kHz 192kHz Set Digital Output to On to use this function 96 kHz or 192 kHz can be set as the upper limit on the output sampling frequenc...

Page 73: ...he limitation of headphones output PHONES VOL Limitation You can set an upper limit on the headphones output to avoid the extremely high volume when turning this unit or playing back The factory default is On Playing back CD more natural sounding audio Re mastering expands the playback band and achieves a higher bit depth to reproduce natural and expansive sounds close to original music sources 1 ...

Page 74: ...performing digital signal processing DSP This enables faithful and high quality reproduction of original sound 1 Press NWP 2 Press DIRECT to select On Off The factory default is Off When setting the MQA decoding function to On the Direct mode will be set to Off ...

Page 75: ...ess to set and press OK You can also enter a setup screen by pressing and holding multi control knob on the unit Use the remote control for setting some items Sleep timer SLEEP The sleep timer can turn the unit to standby mode after a set time 30 minutes 60 minutes 90 minutes 120 minutes Off SLEEP is displayed after setting ...

Page 76: ...efore this unit is turned off Network standby Network Standby This unit can turn on automatically from standby mode when this unit is selected as the Spotify AirPlay media server The factory default is Auto To disable this function select Off Auto Enables the network standby function when the network connection is available On Always enables the network standby function Note If this function is se...

Page 77: ...iority is given to Japanese default Type 2 简体字 Priority is given to Chinese Simplified Checking the model name Model No The model name is displayed Checking the firmware version F W Version The version of the installed firmware is displayed Firmware updates F W Update Occasionally Panasonic may release updated firmware for this unit that may add or improve the way a feature operates These updates ...

Page 78: ...layed as Updating while updating stands for a number When the update has finished successfully Success is displayed 6 Press on the unit to turn this unit off and on Note Downloading may take longer depending on the internet connection environment etc Firmware updating may automatically start after the network setting is complete 28 Update via USB flash memory Preparation Download the latest firmwa...

Page 79: ...d then press OK 6 Press to select Yes and then press OK The progress is displayed as Updating while updating stands for a number When the update has finished successfully Success is displayed 7 Press on the unit to turn this unit off and on Note Downloading may take longer depending on the USB flash memory ...

Page 80: ...ed is displayed after registering You can register up to 9 favourite stations or playlists The favourite function registering calling up deleting can also be set from the dedicated application Technics Audio Center free of charge Press and hold PGM for approx 3 seconds to exit the setting You can also enter a favourite setting screen by pressing and holding INPUT on the unit Calling up the favouri...

Page 81: ... and then press CLEAR 4 Press repeatedly to select Yes and then press OK Cleared is displayed after deleting Empty is displayed if no station or playlist is registered to the favourite list Operations using the dedicated app Technics Audio Center If you install the dedicated app Technics Audio Center free of charge on your tablet smartphone you can control this unit and edit the favourite list Dow...

Page 82: ...pplied System connection cable Amplifier with unbalanced input terminals The illustration shows the example when connecting to an amplifier with unbalanced input terminals using analogue audio cable Connect the device with proper cable terminal supporting the device Note Be sure to connect the device with analogue audio cable when playing back Super Audio CD with this unit System control function ...

Page 83: ...ce 3 Connect the AC mains lead to this unit 27 4 Press NWP to turn this unit on 5 Set the system control function on the connected device For details refer to the operating instructions of the connected device Switching this unit and the connected device to on standby simultaneously When the device supporting system control function Stereo Integrated Amplifier etc is turned on off this unit is tur...

Page 84: ...SU C700 with this unit Each tonal range BASS MID TREBLE can be adjusted 1 Press NWP 2 Press SETUP 3 Press repeatedly to select Tone Control and then press OK 4 Press to set and press OK To enable this function select On adjustment Each level can be adjusted between 10 and 10 ...

Page 85: ...86 To restore all the settings to the factory defaults 87 General 88 Disc 90 USB 90 Bluetooth 91 Network 92 Spotify TIDAL Deezer Internet Radio Podcasts 94 Remote control 94 Messages 95 Playable media 98 Notes on discs 98 USB 99 About Bluetooth 100 Licenses 101 Specifications 103 Table of contents 04 ...

Page 86: ...your dealer for instructions Heat buildup of this unit This unit becomes warm while in use Be careful when touching the bottom of this unit because the bottom of this unit may be hot For installation or unit care disconnect the AC mains lead wait for at least 3 minutes Do you have the latest firmware installed Panasonic is constantly improving the unit s firmware to ensure that our customers are e...

Page 87: ...essed You want to clear and reset the memory contents 1 Press NWP while this unit is turned on 2 Press SETUP 3 Press repeatedly to select Initialization and then press OK 4 Press to select Yes and then press OK A confirmation screen appears Select Yes in the following steps to restore all the settings to defaults 5 Press to select Yes and then press OK again ...

Page 88: ...t the audio quality Keep this unit away from such a location The speakers may output noise when a device nearby is emitting powerful radio waves such as when a mobile phone is on a call No sound Check the volume of the connected device Check the volume of this unit if A Output Level is set to Variable Check to see if the cable connections to the input and output terminals are incorrect If this is ...

Page 89: ...ode simultaneously with the connected device with the system control function 83 The settings are reset to the factory defaults Updating the firmware may reset the settings The system control function is not working Use the system connection cable supplied with the connected device Connect the system connection cable to the system terminals CONTROL 82 Connect Technics device supporting system cont...

Page 90: ... or its contents cannot be read The USB drive format or its contents is are not compatible with the unit 99 The USB drive may not be read which has the files folders with the long names even if the number of the files folders of the USB device doesn t reach a maximum number 105 No response when is pressed Disconnect the USB device and then reconnect it Alternatively turn the unit to standby and on...

Page 91: ...through this unit For some built in Bluetooth devices you have to set the audio output to this unit manually Read the operating instructions for the device for details The sound is interrupted The device is out of the 10 m communication range Bring the Bluetooth device closer to this system Remove any obstacle between this system and the device Other devices that use the 2 4 GHz frequency band wir...

Page 92: ...r connection method 31 The wireless LAN environment or radio interference in your area may cause connection problem In this case try another connection method If the problem persists make a wired LAN connection 29 While the AC mains lead is disconnected the LAN cable must be connected or disconnected Cannot select this system as the output speakers Make sure that the devices are connected to the s...

Page 93: ...ork Turn the wireless router off and then on With some iOS and iTunes versions it may not be possible to restart the AirPlay playback if the selector is changed e g CD or this unit is in standby mode during the AirPlay playback In this case select a different device from the AirPlay icon of the Music App or iTunes and then re select this system as the output speakers 67 If the above solutions do n...

Page 94: ... discontinued either temporarily or permanently without notice Change TIDAL sound quality setting for Settings of Technics Audio Center The performance may be improved Cannot display the information properly Station names countries regions genres track names album names etc which are managed by the service provider may not be displayed properly depending on the broadcasting information Remote cont...

Page 95: ...o see if the server is connected to the same network as this unit and retry the connection to this unit 28 No station or playlist is registered to the favourite list Add a station or playlist to the list 80 Error Incorrect operation is performed Read the instructions and try again Fail Network connection is not complete Try the setting again 28 Firmware update is available The firmware free of cha...

Page 96: ...USB device is playable 105 No Disc No CD is inserted Inserted CD R etc have no audio track Insert the disc to be played 39 No Layer No available layer to be played back Insert Hybrid Super Audio CD disc which has a CD layer and Super Audio CD layer No Network Available This unit is not connected to the network Check the network connection 28 No Play The disc cannot be played back Insert the disc t...

Page 97: ...t is checking the media server on the network Check to see if there is a server in same network Unlocked COAX or OPT is selected but no device is connected The sampling frequency components etc of the audio signals are not input correctly Check the connection with the device 48 For supported formats refer to File format 107 USB Over Current Error USB device is drawing too much power Disconnect the...

Page 98: ...perate with this unit Discs with illegally copied data and those that do not conform to industry standards DualDiscs Discs that record data such as music and images on both sides This unit s lens Use the lens cleaner not supplied to clean the unit s lens Clean discs DO DO NOT Wipe with a damp cloth and then wipe dry with a dry cloth Disc handling precautions Handle discs by the edges to avoid inad...

Page 99: ...is unit cannot record music to a USB device Not all files on the USB device may be read if there are some files not supported About supported format refer to File format 107 Folder and file structure The unit plays back only the music files in the selected folder Select the folder containing the tracks that you want to play back Nothing is played back if you select a folder without music files suc...

Page 100: ...be different This system supports Bluetooth security features But depending on the operating environment and or settings this security is possibly not sufficient Transmit data wirelessly to this system with caution This system cannot transmit data to a Bluetooth device Range of use Use this device at a maximum range of 10 m The range can decrease depending on the environment obstacles or interfere...

Page 101: ...ered trademark of Microsoft Corporation in the United States and other countries Windows Media and the Windows logo are trademarks or registered trademarks of Microsoft Corporation in the United States and or other countries This product is protected by certain intellectual property rights of Microsoft Corporation and third parties Use or distribution of such technology outside of this product is ...

Page 102: ... without specific prior written permission THIS SOFTWARE IS PROVIDED BY THE COPYRIGHT HOLDERS AND CONTRIBUTORS AS IS AND ANY EXPRESS OR IMPLIED WARRANTIES INCLUDING BUT NOT LIMITED TO THE IMPLIED WARRANTIES OF MERCHANTABILITY AND FITNESS FOR A PARTICULAR PURPOSE ARE DISCLAIMED IN NO EVENT SHALL THE FOUNDATION OR CONTRIBUTORS BE LIABLE FOR ANY DIRECT INDIRECT INCIDENTAL SPECIAL EXEMPLARY OR CONSEQU...

Page 103: ...pprox 12 2 kg Operating temperature range 5 C to 35 C Operating humidity range 35 to 80 RH no condensation ANALOG OUTPUT SECTION Channel 2 ch Output level BALANCED 2 0 Vrms Super Audio CD 2 3 Vrms CD UNBALANCED 2 0 Vrms Super Audio CD 2 3 Vrms CD Frequency response Super Audio CD 2 Hz to 50 kHz 3 dB CD 2 Hz to 20 kHz 3 dB THD N Super Audio CD 0 0006 1 kHz 0 dB CD 0 0015 1 kHz 0 dB S N IHF A Super ...

Page 104: ...gde 650 nm Super Audio CD 790 nm CD Laserstyrke Ingen farlig stråling sendes ut Bluetooth SECTION Bluetooth system specification Bluetooth Ver 4 2 Wireless equipment classification Class 2 2 5 mW Supported profiles A2DP AVRCP Supported codec AAC SBC Frequency band 2 4 GHz band FH SS Operating distance Approx 10 m Line of sight 1 1 Prospective communication distance Measurement environment Temperat...

Page 105: ...mber of folders albums 800 Maximum number of files songs 8000 File system FAT16 FAT32 NTFS Ethernet interface LAN 100BASE TX 10BASE T Digital Input Optical digital input Optical terminal Coaxial digital input Pin jack Format support LPCM Analog output BALANCED 3 pin XLR UNBALANCED Pin jack Digital output Optical digital output Optical terminal Coaxial digital output Pin jack Format support LPCM Sy...

Page 106: ...2 0 high speed USB Mass Storage class Wi Fi SECTION Standard IEEE802 11a b g n ac Frequency band 2 4 GHz band 5 GHz band Security WPA2 Mixed mode WPA2 WPA WPS version Version 2 0 The WLAN feature of this product shall exclusively be used inside buildings ...

Page 107: ... files in formats not supported by this unit and output them For details refer to the operating instructions for your devices or servers File information sampling frequency etc shown by this unit and playback software may differ from each other USB A File format Extension Sampling frequency Bit rate Number of quantisation bits MP3 mp3 32 44 1 48 kHz 16 to 320 kbps AAC m4a aac 32 44 1 48 88 2 96 kH...

Page 108: ...6 4 192 352 8 384 kHz 16 24 32 bit ALAC m4a 32 44 1 48 88 2 96 176 4 192 352 8 384 kHz 16 24 bit DSD dff dsf 2 8 5 6 11 2 MHz Whether or not each music file can be played back over your network is determined by the network server even if the format of the file is listed above For example if you are using Windows Media Player 11 not all music files on the PC are playable You can play back only thos...

Page 109: ... Kadoma Osaka Japan Importer for Europe Panasonic Marketing Europe GmbH Panasonic Testing Centre Winsbergring 15 22525 Hamburg Germany Panasonic Corporation Web Site http www panasonic com Panasonic Corporation 2019 En TQBM0225 1 M0519TK169 EU ...

Reviews: