


RX38Ur
RX38Ur Remote
1
2
3
4
5
6
7
10
9
8
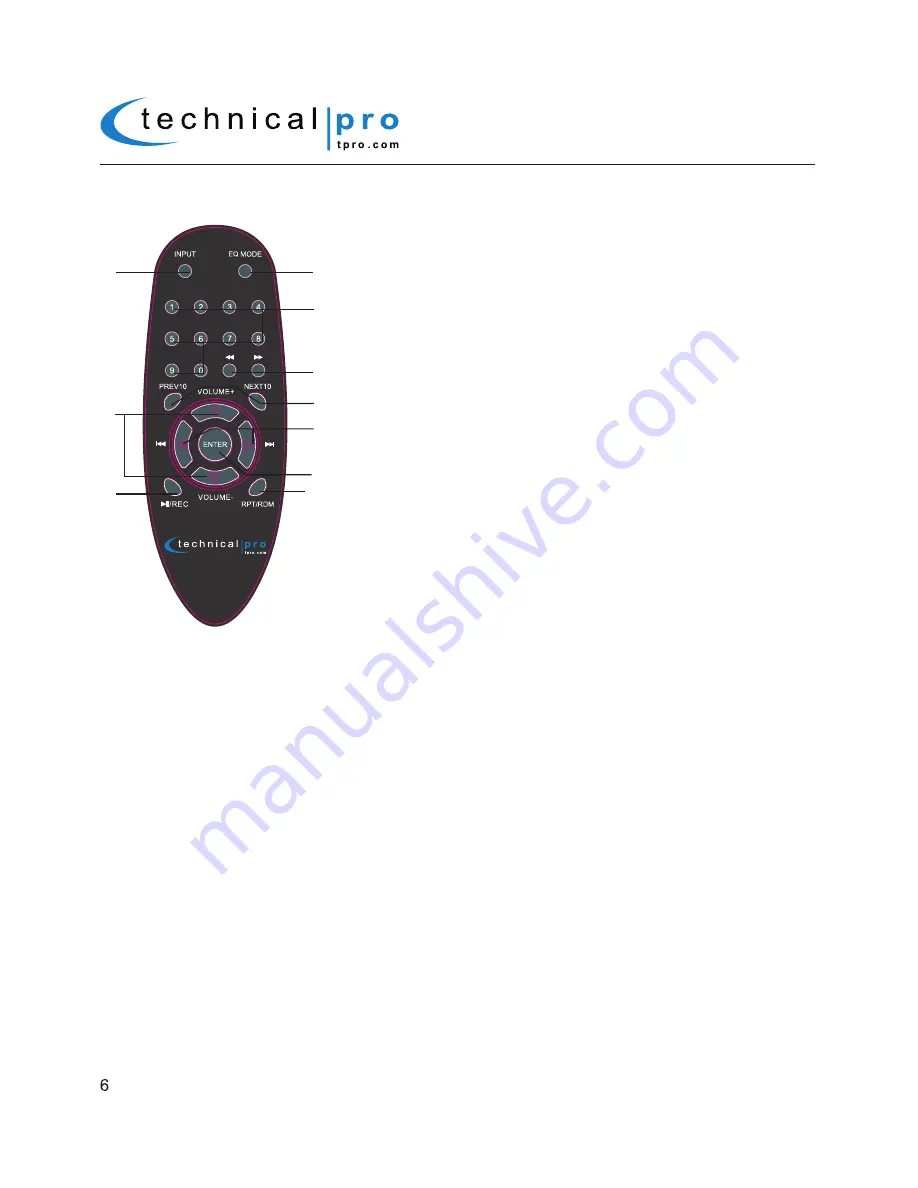
1.Input Selector:
Use this button to switch between the inputs.
2.EQ Mode Selector:
The RX38Ur has four built-in pre-set equalization modes.
Press this button to switch between the pre-set equalization modes.
3.Number Keys:
The number keys are used to input the track number. For
example if you press 6-4-3 then ENTER the unit will go to track number 643
on either the USB flash drive,SD Card or iPod™(Classic and Nano). If you do
not press ENTER after inputting the track number there will be a delay of about
5 seconds before the unit goes to track number 643. These buttons will only
function for the USB flash drive,SD Card or iPod™(Classic and Nano) signals.
4.Fast Forward & Rewind:
Press either of these buttons to fast forward of
rewind. The unit will continue to fast forward or rewind until the button is
pressed again. This button will only function for the USB flash drive,SD Card
or iPod™(Classic and Nano) signals.
5.NEXT 10 & PREV 10:
Press either of these buttons to quickly go 10 tracks
ahead or back. This button will only function for the USB flash drive,SD Card
or iPod™(Classic and Nano) signals.
6.Next & Previous Track:
Press either of these buttons to go to the next or
previous track on USB flash drive,SD Card or iPod™(Classic and Nano) signals.
7.Enter Button:
Press this button to confirm the track number you entered
using the numbers key to quickly go to that track on the USB flash drive,SD
Card or iPod™(Classic and Nano) signals.
8.Master Volume Control:
Use these buttons to adjust the master volume output.
9.Play/Pause & Record:
Press this button to pause the signal from the USB flash drive, SD Card or iPod™(Classic
and Nano) signals, press again to play. The play/pause function will only function for the USB flash drive,SD Card or
iPod™(Classic and Nano) signals.When the unit is playing signal from MP3 or AUX and there is an USB flash drive
or SD card (with blank space on it) inserted into their respective slot, pressing and holding this key will activate the
recording function. Press this key and hold for several seconds and the “REC” words will display on the screen and
unit will create a new file in the connected USB flash drive or SD card and get ready to record. At this point there is
no actual recording yet. Press the key again and the unit will start recording onto the USB flash drive or SD Card and
the elapsed time will display on the screen as well. Press a third time to pause the recording and the “REC” words
and elapsed time displayed on the screen will flash. Press again to continue the recording.Press and hold for several
seconds to save the file and end the recording and exit. If both USB flash drive and SD card are connected, the unit
will begin recording onto the USB flash drive. If the USB flash drive is full, remove it and then press the record button
again to start another recording. THERE IS NO RECORDING FUNCTION WHEN THE UNIT IS PLAYING SIGNAL
FROM USB INPUT SLOT OR SD CARD. THE RECORDING FILE FORMAT IS .WAV.
10.Repeat and Random Control:
Press this button to repeat the current track, all tracks or play random tracks on
the USB flash drive,SD Card or iPod™(Classic and Nano).The unit’s default setup is repeating all tracks. Press this
button once to repeat the current track, press again to play random tracks, press three times to repeat all tracks.
1. The remote should be used within 20 feet in front of the unit.
2. There should be no obstacles in between your remote and the unit,as this will hinder the remote’s functionality.
3. To maximize the effectiveness of your remote control,keep the remote sensor(located on the front of the unit) out
of direct sunlight.
REMOTE CONTROL OPERATION


