


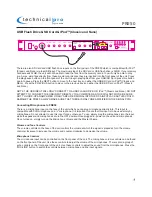


There are also SD Card and USB flash drive inputs on the front panel of the PRE50 which is compatible with iPod™
(Classic and Nano) via the USB input. The maximum size of the SD Card or USB flash drive is 32GB. If your memory
card exceeds 32GB, the unit will not be able to read the files from the memory cards. You will only be able to play
.mp3,.wav,.wma files directly from these memory cards once they are inserted into the front panel of the unit. Press
the play/pause button on the front panel of the unit to begin playing files from your USB /SD Card, press this button
again to pause. Press the NEXT button to move to the next track on either the USB,SD Card or iPod™(Classic and
Nano) . Press the PREVIOUS button to move to the previous track on either the USB,SD Card or iPod™ (Classic
and Nano) .
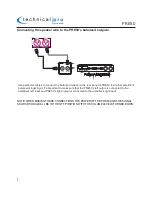
NOTE: THE USB INPUT WILL ONLY CONNECT TO A USB FLASH DRIVE OR iPod™(Classic and Nano). DO NOT
ATTEMPT TO CONNECT THE USB INPUT DIRECTLY TO A COMPUTER AS THIS WILL NOT WORK.BE SURE
NOT TO HOOK-UP AN AMPLIFIER OR ANY AMPLIFIED SIGNAL INTO THE RCA INPUT JACK AS THIS COULD
DAMAGE THE PRE50. ALWAYS MAKE SURE THAT THERE IS ONLY ONE AMPLIFIER IN THE SIGNAL PATH.
There is a microphone input on the face of the unit which you can plug microphone directly into. This input is
compatible with XLR microphone and ¼" microphone. It is important to note that this input is to be used solely by
microphones. Do not attempt to use this input for any other use. To use, simply plug the microphones into the input
while the speaker and microphones are in the OFF position.Once plugged in, power on the unit and microphones.
Once turned on, simply turn up the Microphone Volume and the Master Volume.
The microphone input can be controlled on the front panel of the unit. The microphone volume controls can be found
on the front panel of the unit. Use these controls to adjust the volume of the microphones. There is also a group of
echo controls on the front panel of the unit. Use these controls to adjust the sound from the microphones. Press the
“MIC/LINE” button to switch the controls between microphone and line input signals.
Microphone Controls
Connecting Microphones to PRE50
Volume and Tone Controls
The volume controls on the face of the unit controls the volume at which the signal is played at.Turn the volume
controls clockwise to increase the volume and counter-clockwise to decrease the volume.
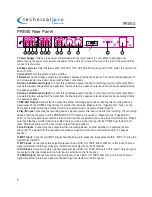
PRE50
USB Flash Drive & SD Card & iPod
™(Classic and Nano)


