


PRE50
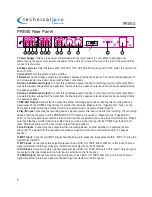
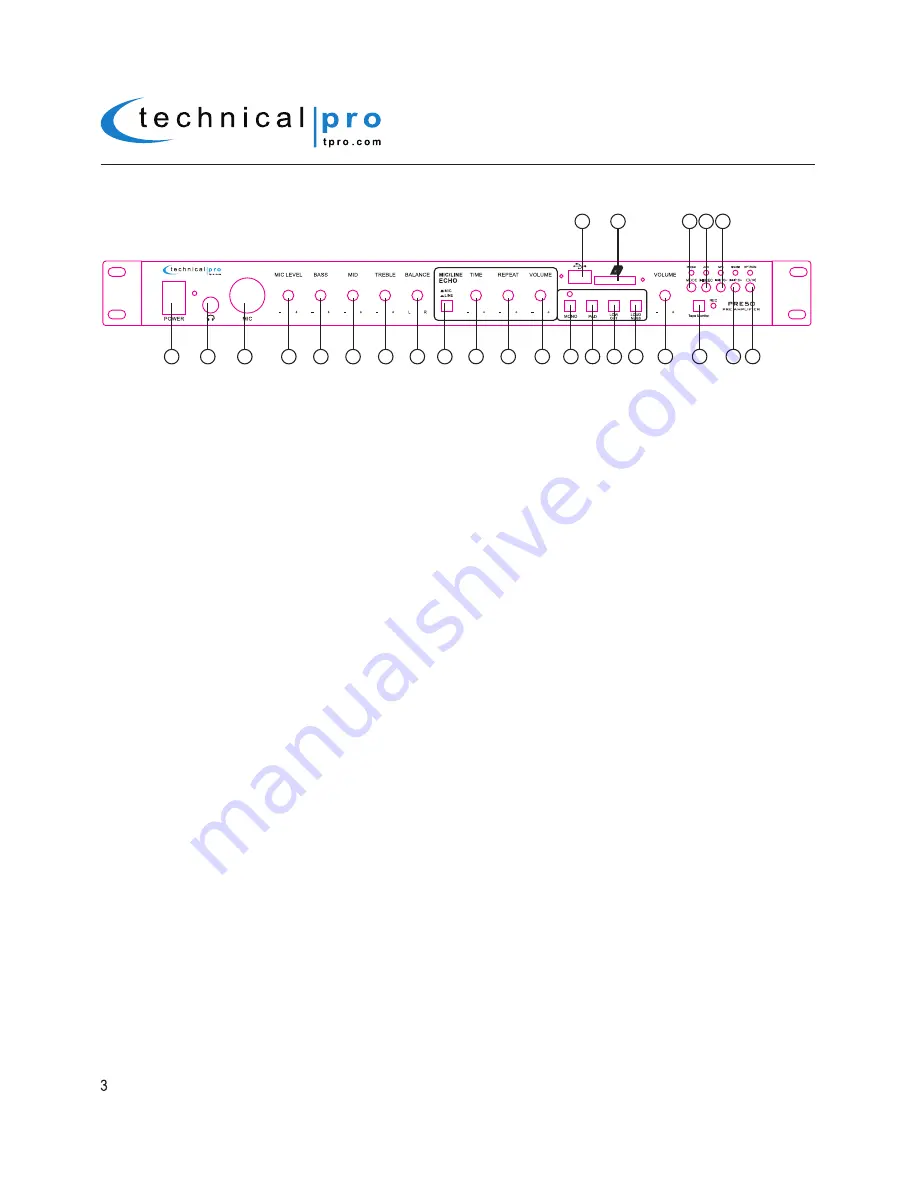
Front Panel
1.Power Button:
Press this button to power the unit on and off.
2.Headphone Output:
Connect your headphone here.
3.Microphone Input:
Connect balanced microphones to this input.
This input is compatible with XLR microphone and
¼" microphone.
4.Microphone Level:
Use this knob to adjust the volume of the microphones.
5.Bass Control:
Use this knob to adjust the bass of the signal from microphones and line inputs.
6.Microphone Mid Control:
Use this knob to adjust the mid level frequencies of the signal from microphones
and line inputs.
7.Treble Control:
Use this knob to adjust the treble of the signal from microphones and line inputs.
8.Balance Control:
Use this knob to adjust the balance of the signal from microphones and line inputs.
9.MIC & LINE Switch:
Press this button to switch the echo controls (Time, Repeat & Balance) between
microphone inputs and Line inputs.
10.Time Control:
Use this knob to adjust the time of echo.
11.Repeat Control:
Use this knob to adjust the repeat times of echo.
12.Echo Volume Control:
Use this knob to adjust the volume of echo.
13.Mono Button:
Press this button to mix the signal from LINE input into a mono signal and the indicator will
light up when this function is enableed. Press again to disable this function.
14.PAD Button:
Press this button to decrease the signal output by 30dB. Press it again to disable this function.
It only works for Line input signal.
15.Low Out Button:
Press this button activate the high-pass filter. The unit will omit the input signal which is
below 30Hz.
16.Loudness Button:
Press this button to enable the loudness function and the unit will raise the signal output
by 3dB. Press it again to turn it off.
17.Master Volume Control:
Use this knob to adjust the master volume output.
18.Tape Monitor:
Press this button to activate the tape monitor function. Press it again to turn it off. Once the
tape monitor function is enabled, connect the REC- OUT of PRE50 to another recording device and connect the
output of this recording device to the PLAY- IN to monitor the recording. There must be a signal coming from the
PLAY-IN once the tape monitor function is enabled. Otherwise there won’t be any volume output from the
speakers.
19.Next Track / Next 10 Button:
Press this button to go back to the beginning of the next track on either the iPod™
(Classic and Nano), USB flash drive or SD Card. Press this button and hold for several seconds to quickly go 10
tracks ahead.
20.REPEAT / RANDOM:
Press this button to repeat the current track, all tracks or play random tracks on
the USB flash drive,SD card or iPod™(Classic and Nano) inputs. The unit’s default setup is repeating all
tracks. Press this button once to repeat the current track, press again to play random tracks, press three
times to repeat all tracks.
PRE50
1
2
3
4
5
6
7
8
10
11
12
13 14 15 16
17
18
19 20
21
23 24 25
22
9


