Technaxx TX-76+ User Manual Download Page 4


Insert & charge the batteries 

Open the back cover of the device. Install the batteries (type: 18650 2000mAh 

3.7V)  and  ensure  their  correct  polarity.  After  that,  close  the  battery 

compartment cover by replacing the back cover. To charge the batteries, use 

the attached Micro USB cable. During charging process the LED 1 (RED light) 

is steady on. The LED turns off if the device is fully charged. 


Insert the memory card 

NOTE: Format the memory card (up to 64GB) first in FAT32 before using 

it  for  the  first  time  (use  free  Software  from  die  Internet).  A  MicroSD 

memory  card  must  be  installed  before  operating  the  camera  function  of  the 

desk clock. Press the memory card into the MicroSD card slot until you hear a 

click tone. To remove the memory card, push it. Then it will slide partially out 

of the desk clock. 

Note: When the MicroSD card is replaced you need to set the date and time 

again. 
 

Clock setting 

(not video /photo time stamp setting) 


Year setting 


Month setting 


Day setting 


Time mode 


Hour setting 


Minute setting 


12H 


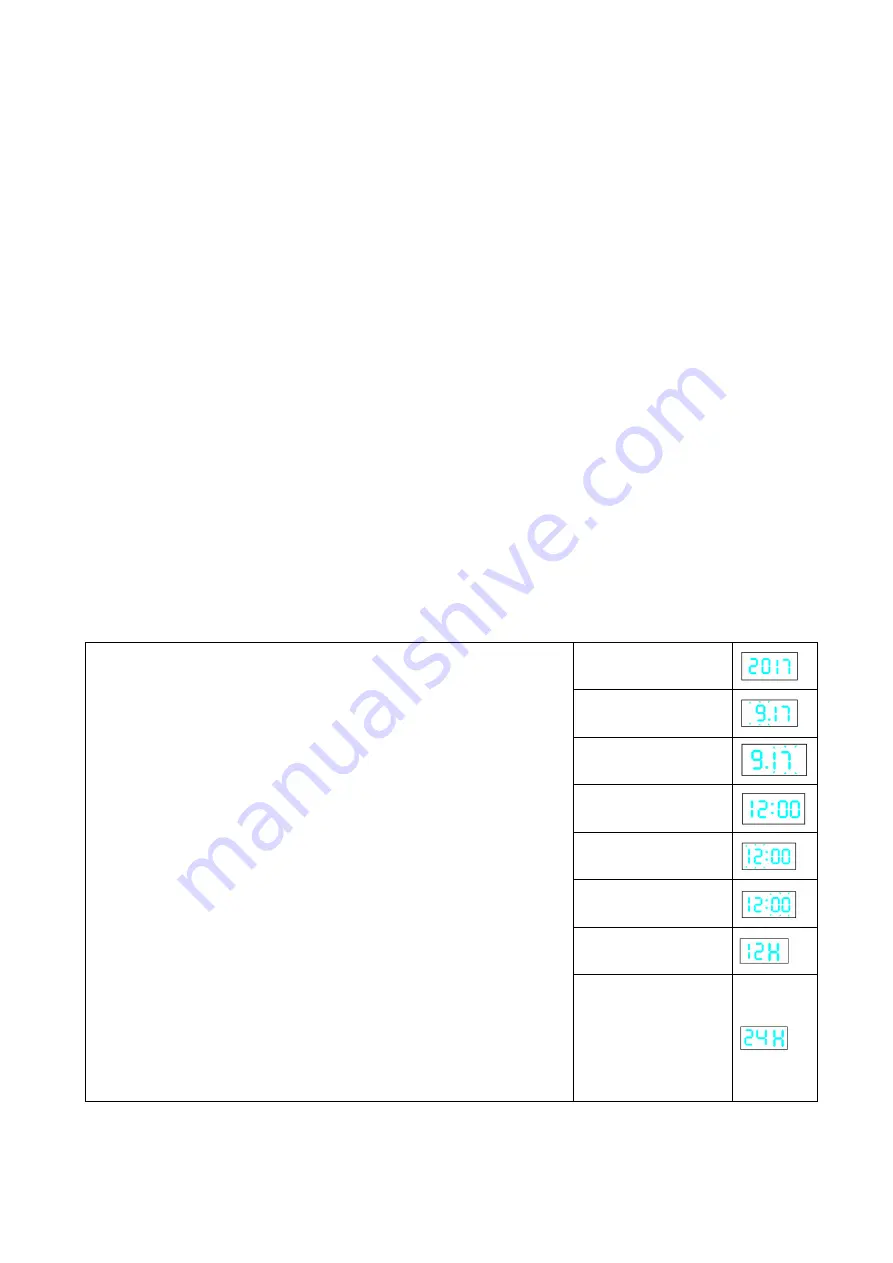
Current date & time setting 
 

Long  press  SET  to  set  up  date,  press  UP/DOWN 
to  select  current  year.  Short  press  SET  to  set  up 
month,  press  UP/DOWN  to  select  current  month. 
Press  SET  to  set  up  day,  press  UP/DOWN  to 
select current day. Press SET to set up time, press 
UP/DOWN to select current hour. Press SET to set 
up  minutes,  press  UP/DOWN  to  select  current 
minutes.  Press  SET  to  select  12H/24H

press 

UP/DOWN  to  select  12H  or  24H  (see  images  on 
the right).   
 
Note: The time & date (month.day) & temperature 
will be displayed in order in every 5 seconds. This 
cannot  be  changed.  When  setting  year  &  date  & 
time,  if  there  is  no  operation  during  10


seconds, 

the device returns back to time display mode. 

24H 


Summary of Contents for TX-76+

Page 1: ...with the original accessories for this product In case of warranty please contact the dealer or the store where you bought this product Warranty 2 years Enjoy your product Share your experience and opinion on one of the well known internet portals Features Digital desk clock with PIR built in FullHD camera Home and office surveillance Digital time display also while recording Set up 2 alarm times ...

Page 2: ...sions 269g with batteries 181g without batteries L 15 2 x W 7 2 x H 3 9cm Package contents Desk Clock with PIR FullHD Camera TX 76 2x batteries type 18650 3 7V Micro USB cable for charging data transfer to the PC User Manual Security and Disposal Hints for Batteries Hold children off batteries When a child swallowed a battery go to a doctors place or bring the child into a hospital promptly Look f...

Page 3: ...et up time date alarms V S Control screen ON OFF 4 RST Reset time date alarm from clock Rear side 1 Open here back cover 2 Battery compartment Battery type 18650 3 Temperature sensor 4 Loudspeaker for alarm sound 5 Rubber feet 6 Switch 3 7 Switch 2 8 Switch 1 9 Working indicator lights LED 1 2 3 10 Micro USB port power supply ...

Page 4: ...it Then it will slide partially out of the desk clock Note When the MicroSD card is replaced you need to set the date and time again Clock setting not video photo time stamp setting Year setting Month setting Day setting Time mode Hour setting Minute setting 12H Current date time setting Long press SET to set up date press UP DOWN to select current year Short press SET to set up month press UP DOW...

Page 5: ...ngs Alarm mode Alarm mode Alarm hour Alarm minute Alarm On Alarm setting Under time mode press DOWN 1x then press SET enters into Alarm setting mode Press UP DOWN to turn on off alarm Press SET to set hour firstly by using the UP and DOWN button Press SET the second time to set Alarm minute by using the UP and DOWN button After finish alarm press SET into alarm setting same way as Note Alarm clock...

Page 6: ... 1 to MD Led 2 blue light flashes 6 times then off the camera will take photos no matter of the position of switch 2 Picture will be taken in every second motion is detected Set switch 1 to OFF the camera turns off and stops taking pictures Infra Red Mode IR the infrared light turns on automatically if the illumination is less than 10 LUX under video recording or pictures taking mode If the automa...

Page 7: ...g properly set the switch 1 to OFF and wait for about 1 minute take out the batteries After one minute reinstall them Set Date Time stamp The date and time will be changed for video or photo in next recording Insert a MicroSD card and set switch 1 to OFF Connect the device with PC using MicroUSB cable Go to My Computer find the CD drive called Date Time Set and double left click on it A folder wil...

Page 8: ...k internal circuit boards or mechanics Use it under normal temperature and normal humidity Do not put it in a moist working environment since it is not waterproof Do not use it directly against strong light to avoid damage optical device Do not use under high dust density environment to avoid the lens and other components stain dust and affect the camera quality Do not make its strong shock vibrat...

Reviews: