background image

EN

9

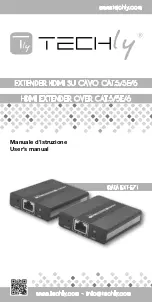
HDMI EXTENDER OVER CAT.5/5E/6

HdMI ExtEndEr ovEr cat.5/5E/6

Dear Customer

Thank  you  for  purchasing  this  product.  For  optimum  performance 
and safety, please read these instructions carefully before connecting, 
operating or adjusting this product. Please keep this manual for future 
reference.

IMPortant saFEtY InstrUctIon

IntEndEd UsE

We do not permit using the device in other ways like 
described in this user’s manual.
Use the product only in dry interior rooms. Not attending 
to these regulations and safety instruction might cause 

fatal accidents, injuries, and damages to persons and property. The 
manufacturer/supplier assumes no liability for damages caused by
failure to comply with the intended use.

To reduce risk of electric 
shock, this product should 
ONLY  be  opened  by  an 
authorized  technician  when 

service is required. Disconnect the product from mains and other
equipment if a problem should occur. Do not expose the product 
to water or moisture. 

C A U T I O N

RISK OF ELECTRIC SHOCK 

DO NOT OPEN

•  Your product is not a toy and is not meant for children, because it 

contains small parts which can be swallowed and can injure when 
used inappropriately!

•  Please install the system and devices attached to it in a way that 

persons cannot be injured, or objects not be damaged for example 
by dropping or stumbling.

•  Please  remove  the  packing  materials,  because  children  may  cut 

themselves on them while playing. Furthermore, there is a risk of 
swallowing and inhalation of incidentals and insulating material.

•  Avoid places with high temperatures, or humidity, or places which 

might come into contact with water. Do not install the product close 
to  openings  of  air  conditioners,  or  at  places  with  an  excessive 
amount of dust or smoke.

•  Do  not  install  the  product  at  places  subject  to  vibration,  or 

oscillation

•  Do not modify and alter the product and any accessories! Do not 

use any damaged parts.

•  Keep enough space around all devices for a good ventilation and 

free motion and to avoid damages.

•  Keep distance from flammable and explosive devices.

Summary of Contents for IDATA EXT-E71

Page 1: ...EXTENDER HDMI SU CAVO CAT 5 5E 6 HDMI EXTENDER OVER CAT 5 5E 6 Manuale d istruzione User s manual www techly com IDATA EXT E71 www techly com info techly com ...

Page 2: ...essario ripararlo Scollegare il prodotto dall alimentazione e da altri apparecchi se dovesse esserci un problema Non esporre il prodotto ad acqua o umidità ATTENZIONE RISCHIO DI SCOSSE ELETTRICHE NON APRIRE Questo prodotto non è un giocattolo e non è pensato per i bambini contiene piccolo parti che potrebbero venir ingerite o inalate e provocare danni se non utilizzato correttamente Installare l a...

Page 3: ...V con applicazione in sistemi di conferenze HD riprese video HD sistemi multimediali educativi in HD pubblicità digitale e segnaletica HD ecc CARATTERISTICHE 1 Plug and play non richiede installazione 2 Include trasmettitore TX e ricevitore RX lavora in coppia 3 Distanza di trasmissione fino a 120m via cavo Cat6 100m via cavo Cat5e e 80m via cavo Cat5 4 Supporta funzione IR passback per il control...

Page 4: ...MI Collegare con la sorgente HDMI Uscita segnale IR Collegare con la prolunga IR blaster 2 Ricevitore RX Tasto Reset Riavvia l unità Ingresso segnale RJ45 Collegare con il cavo di rete Indicatore di alimentazione Il LED si accende tutte le volte che avviene una trasmissione del segnale HDMI lampeggia quando non c è trasmissione di segnale Ingresso alimentazione Collegare l alimentatore DC5V1A Segn...

Page 5: ...ore TX al ricevitore RX tramite un cavo di rete CAT 5 CAT 5e o CAT 6 3 Collegare gli alimentatori al trasmettitore Guida all uso dell IR 1 La prolunga IR blaster va collegata alla porta IR OUT del trasmettitore TX dell extender HDMI e la prolunga del ricevitore IR deve essere collegata alla porta IR IN del ricevitore RX 2 L emettitore dell IR blaster dovrebbe essere il più vicino possibile alla fi...

Page 6: ...cavo di rete di collegamento segua lo standard EIA 568B 2 Verificare la presenza del segnale HDMI in ingresso sul trasmettitore 3 Riavviare il trasmettitore e il ricevitore e connetterli Q Il led LINK del ricevitore è acceso costantemente ma non c è alcuna immagine in uscita A 1 Assicurarsi che il monitor supporti la modalità di segnale HDMI corrente 2 Assicurarsi che il cavo HDMI sia ben connesso...

Page 7: ...nto 10 2Gbps Ingresso e uscita segnale TMDS 0 5 1 5p p TMDS Ingresso e uscita segnale DDS 5Vp p TTL Lunghezza cavo in ingresso supportata 8m AWG24 Lunghezza cavo in uscita supportata 8m AWG24 Livello protezione Protezione elettrostatica per l intero dispositivo 1a Scarico del contatto livello 3 1b Scarico dell aria livello 3 Implementazione dello Standard IEC61000 4 2 Indicazioni ambientali Temper...

Page 8: ...roniche Contattate le autorità locali competenti per ottenere informazioni in merito allo smaltimento corretto della presente apparecchiatura Con il marchio CE Techly garantisce che il prodotto e conforme alle norme e direttive europee richieste Manutenzione pulire solo con un panno asciutto Non utilizzare solventi detergenti o abrasivi Garanzia non sarà accettata alcuna garanzia o responsabilità ...

Page 9: ...ot expose the product to water or moisture CAUTION RISK OF ELECTRIC SHOCK DO NOT OPEN Your product is not a toy and is not meant for children because it contains small parts which can be swallowed and can injure when used inappropriately Please install the system and devices attached to it in a way that persons cannot be injured or objects not be damaged for example by dropping or stumbling Please...

Page 10: ...ystem HD video shooting HD multimedia education system HD digital advertising and signage etc Features 1 Plug and play without installation 2 Include a transmitter unit TX and a receiver unit RX working as a pair 3 Transmission distance up to 120m via Cat6 cable 100m via Cat5e cable 80m via Cat5 cable 4 Support IR pass back for remote control source device to receiver site easily 5 Uncompressed an...

Page 11: ...th DC5V1A power supply HDMI signal input Connect with HDMI source device IR signal output Connect with IR blaster extension cable 2 Receiver unit RX Reset button Restart the unit R145 signal input Connect with network cable LINK indicator LED turns on all the time with HDMI signal transmission flashes with no signal transmission Power input Connect with DC5V1A power adapter HDMI signal output Conn...

Page 12: ...ue white 6 Green 7 Brown white 8 Brown Connection Connection instruction 1 Connect source device to transmitter unit TX and display device to receiver unit RX via HDMI cables 2 Connect transmitter unit TX and receiver unit RX via network cables CAT5 5e 6 3 Plug the power supplies to transmitter and receiver units each unit will power up then initialize itself this HDMI extender works ...

Page 13: ...e device towards the IR receiver connected to the receiver to remote control source media playback FAQ Q No image output A 1 Check and make sure all cables are connected well 2 Restart the TX RX by RESET button Q RX LINK indicator is flashing all the time A 1 Make sure network cable connection follows the standard of EIA 568B 2 Reset the transmitter and receiver and reconnect Q Receiver LINK led l...

Page 14: ... formats PCM Maximum transfer rate 10 2Gbps Input and output TMDS signal 0 5 1 5p p TMDS Input and output DDS signal 5Vp p TTL Input cable lenght 8m AWG24 Output cable lenght 8m AWG24 Protection level Electrostatic protection of the whole machine 1a Contact discharge level 3 1b Air discharge level 3 Implementation of the standard IEC61000 4 2 Operating environment Working temperature 0 C 60 C Stor...

Page 15: ...product In compliance with EU Directive WEEE this product is marked with this symbol It means that used electrical and electronic products should not be mixed with general household waste There is a separate collections system for these products in compliance with WEEE directive otherwise contaminative and hazardous substances can pollute the environment With the CE sign Techly ensures that the pr...

Page 16: ...www techly com ...

Reviews: