


Dual bay HDD Docking
2
www.techly.com
En
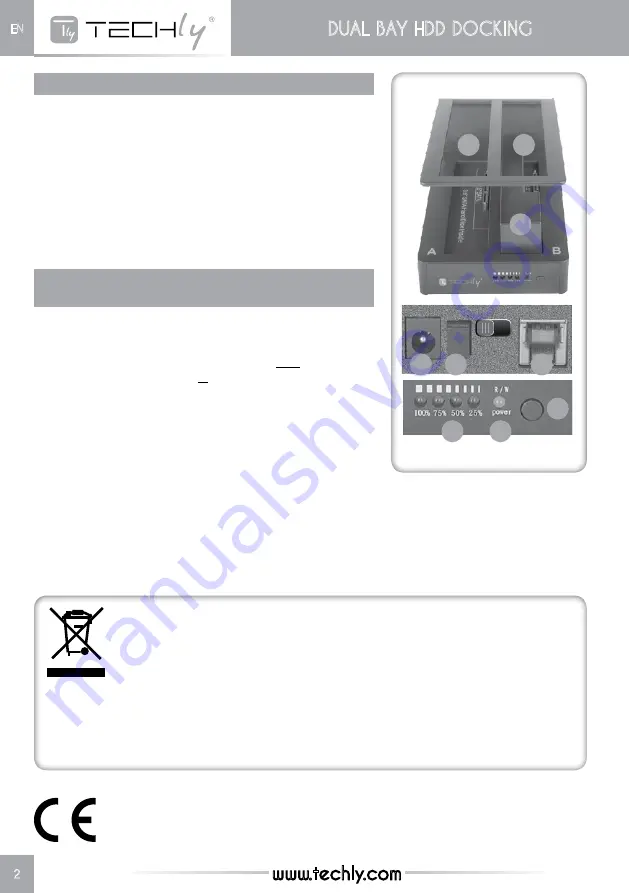
Read from / Write to an external drive
This product is commonly used simply to work directly on an
external hard disk drive (HDD).
1. Use the included power adapter to connect the DC Input jack
(C) to an AC outlet.
2. Use the included USB cable to connect the Dock (D) to your
computer.
3. Using one of the spacers (E) if needed, insert an HDD (2.5” or
3.5”) into the Dock (A or B), put switch on “PM”, see the icon.
4. Press the On/Off button (F) and make sure the R/W Power
LED (G) lights. When the external HDD displays on your
computer, you can read or write directly to it.
Cloning: Copying a hard disk drive (HDD)
without using a PC
1. Use the included power adapter to connect the DC Input jack
(C) to an AC outlet. If necessary, disconnect the Dock from
your computer (D).
2. Insert the source HDD you’re copying from (A) and the
target HDD you’re copying to (B), put switch on “clone”, see
the icon. Note: The capacity of the target HDD must be
greater than that of the source HDD. Any data already on
the target HDD will be lost.
3. Press the On/Off button (F) and make sure the R/W Power
LED (G) lights.
4. Press the Clone button (H) twice. The LEDs (I) indicate the
progress (25-100%). All four LEDs light when the copying
process is complete.
5. Turn the power off; remove the drives.
Don’t turn off power to the Dock or remove a drive while any LED is blinking; that is, while any data
transfer is still in progress.
Cloning time depends on the transfer rate: for example, 100 GB / SATA @ 60 MBps would take about a
half hour.
The product is compliance with European Directive EMC 2004/108/EC and 2011/65/ EU.
This symbol on the product or its packaging indicates that this product shall not be
treated as household waste. Instead, it should be taken to an applicable collection
point for the recycling of electrical and electronic equipment. By ensuring this product
is disposed of correctly, you will help prevent potential negative consequences to the
environment and human health, which could otherwise be caused by inappropriate
waste handling of this product. If your equipment contains easily removable batteries
or accumulators, dispose of these separately according to your local requirements.
The recycling of materials will help to conserve natural resources. For more detailed information
about recycling of this product, contact your local city office, your household waste disposal service or
the shop where you purchased this product. In countries outside of the EU: If you wish to discard this
product, contact your local authorities and ask for the correct manner of disposal.
A
B
E
D
F
C
I
G
H
DC INPUT ON/OFF PM CLONE USB 3.0
Clone
Clone
Summary of Contents for I-CASE SATA-TST42
Page 8: ...www techly com ...


